How To Automate Your Virtual Assistant Hiring Process?

-
From Posting Jobs to Recruiting the Best of the Best – This is the Hiring Automation System You have been Looking for all Along!
- Introducing Barak Almog
- Automating Your Hiring Process: A Simple Step-by-Step Guide to Business Automation
- Is Automating Your Hiring Process Worth It?
- System Interfaces
- Frequently Asked Questions
- Conclusion
Disclosure: Hi! It's Vova :) Some of the links in this article may be affiliate links. I get a commission if you purchase after clicking on the link, this does not cost you more money, and many times I can even get a nice discount for you. This helps me keep the content free forever. For you. Thank you! :)
From Posting Jobs to Recruiting the Best of the Best – This is the Hiring Automation System You have been Looking for all Along!
Hello, guys!
Are you an entrepreneur looking to hire cultivated talent for your business, but the lengthy process puts you off?
Well, worry no more.
My friend, Barak Almog from SellerFrame, has created an advanced recruiting system that automates the entire process and makes it efficient and productive.
Sounds like an overstatement?
Stay with me to the end of this article, and you will see it for yourself!
Finding professionals that fit the job is truly a hectic process, especially when you also have to look after other aspects of the business.
Many businesses do have an HR department for carrying out candidate assessment and recruitment.
However, the traditional hiring process can indeed be a time-consuming affair.
From sifting through mountains of resumes and applications to conducting multiple rounds of interviews and evaluations, the conventional method often feels cumbersome for both the employer and potential employees.
As you aptly put it, it's like watching a ping-pong match on YouTube at 0.50x speed – everything is happening, but just not as efficiently as you'd like it to.
And things become even more sluggish when you are a solopreneur on Amazon or any other eCommerce marketplace.
In such cases, the business essentially is you, and each minute spent on hiring is a minute not spent on inventory management, customer service, marketing, or other critical activities that drive your business.
The drag of traditional hiring methods is not merely an inconvenience; it's a potential threat to the agile operation of your venture, making streamlining the recruitment process not just a preference but a necessity.
Now imagine having a system where you have all the possible information about all candidates and where you can interact with the entire lot through only a few clicks!
That’s what I am going to demonstrate in front of you today.
My name is Vova Even, and I am an established seller on Amazon.
Barak and I concluded our series on automating the hiring process on my YouTube channel some time ago where we discussed a range of topics.
The first part of the series comprised a theoretical discussion on the perfect hiring process.
In the second part, he gave a demo of his virtual assistant hiring system created with the help of Airtable and other automation tools.
The system is intended to streamline the entire hiring process, from capturing candidate details to sending booking links for interviews and skill tests.
The best part?
It takes all that crap off your plate and lets you focus on what's really important – evaluating the person and bonding with them.
Want to have a quick glimpse into how it looks?
Here you go!
This article is mainly derived from the contents of that demonstration so, if you would rather prefer to watch that video, it's embedded right below.
Enjoy!
But that's not all!
If you're new to hiring or need a refresher, I've also got a free course on YouTube that covers the basics of hiring virtual assistants and personnel for your business.
It's just one video tutorial that you can access from the button right below, but if you're somewhat more advanced, then my article is going to be great for you as I'm going to share the nitty-gritty of a winning hiring process and how to automate it step-by-step.
Introducing Barak Almog
Barak Almog hails from Chiang Mai, Thailand, and is the Founder and CEO of SellerFrame.
He’s the Digital Transformation Specialist and helps business owners in automating different aspects of their ventures.
Although he has an academic background in Data Science and Machine Learning, he has also been a seller on Amazon.
Barak has had a long history of experiencing different niches and industries before he found his true calling.
His diverse professional background helped him not only understand the various challenges entrepreneurs encounter in their careers but also enabled him to develop workable and efficient solutions.
This virtual assistant hiring automation system that I am going to introduce is the manifestation of his skill level in business development and automation.
“Building systems is my comfort zone. I love to develop tools that help me automate certain aspects of my business, and I’m glad it works a great deal for others too!”
~ Barak Almog.
Automating Your Hiring Process: A Simple Step-by-Step Guide to Business Automation
After introducing the creator and his creation, let’s get to know how the system actually works.
The system basically comprises three parts: data structure, folder structure, and a set of automation tools.
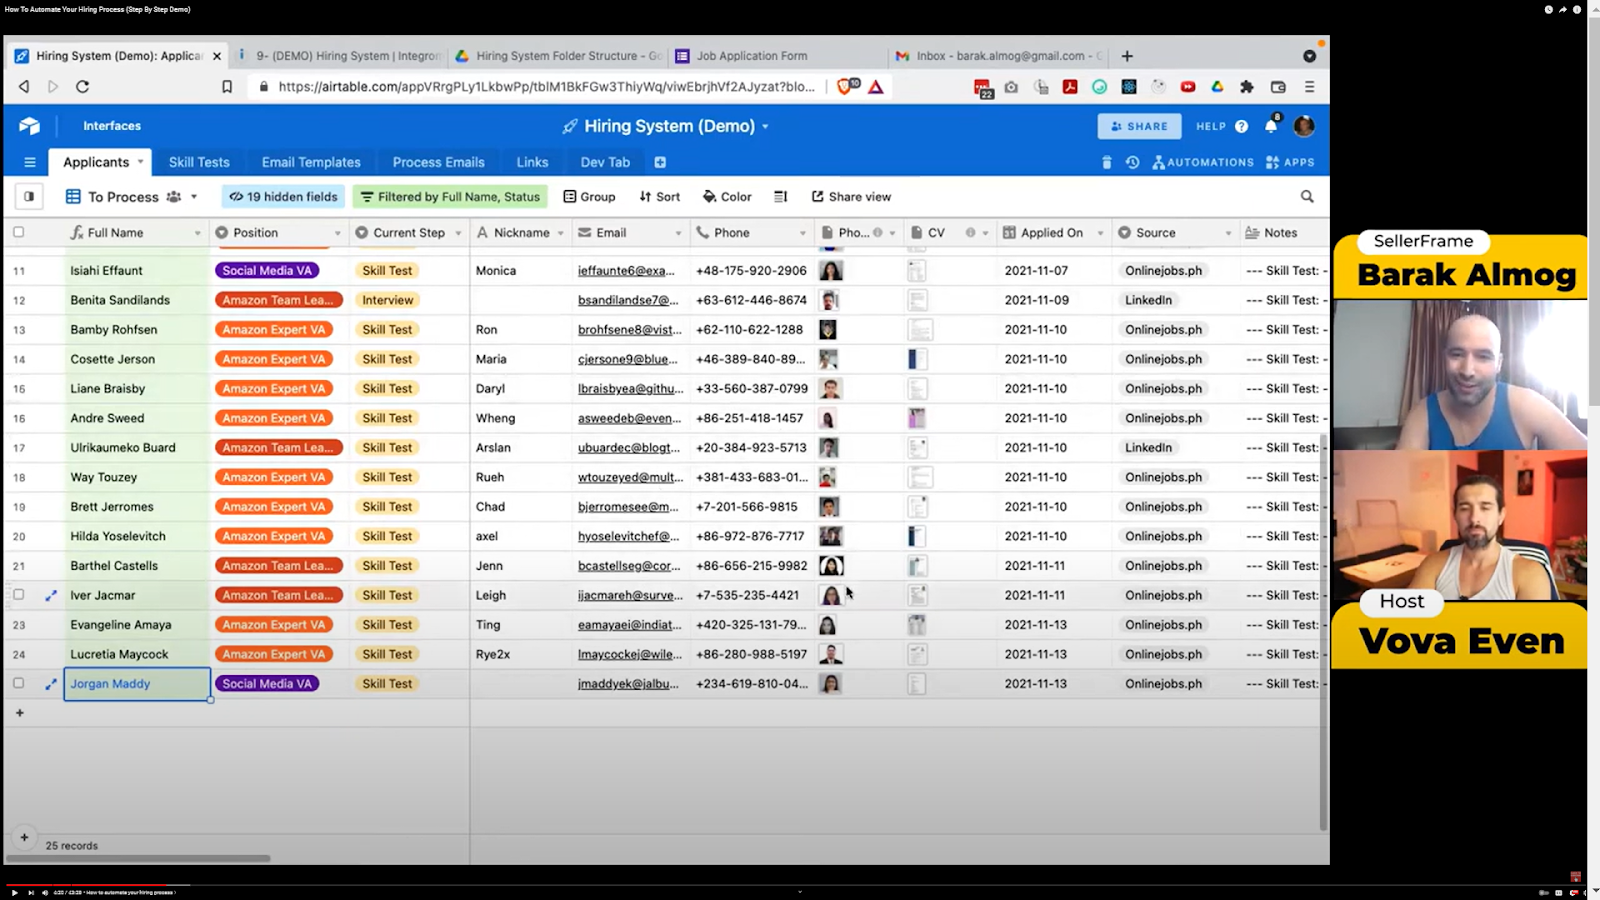
The data structure is where all the information regarding the candidates is concentrated, and the process of hiring also takes place right here.
The user interface of this table-like system is easy to understand and replicates an Excel sheet.
It's important to note that all the data you see in the above screenshot is fake, but the photos are real.
So, no need to worry about any privacy breaches.
The data structure is the foundation of the system and it helps to organize all the information related to the candidates.
The stream of information in the table is set from left to right.
It means that as a candidate goes through the funnel, you will be able to see his or her performance or status by moving the table from left to right.
The table contains everything – from the full name of a candidate to all the email templates and action buttons that you will use.
The data structure is further supported by the folder structure which contains all the necessary documents and information, mainly submitted by the candidates.
It includes CVs, photos, cover letters, etc.

Folder structure helps keep all the necessary documents and information in one place, making it easy to access and manage.
The last part of the system involves a set of automation, powered by Integromat (Now Make) which is an automation tool similar to Zapier.
These automations play a significant role in the development of the whole system; in fact, it won’t be wrong to say that Barak's hiring system revolves around these automations.
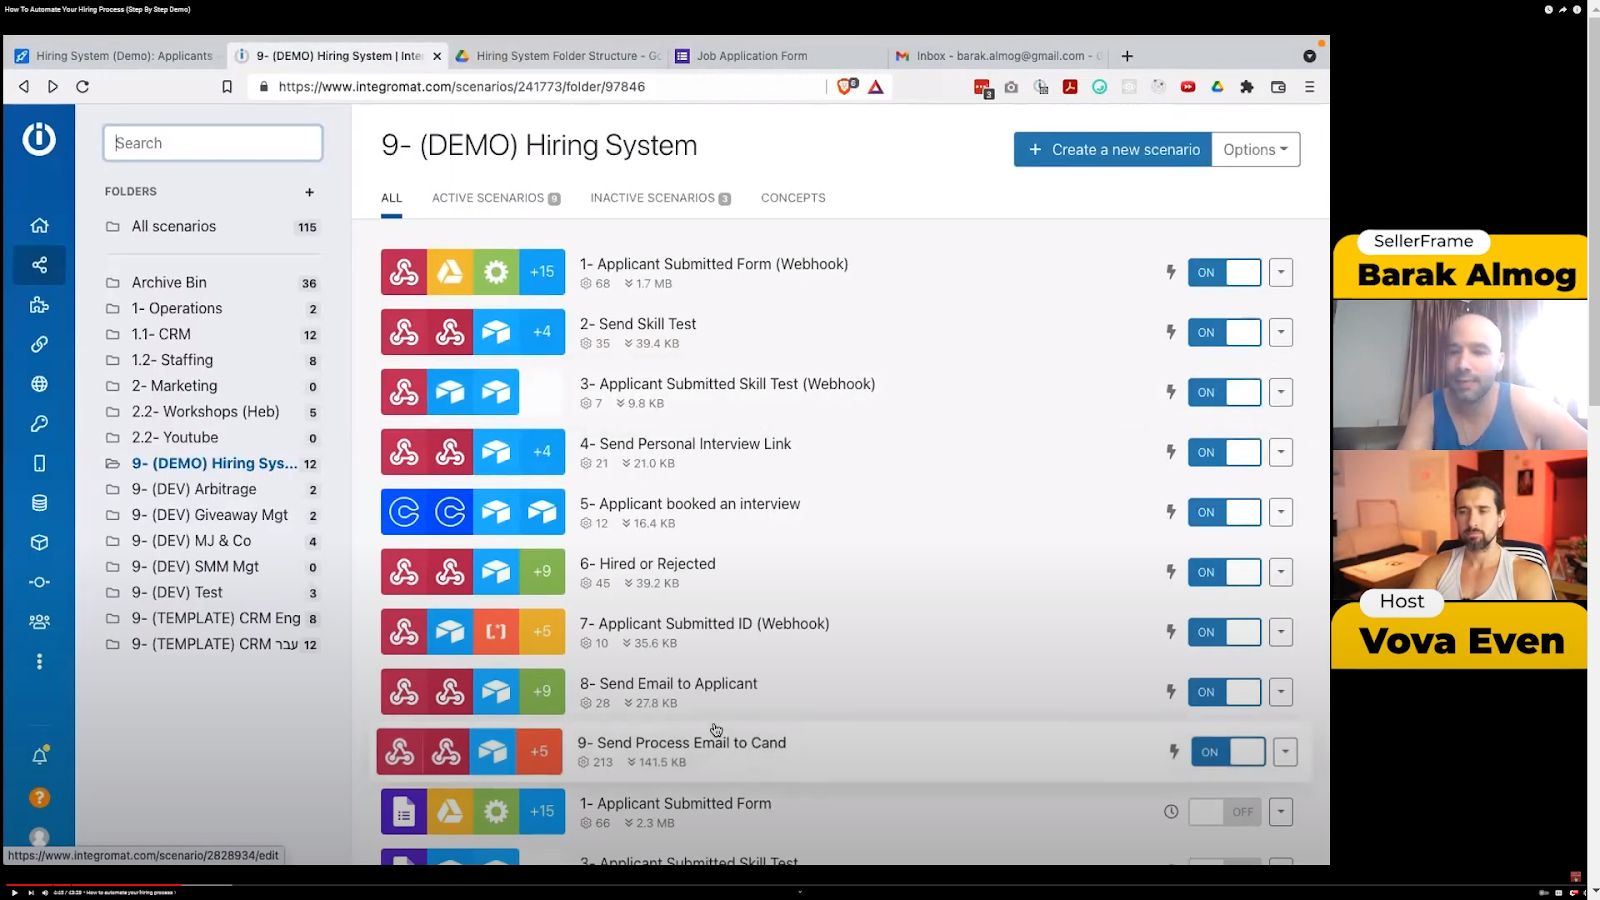
Barak substantially relies on Integromat and says he loves using it for all his automation endeavors.
He has also got an exclusive one-month FREE Integromat trial for those who are interested in trying it.
Unfortunately, I won’t dig deeper into these automation tools today, but be assured that they are worth giving a try!
Now, let's put all the things together and see how the automated hiring system works from the very beginning.
Let's start with the structure of the system.
See the screenshot below.
The first three columns are fixed and the columns next onwards can be moved from the right to the left.
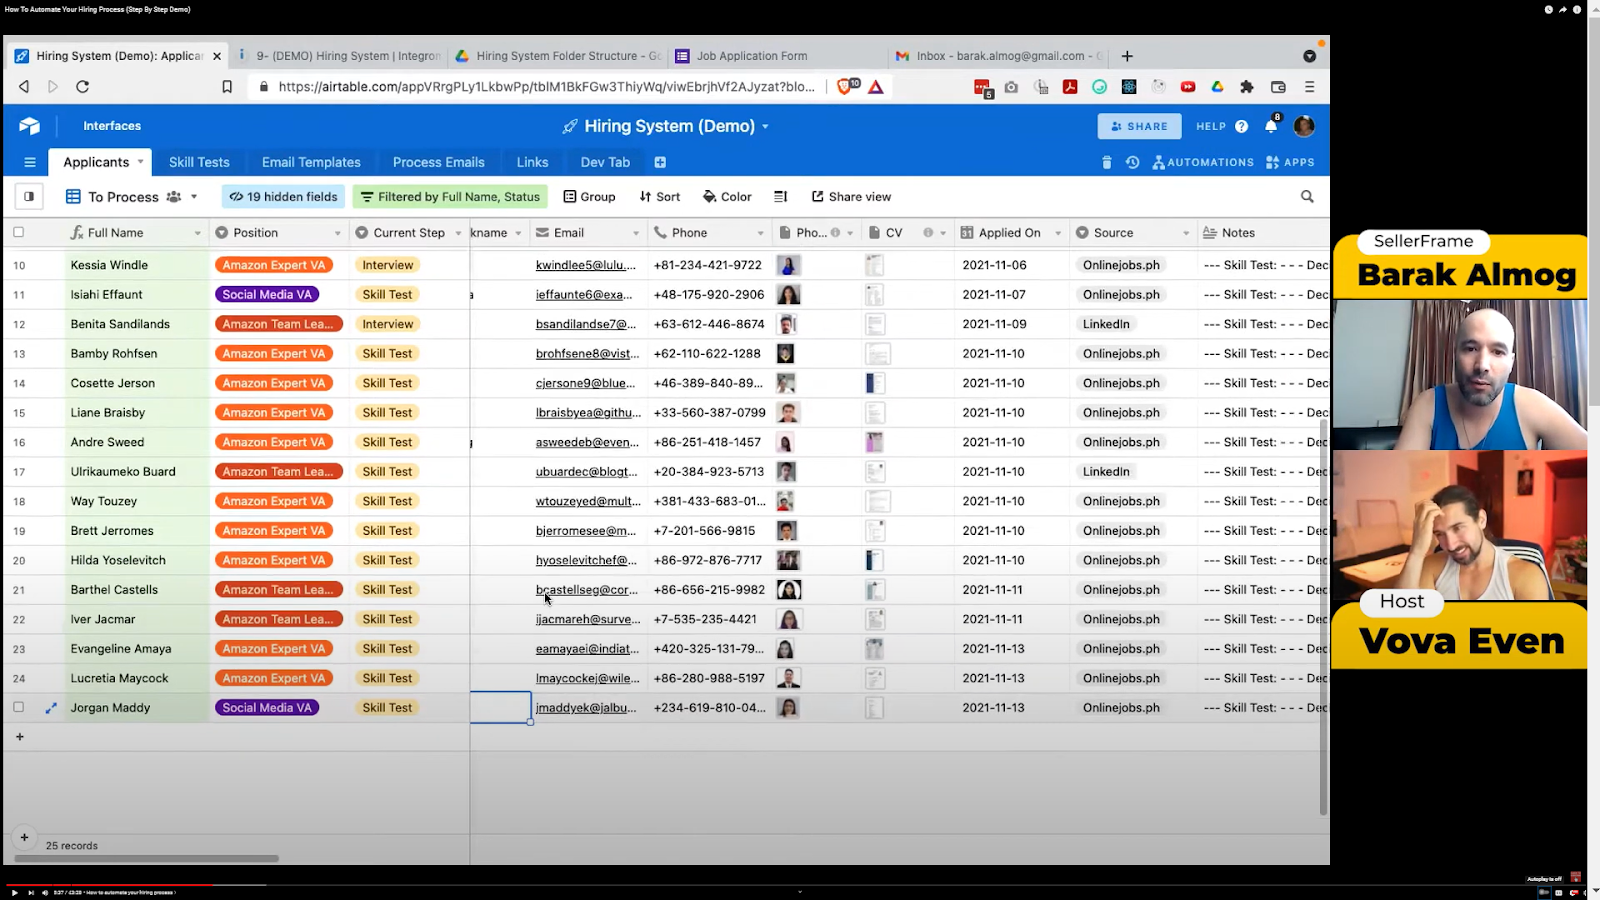
The table is organized in a way that makes it easy to maintain and keep track of all the data as candidates move through the funnel.
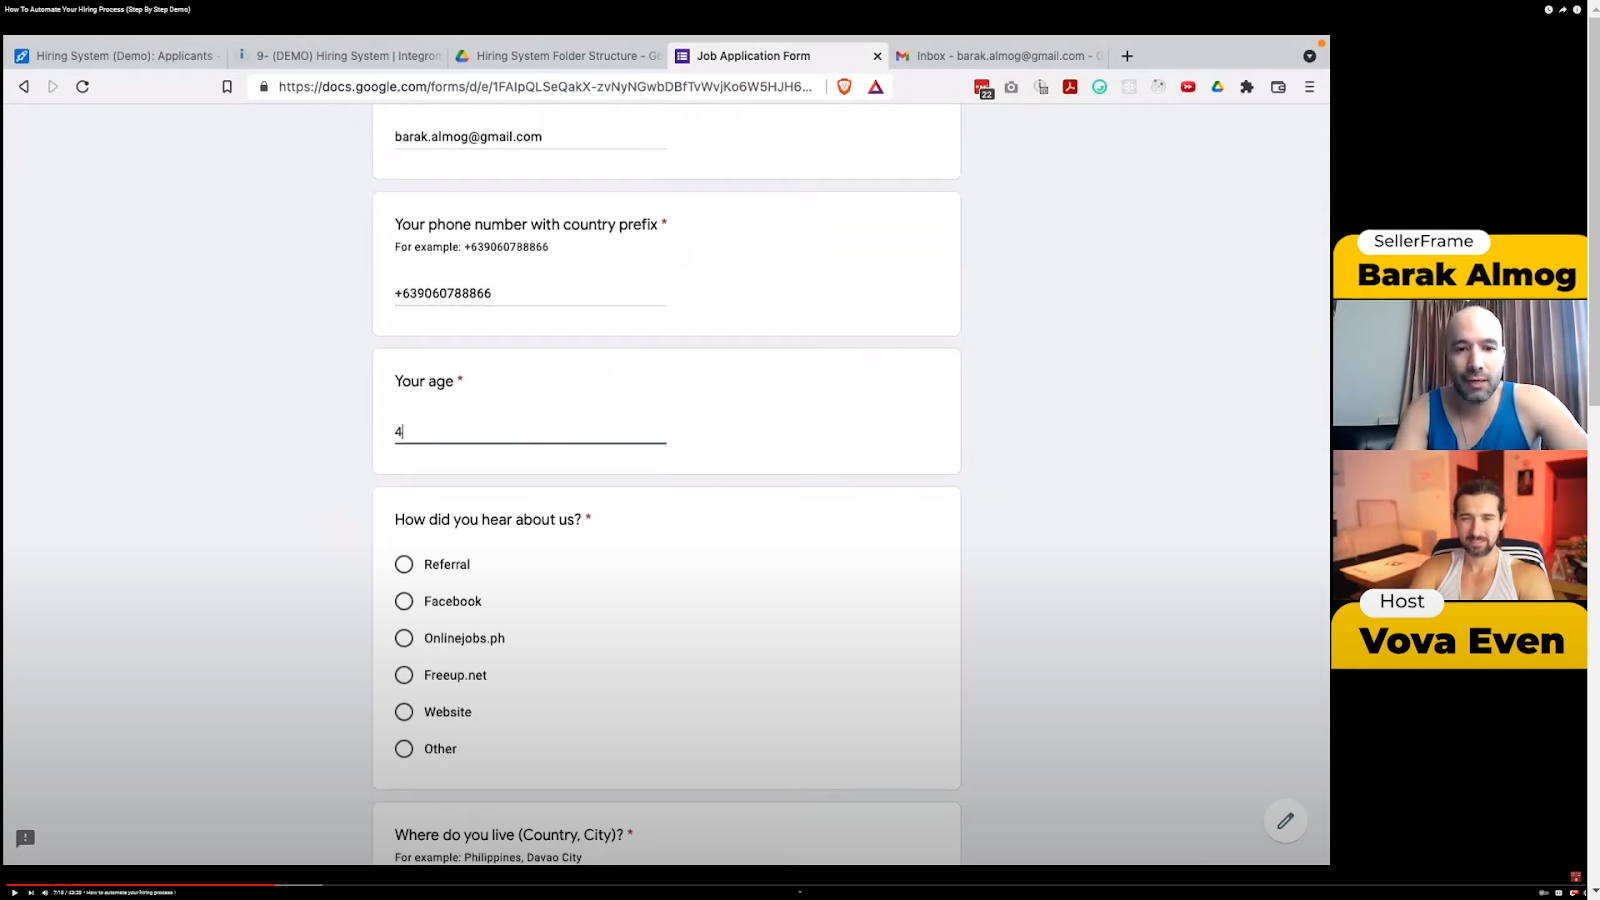
Step #1: Job Application Form
Basically, the system contains several sample job postings, each accompanied by a relevant Google form.
These Google forms are integrated with Airtable via Integromat.
After the regular evaluation of a candidate, you can send them a relevant job application form, asking for whatever information you deem essential.
The current forms ask for personal and academic details like name, contact, address, education, experience, etc.

By the way, this is the form that Barak has been using for a long time.
You are free to copy it, if you want, or you can also create your own.
As the form is connected to the hiring system, the candidate’s information will automatically be integrated into it, and you will see the latest entry in the data structure.
Lastly, as soon as a form submission is received, the system will send an automated email to the applicant, confirming that his submission has been received and is under consideration.
Here’s what it may look like:

This is merely a sample.
You can go with the same email template or write your own – it’s all up to you!
Step #2: Scanning Through Details
Once a candidate submits their form, you can quickly scan through their details and see if they match your expectations and the job description.
And you know what's even better?
This system not only shows you their professional accomplishments but also links you straight to their LinkedIn profile!
How cool is that?
And that's not all - you can even check out their CV, photos, and other documents they've submitted, all without leaving the table or folder structure.
It's like magic, everything is connected and at your fingertips 😉.
I absolutely love how this system takes care of all the nitty-gritty work for us.
Gone are the days of slogging through individual forms, noting down personal and professional details manually, and creating separate sheets to consolidate all the information.
It's such a cumbersome process…
But thanks to Barak's genius creation, we can wave goodbye to those tedious tasks.
This advanced hiring system automatically transfers the candidate's personal information to their respective columns. It's like having a personal assistant right at our fingertips, effortlessly organizing everything for us!
And you know what?
This system doesn't just save us time and energy, it adds an element of fun to the job!
No more drudgery, no more boredom.
We can dive into the hiring process with a smile, knowing that our candidate's information is seamlessly connected and easily accessible.
Step #3: Sending Skill Test
Let's now talk about the coolest part of this system!
Once you've checked out a candidate's background and decided they might be a good fit, it's time to test their skills.
And guess what?
The system has customized skill tests for each job position!
For example, if someone has applied for a Social Media Virtual Assistant, you can easily select the Social Media VA Skill Test under the ‘Skill Test Type’ from the system.
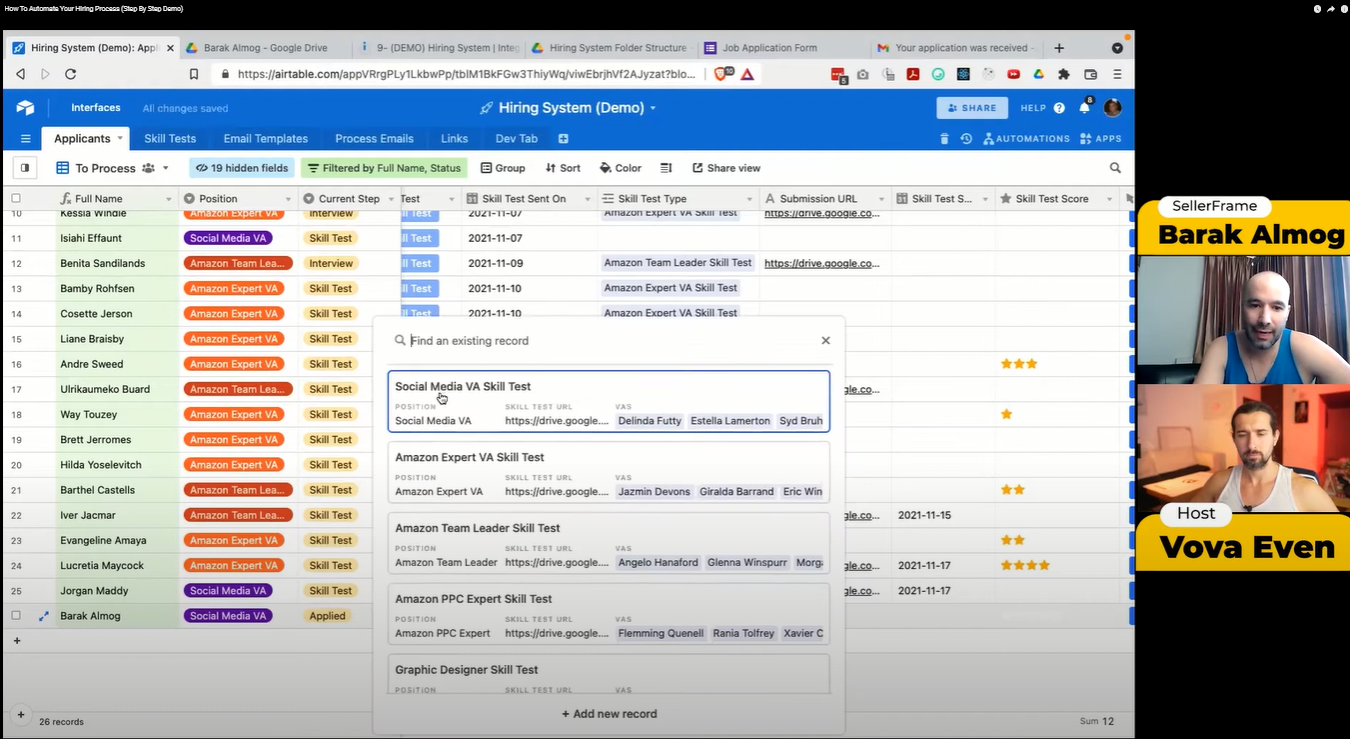
After selecting the test, all you need to do is hit the blue ‘Send Skill Test’ button and the system will automatically forward an email to the candidate with all the important details they need to know.

Please note that you won’t be able to send the skill test unless you pick the test type first.
Once the test is forwarded, the date will be recorded on the table.
If you have any deadlines in mind, you can mention them in your instructions because the system, as of now, doesn’t offer any such kind of facility.
Another thing to note is that candidates can't email the test results.
Instead, they will need to submit them via a Google form.
The link to the form will be provided in the same email.
And once the test is submitted, it will appear in the table.
The test submission date will also be recorded, giving you valuable insight into how quickly the candidate completed the test and whether or not they met the deadline.
But wait, there's more!
The system even gives you the option to rate the skill test submitted by the candidate.
This helps you evaluate all the candidates thoroughly and choose the best person for the job.
It's the most intriguing part of this system, in my opinion, and takes hiring automation to the next level!
People in the HR department or those solopreneurs who have to lead all the communications by themselves in the traditional way perhaps may better understand the value of such a sophisticated system.
No more reading separate emails, downloading files, or checking them one by one.
Everything is organized and easily accessible right from the table.
Plus, you can even send different skill tests to relevant applicants with just a few clicks.
Impressive, right?
Step #4: Booking an Interview
Let’s suppose you liked the test submitted by a candidate and gave it a 4 or 5-star rating, and now you want to move on to the interview stage.
This system, again, has got you covered.
It provides you with a simple button to send the interview booking link to as many candidates as you want, just as demonstrated in the following screengrab:
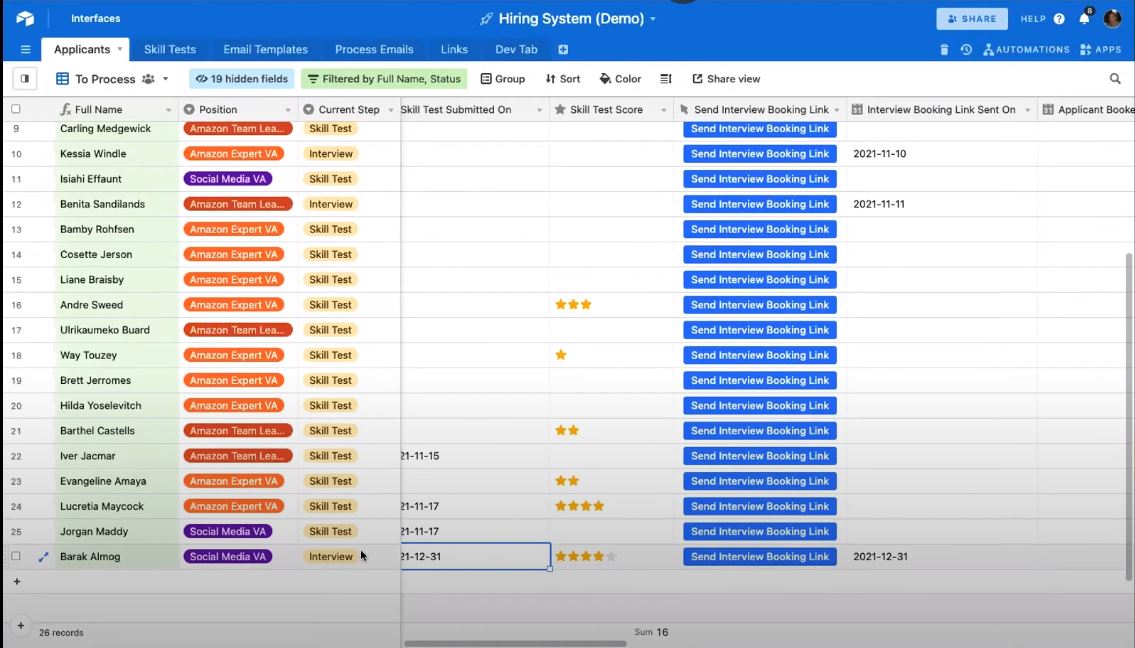
The system will also record the date you sent the booking link on.
An email will be forwarded to the applicant at his email address, containing a Calendly link to book the interview on available slots.
Once the applicant books any date for the interview, you will see two dates recorded in the system.
The first one is when the applicant booked his interview and the other is when the interview is actually scheduled to take place.
According to the developer, Barak Almog, this has tactically been created to evaluate the applicant’s enthusiasm and confidence level for the interview as well as for the job.
And I couldn’t agree more!
Truth be told, we lose track of all these little things while carrying out hiring via email.
In responding to all the queries, and in the entire communication between us, we miss the bigger picture.
This system provides us with a complete sketch of everything that we should know about the applicant.
Things like how quickly he submits the test, when he books the interview, his skill test, etc., really do matter as they show the applicant’s motivation for the job.
They may not play a decisive role in hiring, but they help us evaluate the applicant comprehensively.
Step #5: Rejecting/Hiring Decision
Here comes the final step.
All things have been considered.
Tests conducted, ratings given, and interviews, too, are done – now, it’s time to reject or hire deserving applicants.
So, how do you do it?
Let’s start with rejection.
If you have ever been an employer, and been involved in the hiring process, you would know that there is always a reason to reject an applicant.
That’s how rejection works in this system as well.
First of all, you need to pick a reason for the rejection from the drop-down menu in the table.
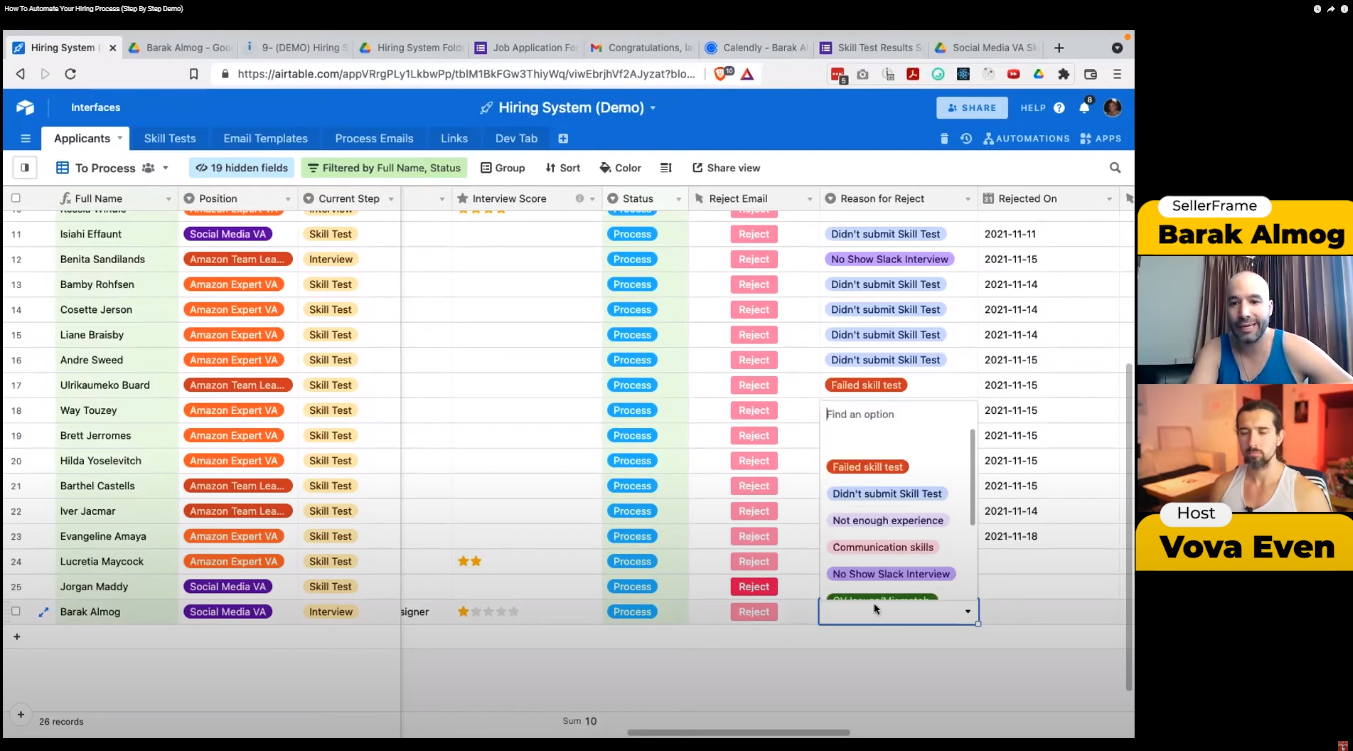
Maybe it was the experience communication skills, or professional skills that proved to be a deal breaker.
You will have all the options available in the menu.
After you pick any from there, simply click the red ‘Reject’ button and that will be it.
An email will be forwarded to the applicant with the news that he is no longer being considered for the position – but in a reasonably professional way.
Remember that you can only reject after you pick a reason from the list.
The button won’t come alive until you don’t give it a reason.
However, you don’t need to pick any option to hire a candidate.
On the far right side of the table, you will find a green button, inscribed with ‘Hire’ text.
Click it and prepare to welcome a new member to your team!
Before you know it, a congratulatory email will pop up in the applicant’s inbox with the good news.
In fact, why don’t I show you how it will look?!
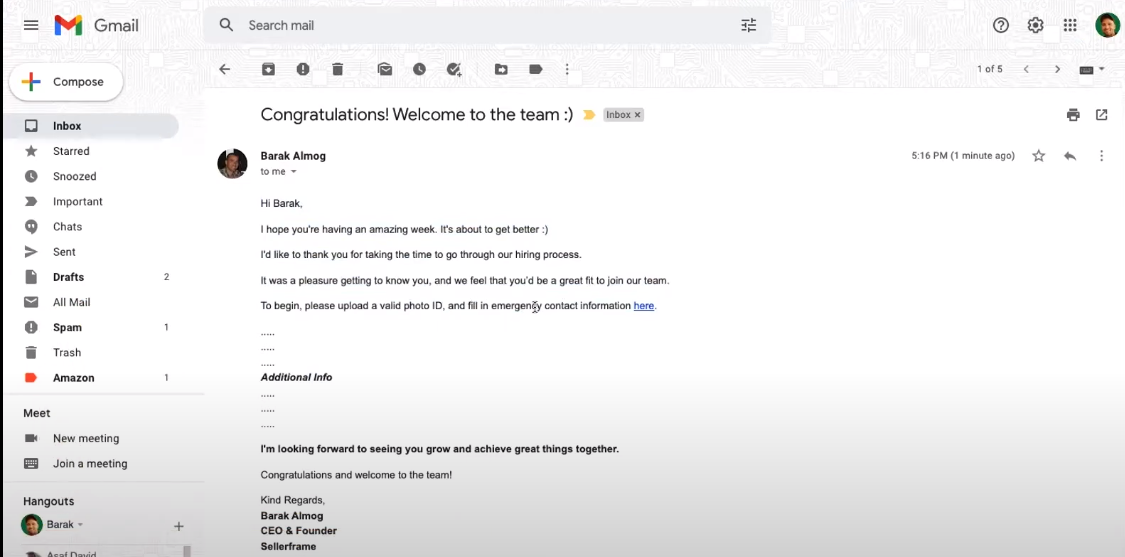
That’s a default template.
If you want, you can craft your own email template and add it to the system.
As you can see, the applicant has been asked to upload a valid ID and fill in emergency contact information.
Once that is up, it can be accessed in the same, far-right section of the table.
Also, as you reject or hire the applicants, you will notice the status being changed to hired or not hired.
It helps you filter out the options and minimizes a big list of candidates in the simplest way.
Is Automating Your Hiring Process Worth It?
I have to say, this hiring automation process is a real game-changer!
I couldn't agree more that the traditional method is outdated and can slow down the recruitment process, especially for companies that frequently hire new talents.
In today's fast-paced world, businesses need to keep up with the latest technology trends and embrace automation.
Many companies have already implemented automation across various aspects of their operations and are reaping the rewards.
Even solopreneurs, like Amazon sellers, are benefiting from automation tools.
Take Barak Almog, for instance – he's been using this hiring automation system for two years now and has seen some remarkable benefits.
Here are just a few:
1. Ease of Mind
As an Amazon seller, you don’t need to invest in HR personnel to hire virtual assistants for you.
Barak believes that it will be a redundant investment as sellers rarely need a team of more than five or six members.
In addition to that, it is ideal that a seller hires VAs themselves as they are well aware of all the nitty-gritty of the Amazon marketplace.
Hence, their evaluation will be effective.
That’s why Barak’s automation system offers great ease of mind as it saves you from unnecessary expenses and empowers you to choose the best teammates on your own terms.
2. Simple and Easy
It doesn’t matter if you don’t know the technicalities and all the human resource jargon about hiring.
This system is simple, easy to use, and to the point.
Gone are the days when you had to keep a close eye on your emails to stay in touch with the applicants.
The hiring automation system by Barak has made the entire process a game of a few clicks.
You can farewell all the Zoom meetings, Skype calls, and frequent email communication – this system allows you to do everything from one screen!
Comprehensive Evaluation
Interestingly, this advanced automated hiring system provides you with the aspects of evaluation that you mustn’t have contemplated otherwise.
Since you get everything on a single screen, you get a bigger picture of applicants coming through the process.
The fact that all the important dates are recorded in the system allows you to single out motivated and eager candidates.
Moreover, ratings and the notes left by you for each applicant help you make an informed decision.
System Interfaces
Before dropping the curtain on everything, let me quickly take you through a few interfaces of the system.
You know how in a spreadsheet you have different sheets to organize your data?
Well, Airtable has taken it up a notch and given us multiple tables to work with!
That means you can switch between tables just like you would with sheets, but each table can have its own set of columns and data.
It's like having multiple spreadsheets within one system!
In Barak's hiring system, there are basically six interfaces:
Applicants
Skill Tests
Email Templates
Process Emails
Links
Dev Tab
1. Applicants
In Applicants, you have all the potential teammates undergoing the hiring process.
We have thoroughly discussed it in our step-by-step guide above so I won’t repeat it here.
Let’s see what you can expect in the Skill Tests.
2. Skill Tests
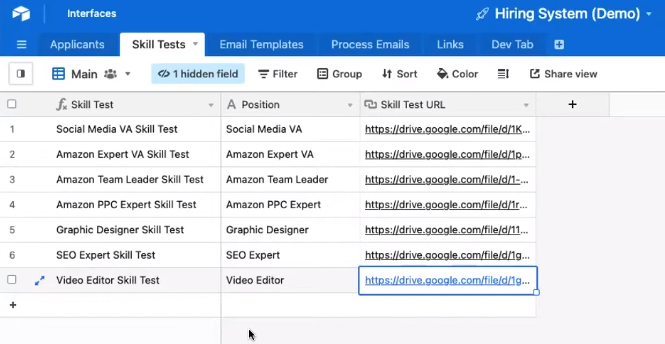
This interface contains all the skill tests for each virtual assistant position.
You can add, edit or remove any test if you want in just a few seconds.
Or if you want to go with the existing ones, be my guest!
To add a new test, write the position name in the relevant column.
You won’t need to add anything to the Skill Test column; the system will automatically identify the newly added position test.
After that, please add the skill test URL and you are good to go.
3. Email Templates
You will get the default email templates here in this interface.
Although they are nicely written and can do the job, you can edit them in any way you want.
And not to forget, you can also add new ones to fit your requirements.
4. Process Emails, Links & Dev Tab
The function of the remaining tables can be easily determined by their names: they can be used to process emails in the system, and check links, and in the dev tab, you can do all the programming stuff.
The last one is for developers/programmers only.
Frequently Asked Questions
Here are some frequently asked questions about Barak Almog’s automated hiring system.
Is it available in every country?
Yes. You can buy it from anywhere in the world. Barak hires virtual assistants for his clients from all over the globe using the very system.
Can I use it to hire anyone else other than Amazon virtual assistants or social media managers?
With a little customization, yes. You can use it to hire anyone i.e. Graphic designer, WordPress, SEO expert, etc.
I don’t know how to automate my hiring process. I want to learn that, but how can I do it?
Well, that’s where Barak comes in! He’s a very welcoming person and you can reach out to him for any queries you have regarding automating your hiring procedure. Trust me, he can be a big help!
Conclusion
Well, that’s all for today. I am ending this article here with the hope that Barak’s automation tool would have amazed you just as it did to me.
The business world is crazily heading toward automation, and if you don’t make a timely choice right now, it might cost you a big deal!
This is me, Vova, signing off.
I will see you in my next article.
Until then, bye!
-
From Posting Jobs to Recruiting the Best of the Best – This is the Hiring Automation System You have been Looking for all Along!
- Introducing Barak Almog
- Automating Your Hiring Process: A Simple Step-by-Step Guide to Business Automation
- Is Automating Your Hiring Process Worth It?
- System Interfaces
- Frequently Asked Questions
- Conclusion
Disclosure: Hi! It's Vova :) Some of the links in this article may be affiliate links. I get a commission if you purchase after clicking on the link, this does not cost you more money, and many times I can even get a nice discount for you. This helps me keep the content free forever. For you. Thank you! :)