How To Use PixelMe - A To Z Tutorial And Review - A Tool That Helps Drive External Traffic To Amazon
-
PixelMe for Amazon FBA: A-Z Tutorial and Review to Drive External Traffic and Get Sales
- Introduction
- Meet My Guest – Clayton Atchison
- How to Use PixelMe – A to Z Tutorial
- Conclusion
Disclosure: Hi! It's Vova :) Some of the links in this article may be affiliate links. I get a commission if you purchase after clicking on the link, this does not cost you more money, and many times I can even get a nice discount for you. This helps me keep the content free forever. For you. Thank you! :)
PixelMe for Amazon FBA: A-Z Tutorial and Review to Drive External Traffic and Get Sales
Ever wished you could get more people to see your awesome Amazon products?
Struggling to climb the organic ranking ladder on Amazon can feel frustrating.
But what if there was a tool that could help you drive more traffic to your listings and boost your sales?
In this jam-packed guide, we'll be diving deep into PixelMe, a powerful tool from Carbon6 designed specifically to help Amazon sellers like you do just that!
I invite you to get a free ASIN audit by PixelMe. You'll see if it fits your Amazon business and specific ASINs and products, and it's honestly fully free!
I recently invited Clayton Atchison, a pro in the Amazon space, onto my YouTube channel for an exclusive A-to-Z walkthrough and review of PixelMe.
Clayton didn't hold back – he shared a step-by-step tutorial, complete with screen sharing, to show you exactly how PixelMe works and how it can benefit your business.
Ready to unlock the secrets of driving external traffic to your Amazon listings and skyrocket your organic ranking?
Let's get started!
___________________
Introduction
Vova: Hey there everyone!
In this article, we're going to be taking a close look at a tool called PixelMe.
PixelMe helps sellers on Amazon bring more visitors, or traffic, to their product listings from outside of the Amazon website itself.
We'll be guiding you through how to use PixelMe step-by-step, so you can see exactly how it works.
Joining me today is Clayton, from Carbon6.
I've actually collaborated with Clayton on a few videos before, and you can access them all by clicking on the button below.
Also, I've got a special offer for PixelMe.
So, if you click on the button below, you'll be able to get a free Amazon ASIN audit with them. Enjoy! :)
Meet My Guest – Clayton Atchison
Vova: Alright Clayton, why don't you tell everyone a bit about yourself, and then we can jump right into exploring PixelMe?
Clayton: Thanks Vova, always good to be here with you.
My name's Clayton Atchison, and I lead the team at PixelMe over at Carbon6.
I've been with Carbon6 for almost three years now, and for the last year and a half, I've been fully focused on developing and expanding PixelMe's features.
Originally, PixelMe was a simple tool for shortening links.
But it's come a long way since then!
Now, it connects directly with advertising platforms like Google Ads, Facebook Ads, Instagram Ads, and even TikTok Ads.
This lets you create targeted campaigns to drive more visitors, or traffic, to your Amazon listings from those popular websites.
Ultimately, PixelMe helps sellers like you improve their organic ranking on Amazon and increase their sales.
That's what I do!
Vova: Thanks for joining us again, Clayton!
For those who don't know, we actually did a video together about a year ago, where we talked about Carbon6's other tools.
Even if you're just starting out with PixelMe, that video can give you a good general idea of what Carbon6 does.
I've actually converted into a blog as well.
Embedding them both below for your ease… 😉
-: Video Version :-
-: Blog Version :-
Carbon6 Review: Unleashing Amazon FBA Software Brilliance!
But enough about the past, let's get down to business!
We're here today to learn all about PixelMe, and Clayton's going to walk us through how to use it step-by-step.
How to Use PixelMe – A to Z Tutorial
Vova: So, Clayton, take it away and show us the ropes!
Clayton: Alright, great!
Let's get started.

I will use this demo account shown in the screenshot above.
As you can see, it has a whole bunch of different products listed.

This account helps me do research for clients.
Most Amazon sellers, though, will be spending most of their time on the tab with the little "a" in the corner.
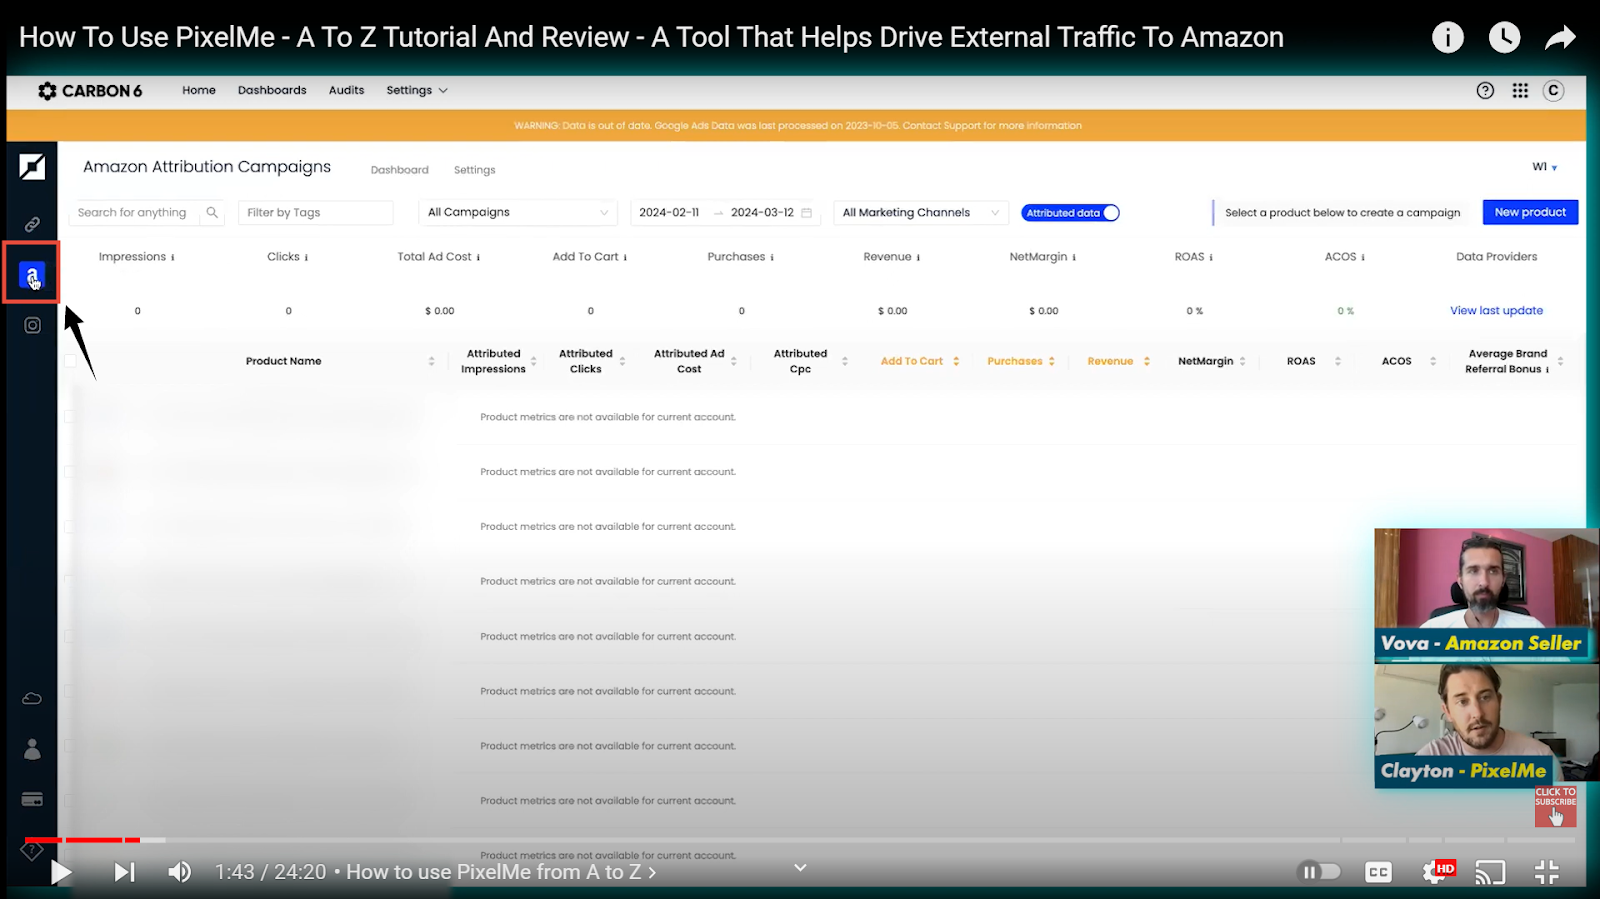
If you're just starting out and logging in for the first time, you won't have any products listed there yet.
Let's take a look at a real example.
I'm going to head over to amazon.com and search for "pickleball."
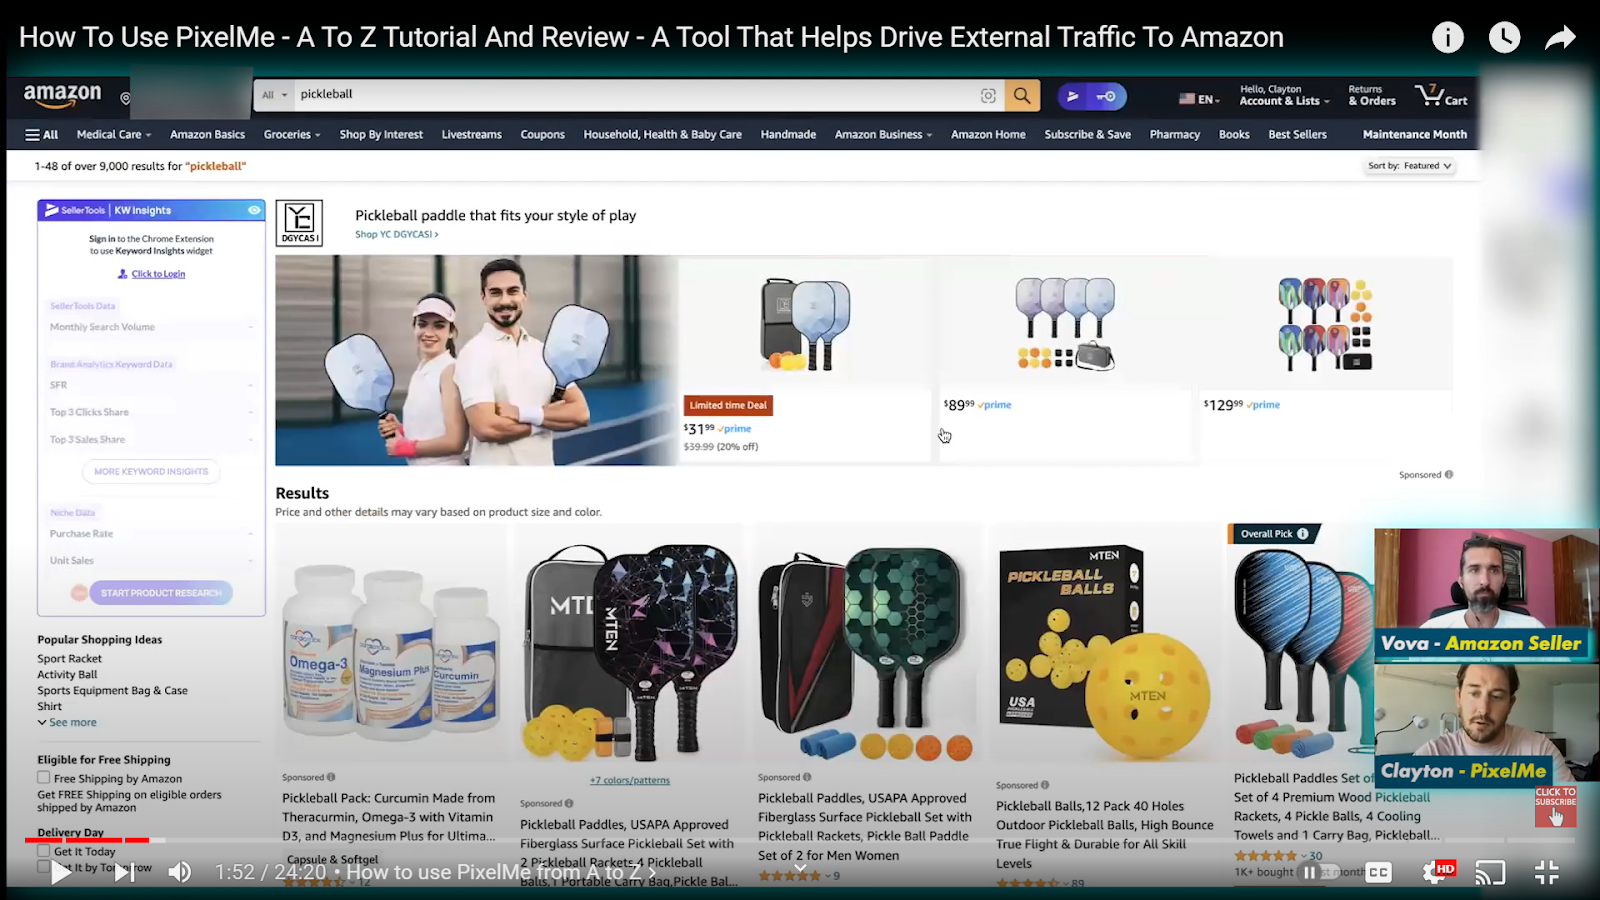
Here's a pickleball set that I think could benefit from a little help with its ranking on Amazon, although it seems to be doing okay overall.
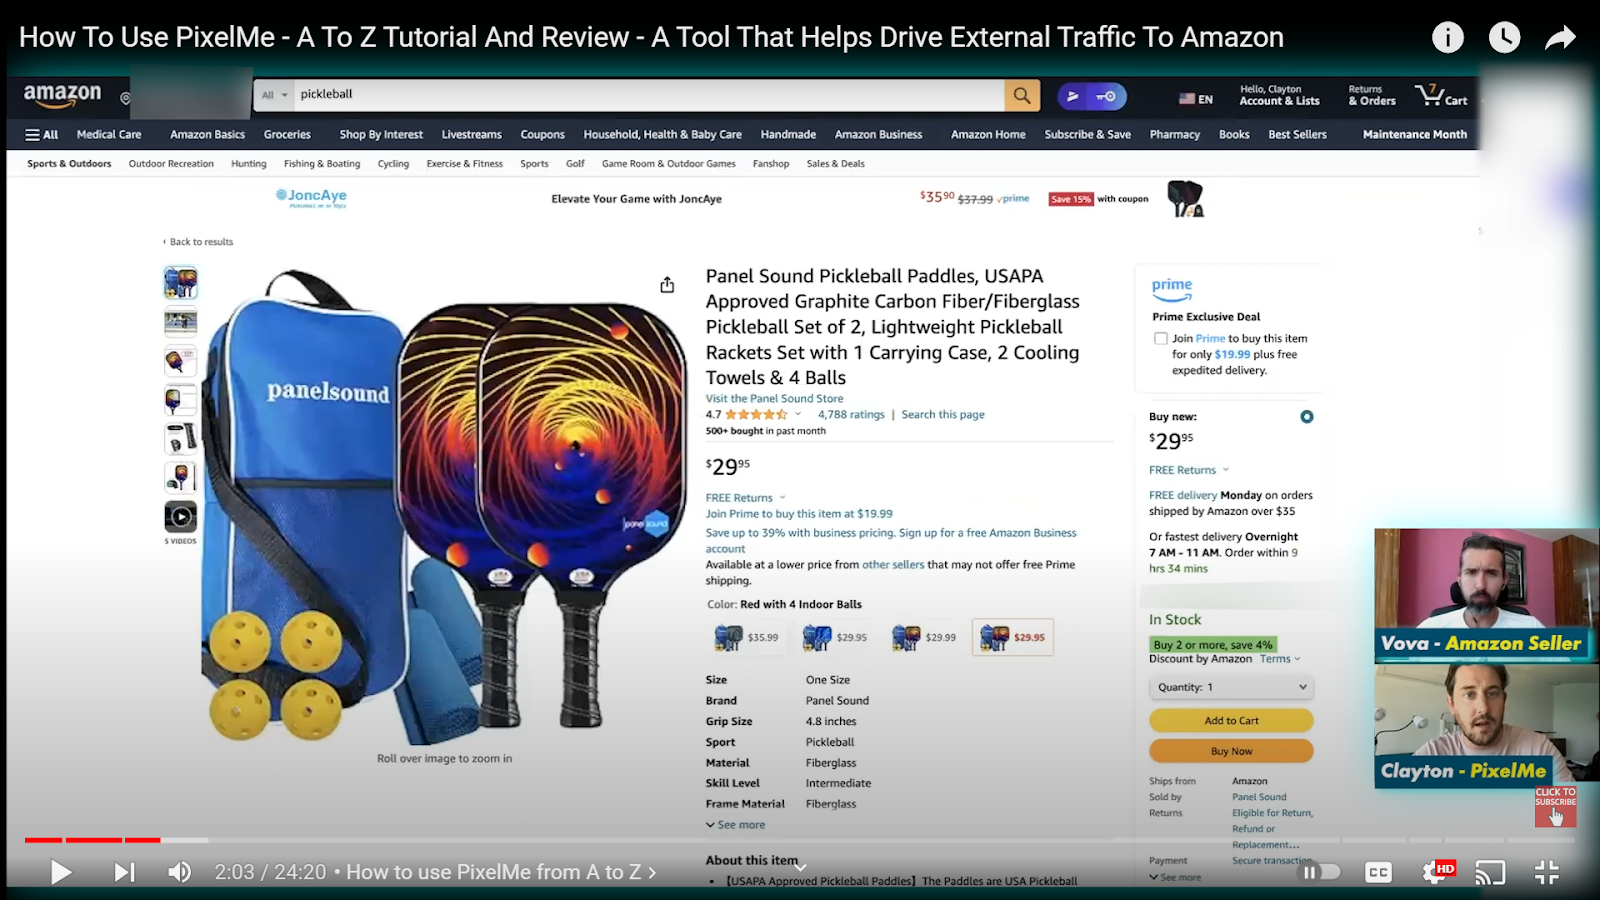
There are a couple of key things to remember when copying a product URL for use with PixelMe.
First, we want to grab the "canonical URL," which basically means just the first five words of the website address, followed by everything up to the unique product identifier, called the ASIN (Amazon Standard Identification Number).
It's important to avoid keyword stuffing in the URL, which is against Amazon's terms of service.
-----
I invite you to get a free ASIN audit by PixelMe. You'll see if it fits your Amazon business and specific ASINs and products, and it's honestly fully free!
-----
While the full URL might contain the word "pickleball" somewhere, we want to keep things clean and concise.
So, with that in mind, I'm going to switch back over to PixelMe and click on "New Product."
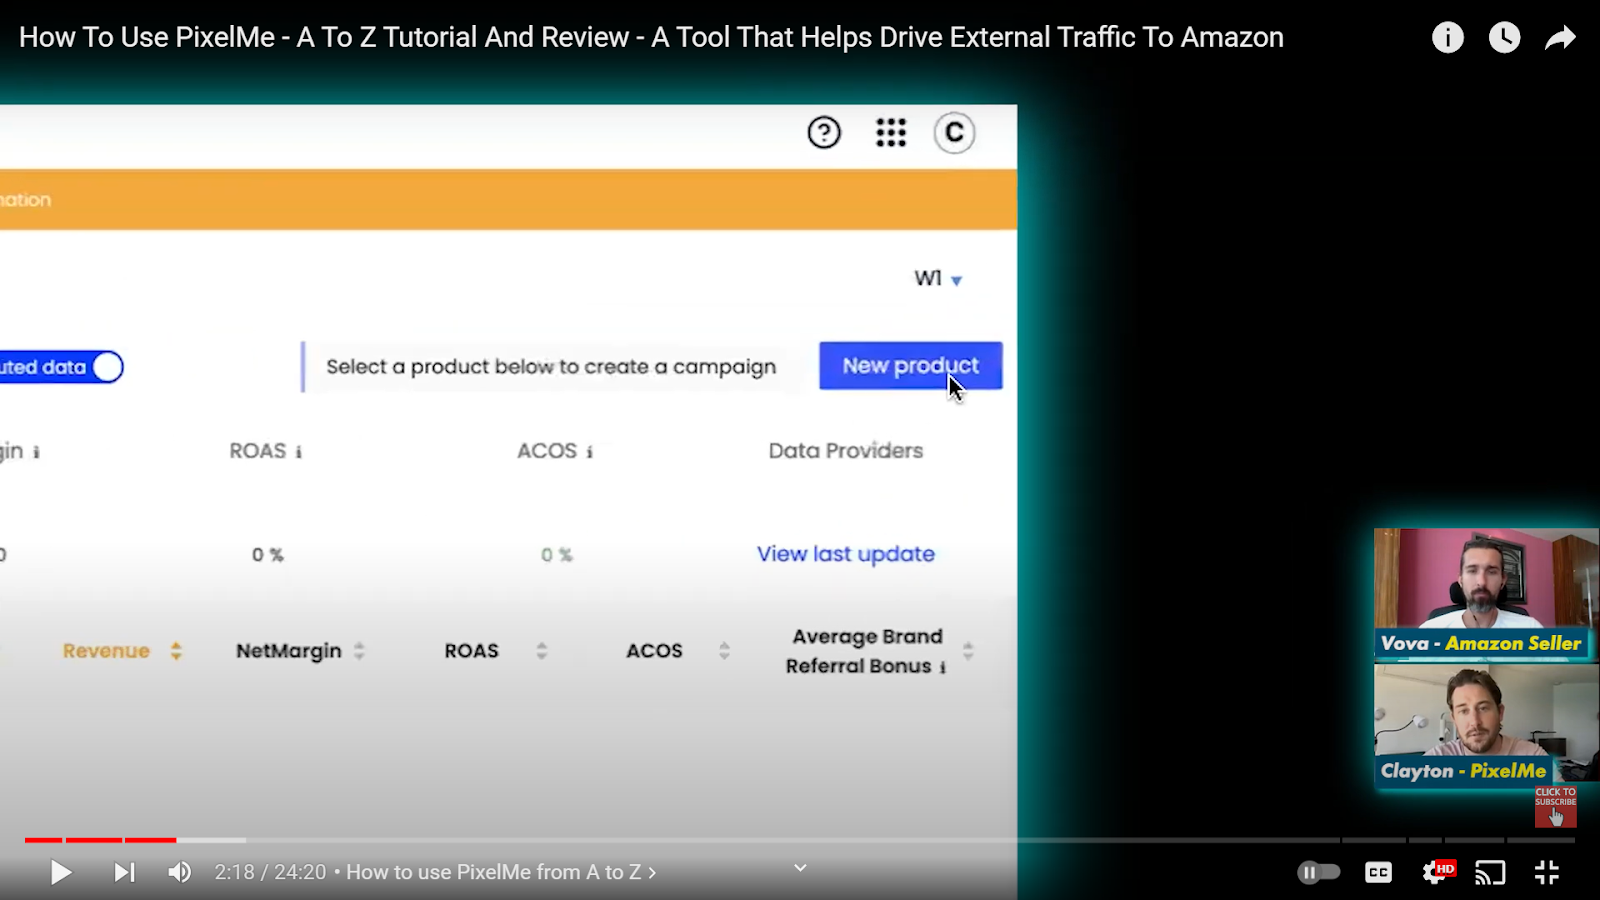
You can also send traffic to an entire storefront, but typically the recommendation is to direct traffic to the specific product detail page.

This is because sending people directly to the product page has been shown to be more effective in improving a product's organic ranking on Amazon.
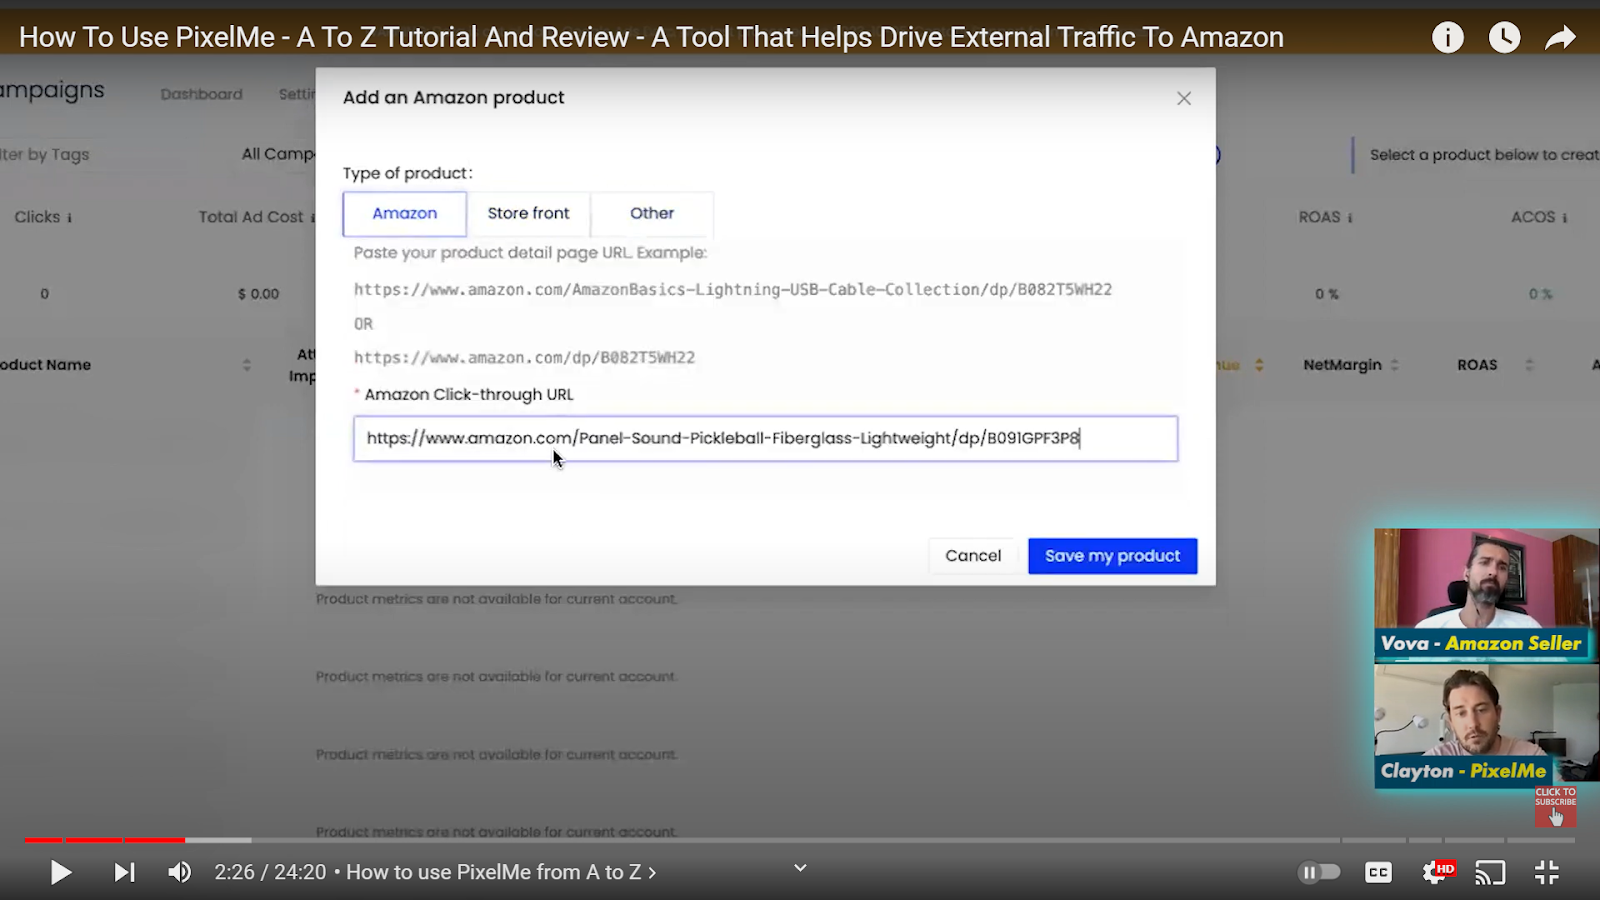
While PixelMe saves the product information I entered, grab the product's ASIN from the Amazon page.
My demo account has quite a few products listed, so it might take a moment to load everything.
Once done, you'll see such a pop up on the screen:
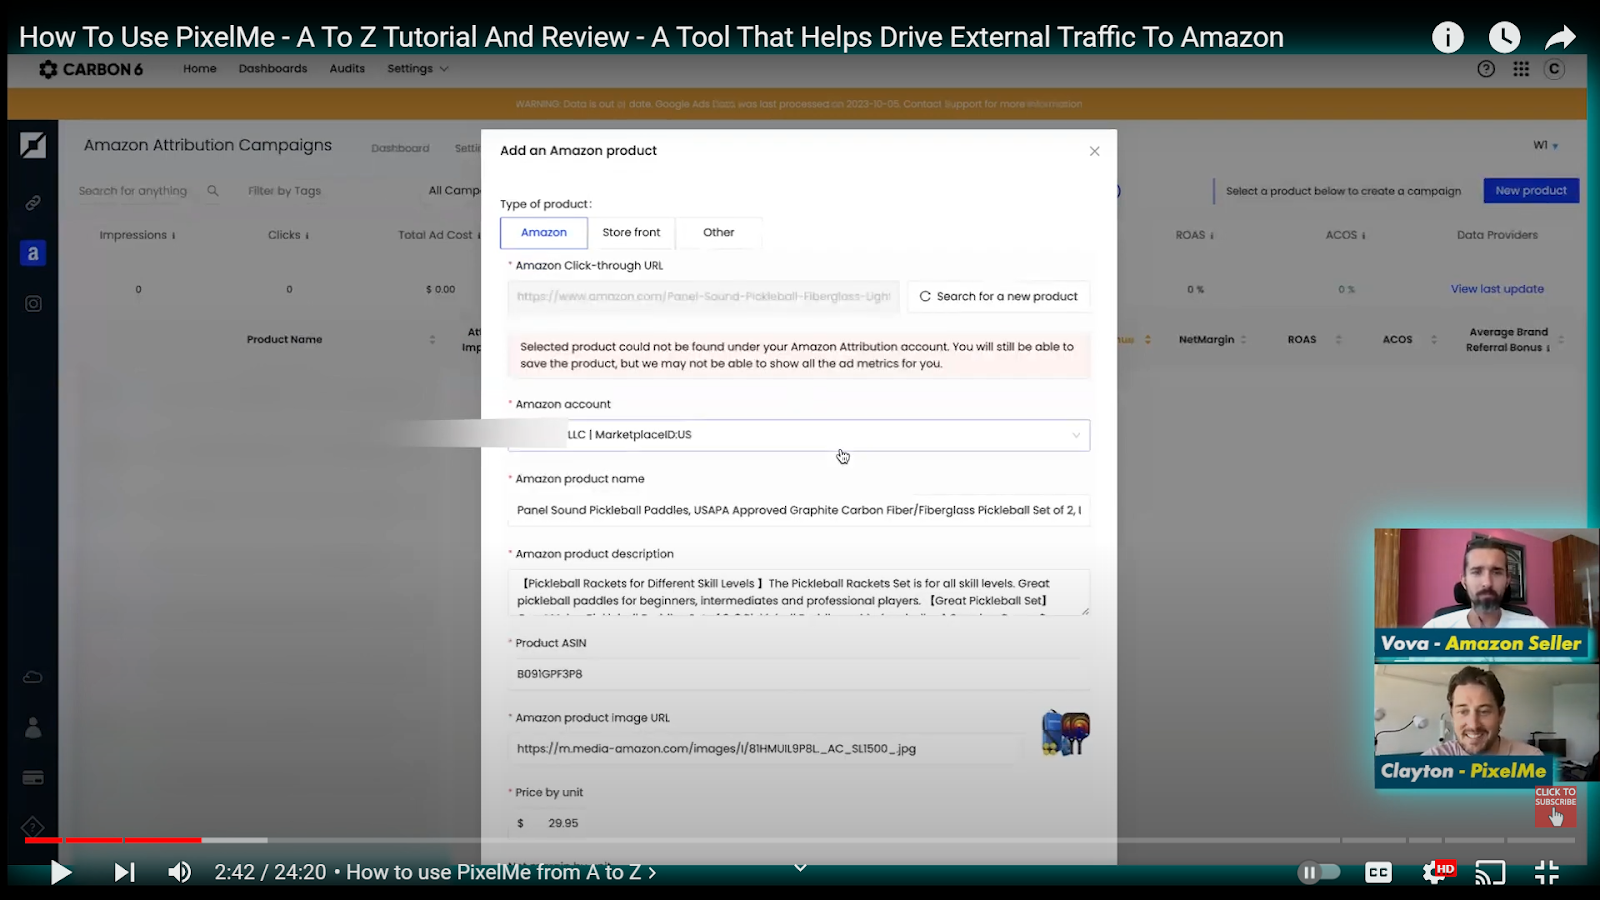
As you can see, there's a warning message that says the selected product couldn't be found in our connected Amazon Attribution account.
That makes sense, because the account we're using doesn't actually sell this particular pickleball set.
Let's take a closer look at the information PixelMe automatically filled in for us.
It includes the product name, description, ASIN, and even the current price.

There's also a spot to enter your net profit margin for this product, assuming you weren't already running any advertising for it.
A common estimate for net margin is around 30 percent, but you can adjust this based on your specific product and business.
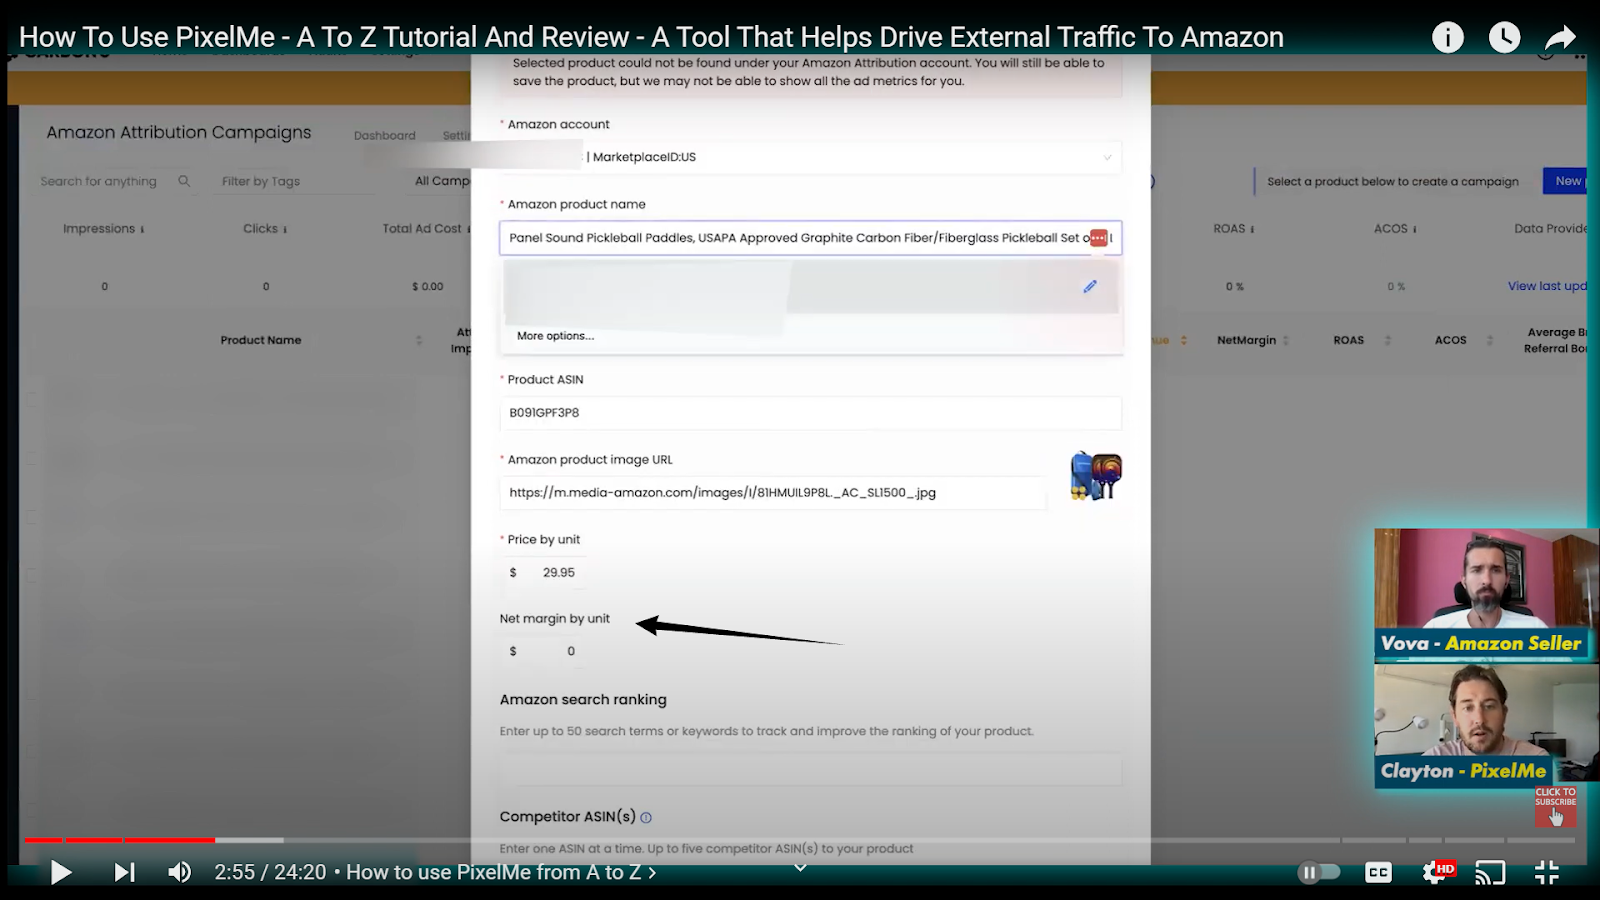
PixelMe also allows you to enter competitor ASINs, which can be helpful for tracking performance.
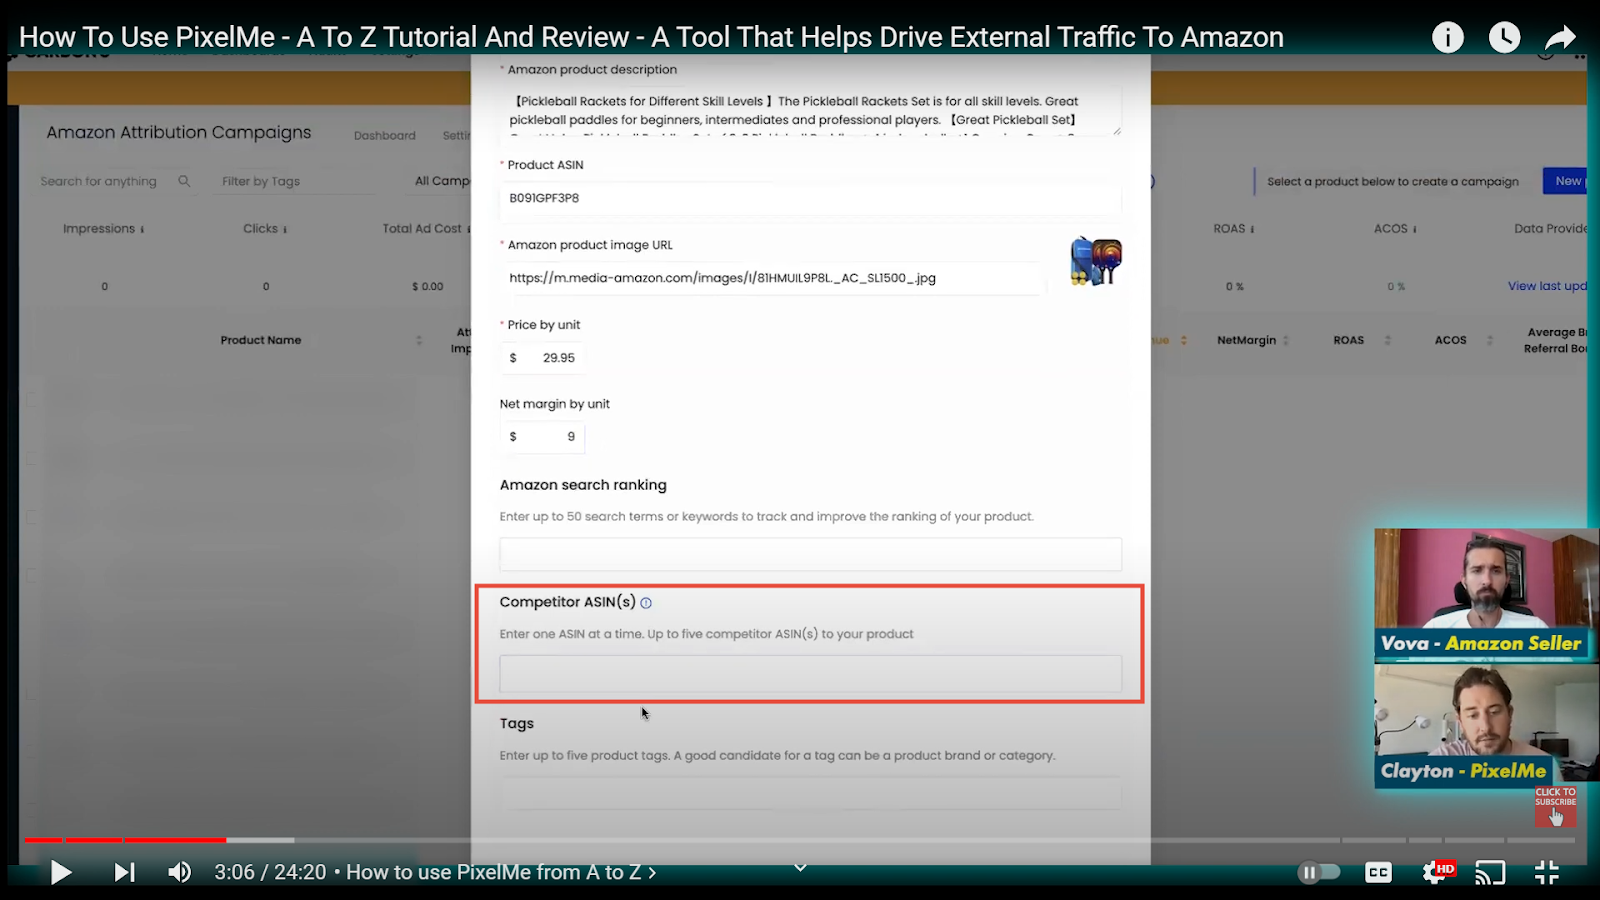
And for organization purposes, you can add product tags.
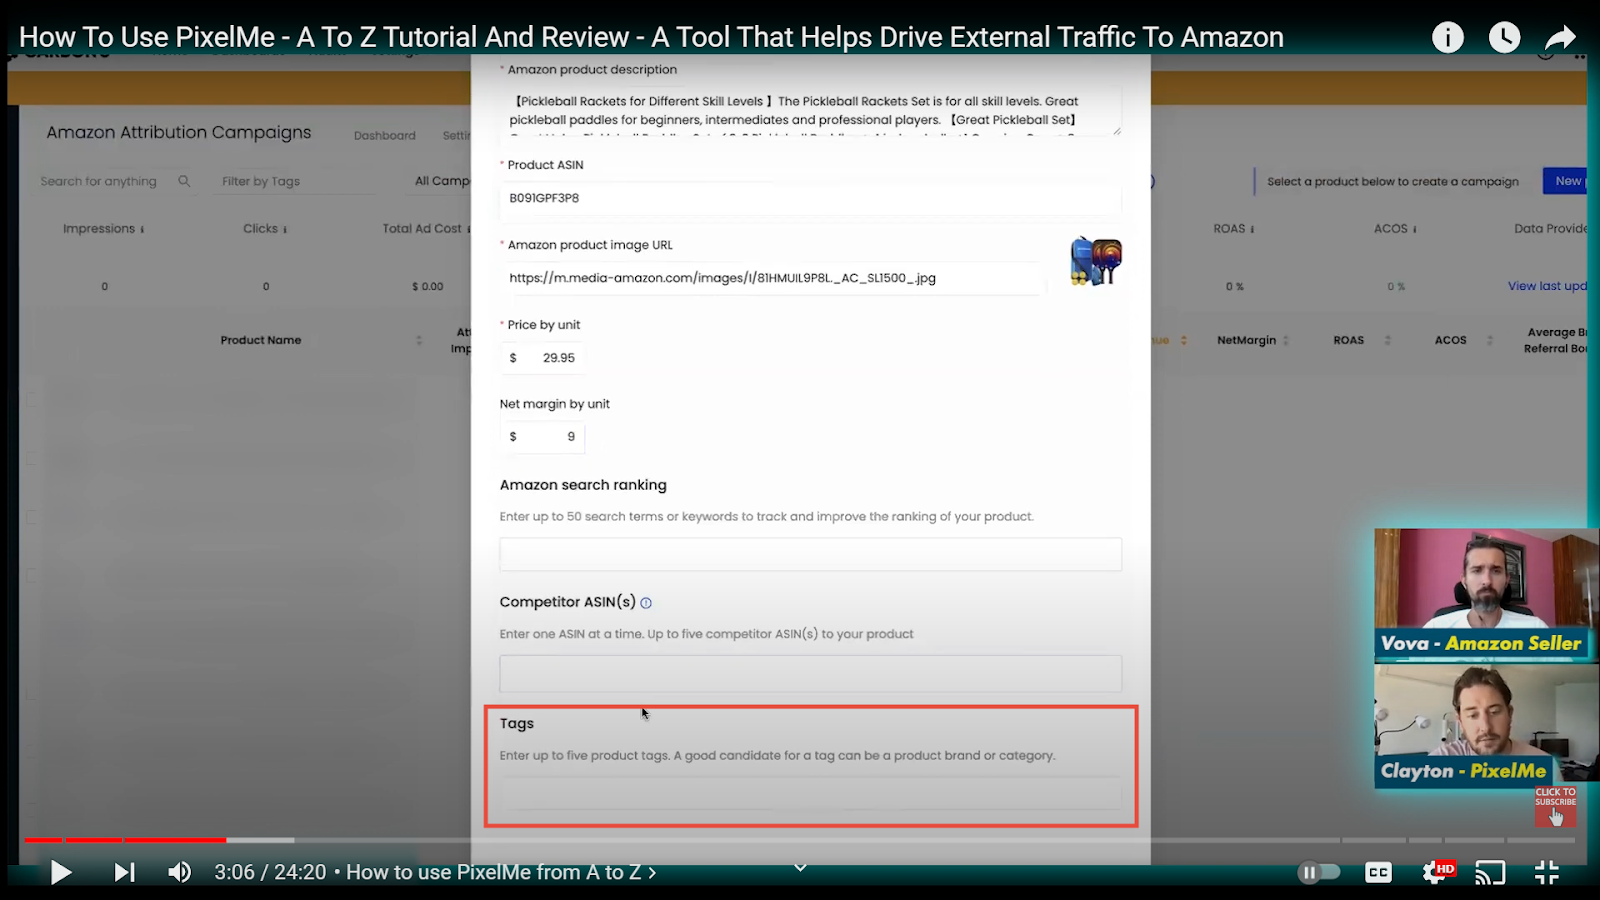
For example, if you sell pickleball equipment and water bottles, you could create separate tags for each brand category.
Let me show you how that works.
Let's create a tag for this product.
I'll call it something simple, like "Vova," and then click "Save My Product."
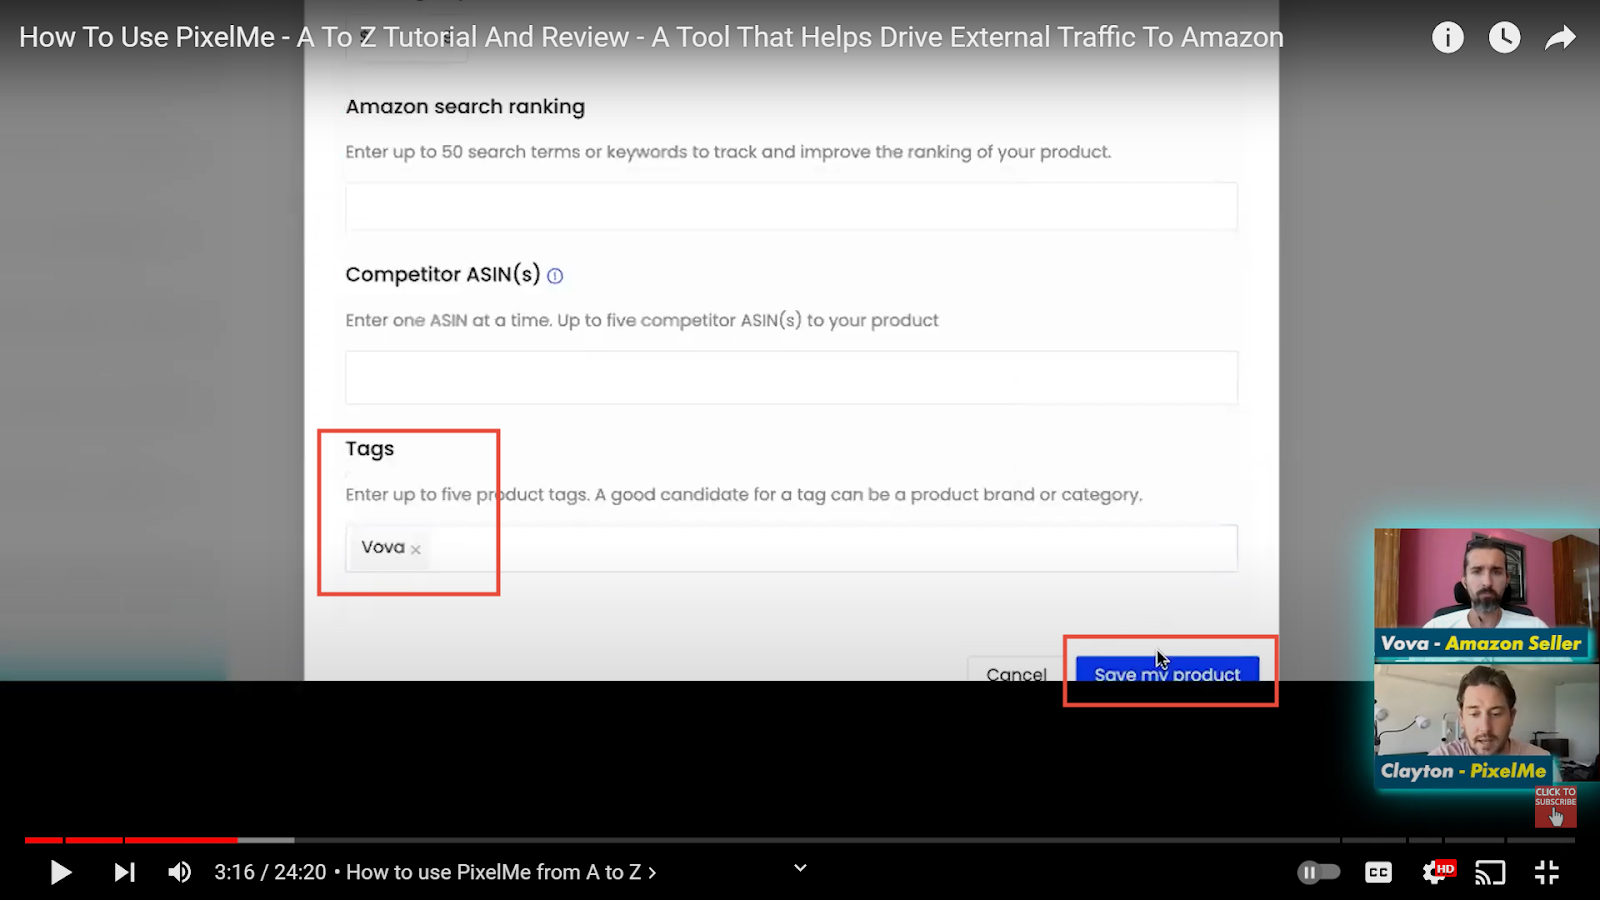
Now, PixelMe will add this product to your account.
There might be a short delay as the page refreshes, especially considering this demo account has quite a few products.
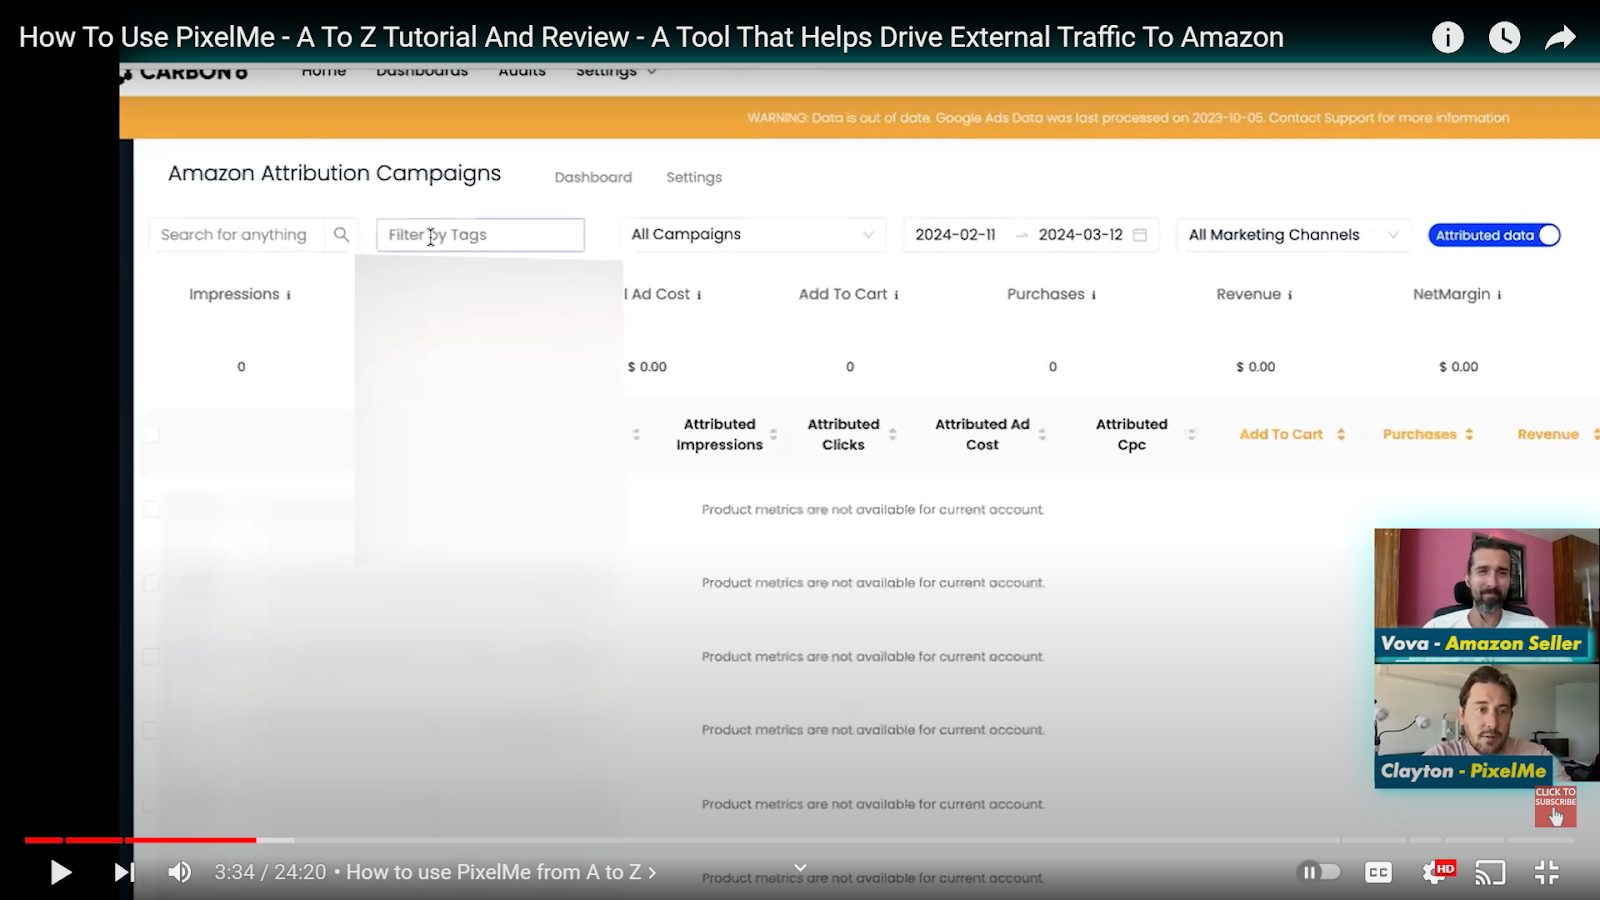
Once the page is updated, you'll be able to see several ways to find your new product.
You can filter by tags, search by the ASIN, or simply scroll through the list.

We can see the product listed by its ASIN right away, but searching by the tag we just created ("Vova") will take a moment longer.
And there it is!
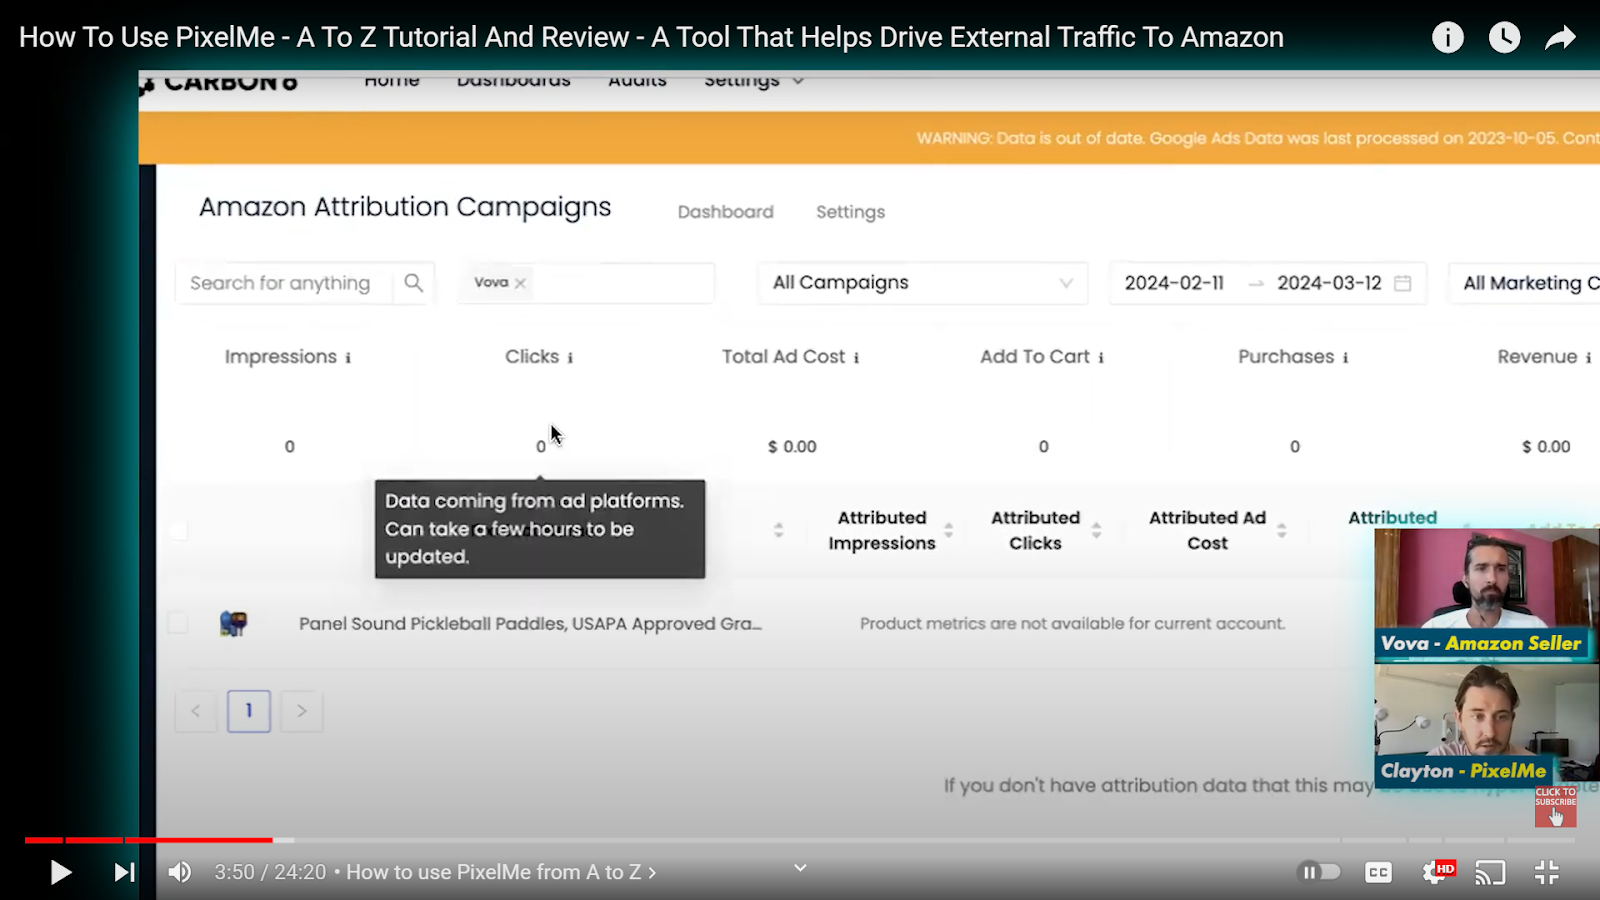
Now that we see our new product listed in PixelMe, let's take a look at the data it tracks.
As you can see, there are columns for impressions, clicks, total ad cost, and CPC (cost per click).

It's important to understand where this information comes from.
PixelMe uses an API (application programming interface) to connect directly with both Google Ads and Amazon Attribution.
This allows it to gather data from both platforms and display it in one convenient location.
So, all the information in black (impressions, clicks, ad spend, and CPC) comes directly from Google Ads, while the information in gold comes from Amazon Attribution.
I paid to send this ad from Google to Amazon. That's my cost.
But the question is, what happened after it was sent to Amazon?
Did people simply browse and leave, or did they take a more positive action, like adding the product to their cart or even purchasing it?
Did this ad campaign generate any revenue for me?
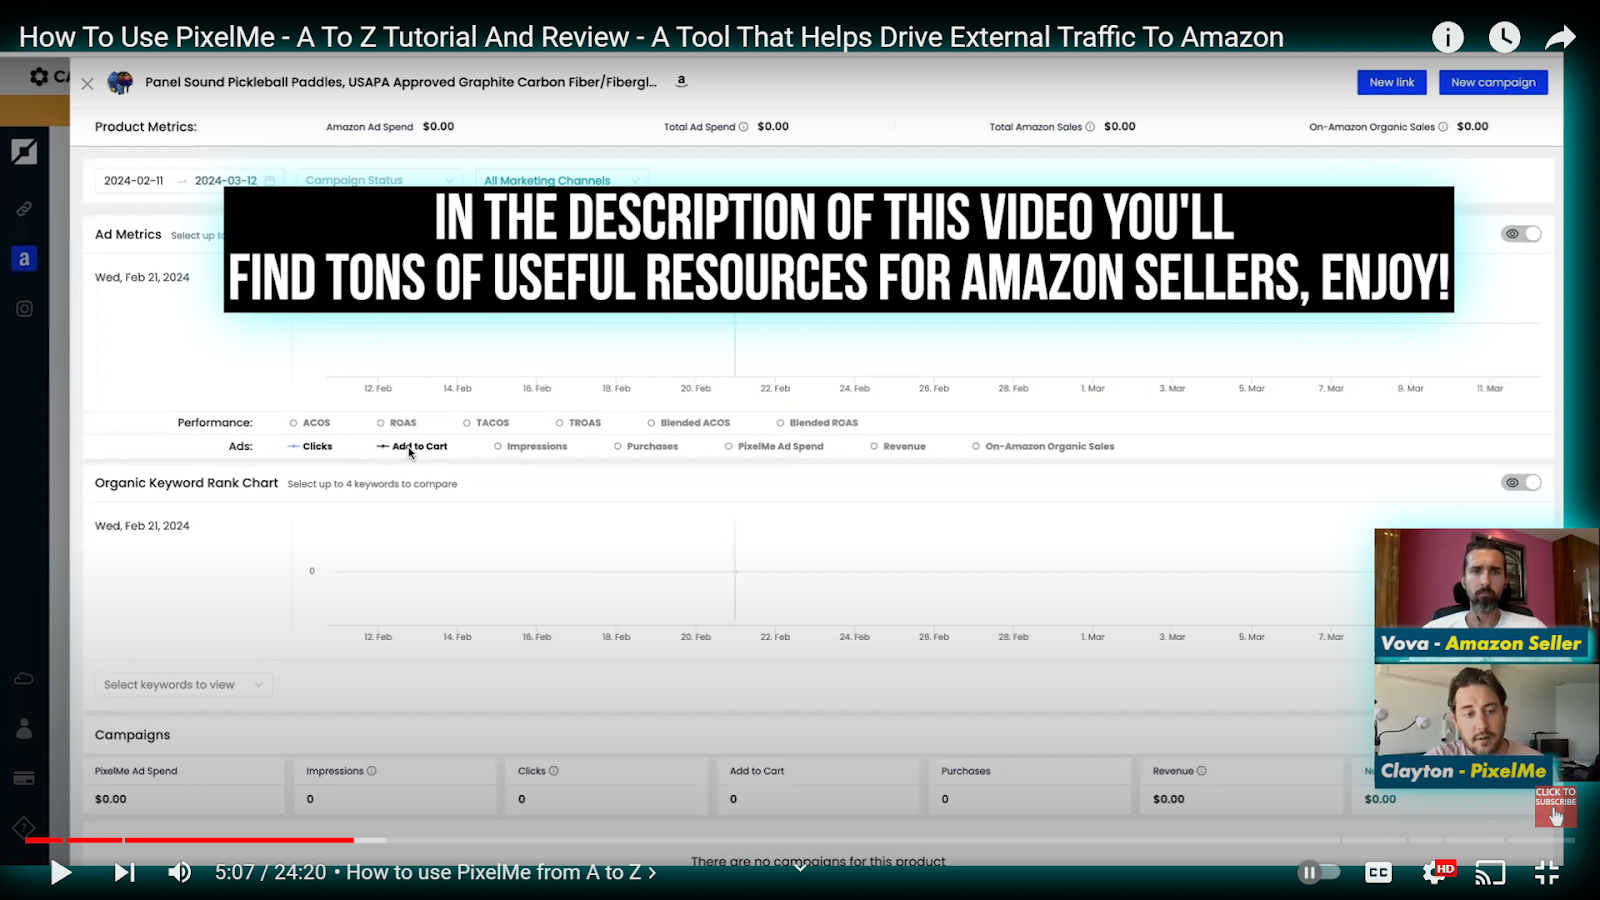
PixelMe helps answer these questions by calculating your Advertising Cost of Sale (ACOS) and your Return On Ad Spend (ROAS).
To achieve this, we'll need to click here.

See the screenshot below, there isn't any data yet because the ad campaign is new.

But this is exactly where PixelMe will track all important metrics like ACOS, ROAS, and even your Total Advertising Cost of Sale (TACOS).
It connects to both your Amazon Seller API and Seller Central API to pull in your ad spend data from Amazon alongside your overall sales figures.
The ultimate goal for any Amazon seller using ads is to improve their product's organic ranking while lowering their TACOS.
PixelMe helps you track these metrics over time, giving you valuable insights into the effectiveness of your campaigns.
There are a few other features worth mentioning.
By clicking on "Add to Cart" (which won't have any information yet since the ad campaign is new), you'll be able to see your product's Best Seller Rank (BSR) within both its parent category and its niche category.
This can be helpful for understanding how your product stacks up against the competition.
This section here is for tracking keywords:
However, since we haven't created a campaign yet, there's nothing to see.
If we scroll down to the bottom, you'll see it says "There are no campaigns for this product."

So, the next step is to create a campaign!
PixelMe offers two options: you can create a new link for tracking purposes, or you can create a full advertising campaign.
Now, if you're looking to collaborate with influencers, creating a trackable link with PixelMe is a great option.
This lets you create a unique Amazon Attribution link for each influencer you partner with.
By giving each influencer their own special link, you can see which ones are actually driving sales, not just clicks.
This valuable data allows you to make informed decisions about how to best work with your influencers in the future.
For this demo, though, let's go ahead and click on "New Campaign."
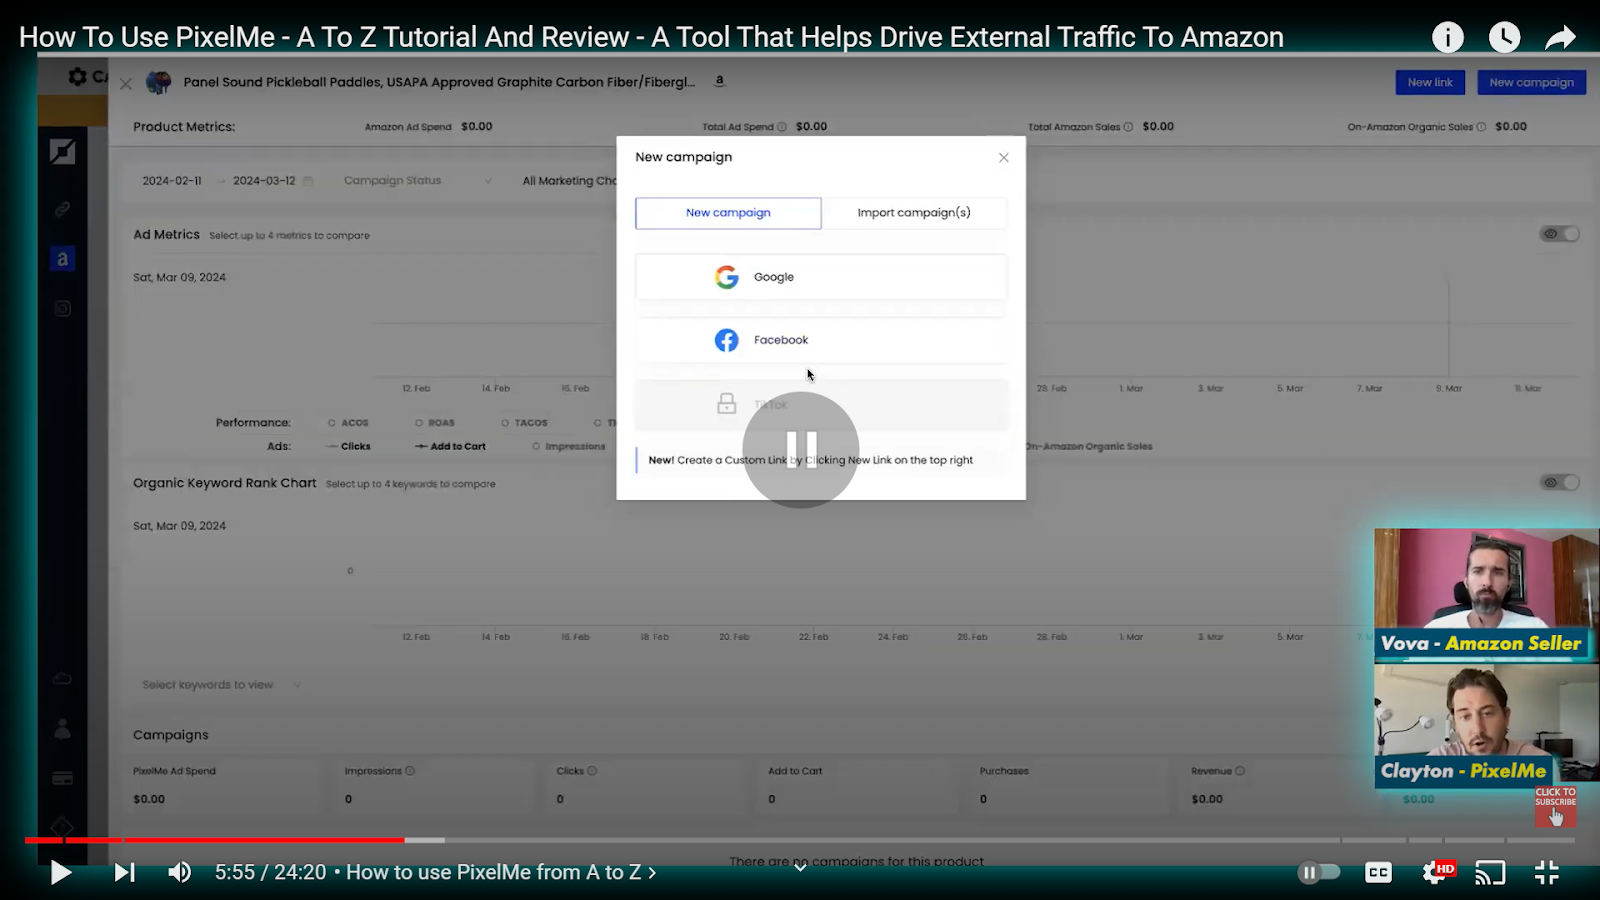
In this demo account, TikTok isn't currently activated, but I can choose to connect with either Google Ads or Facebook Ads.
PixelMe also allows you to import existing campaigns you might already have running on Google Ads.
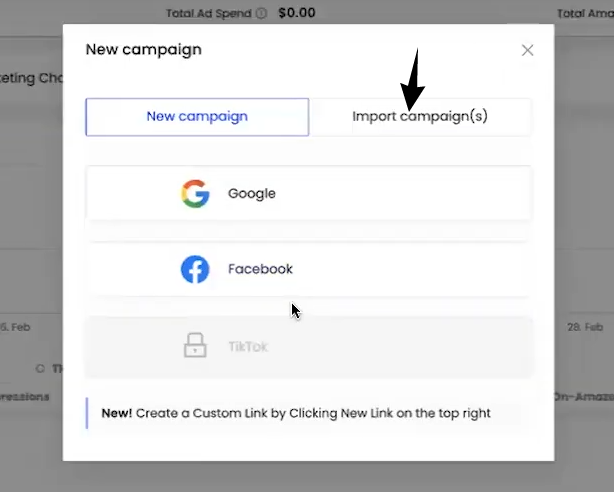
This is handy because you can then add an Amazon Attribution tag to the campaign within PixelMe, ensuring everything works seamlessly together.
-----
I invite you to get a free ASIN audit by PixelMe. You'll see if it fits your Amazon business and specific ASINs and products, and it's honestly fully free!
-----
Many of our clients find the "Import Campaign(s)" feature useful for incorporating their historical campaign data.
For this demo, though, I'll click on "Google."
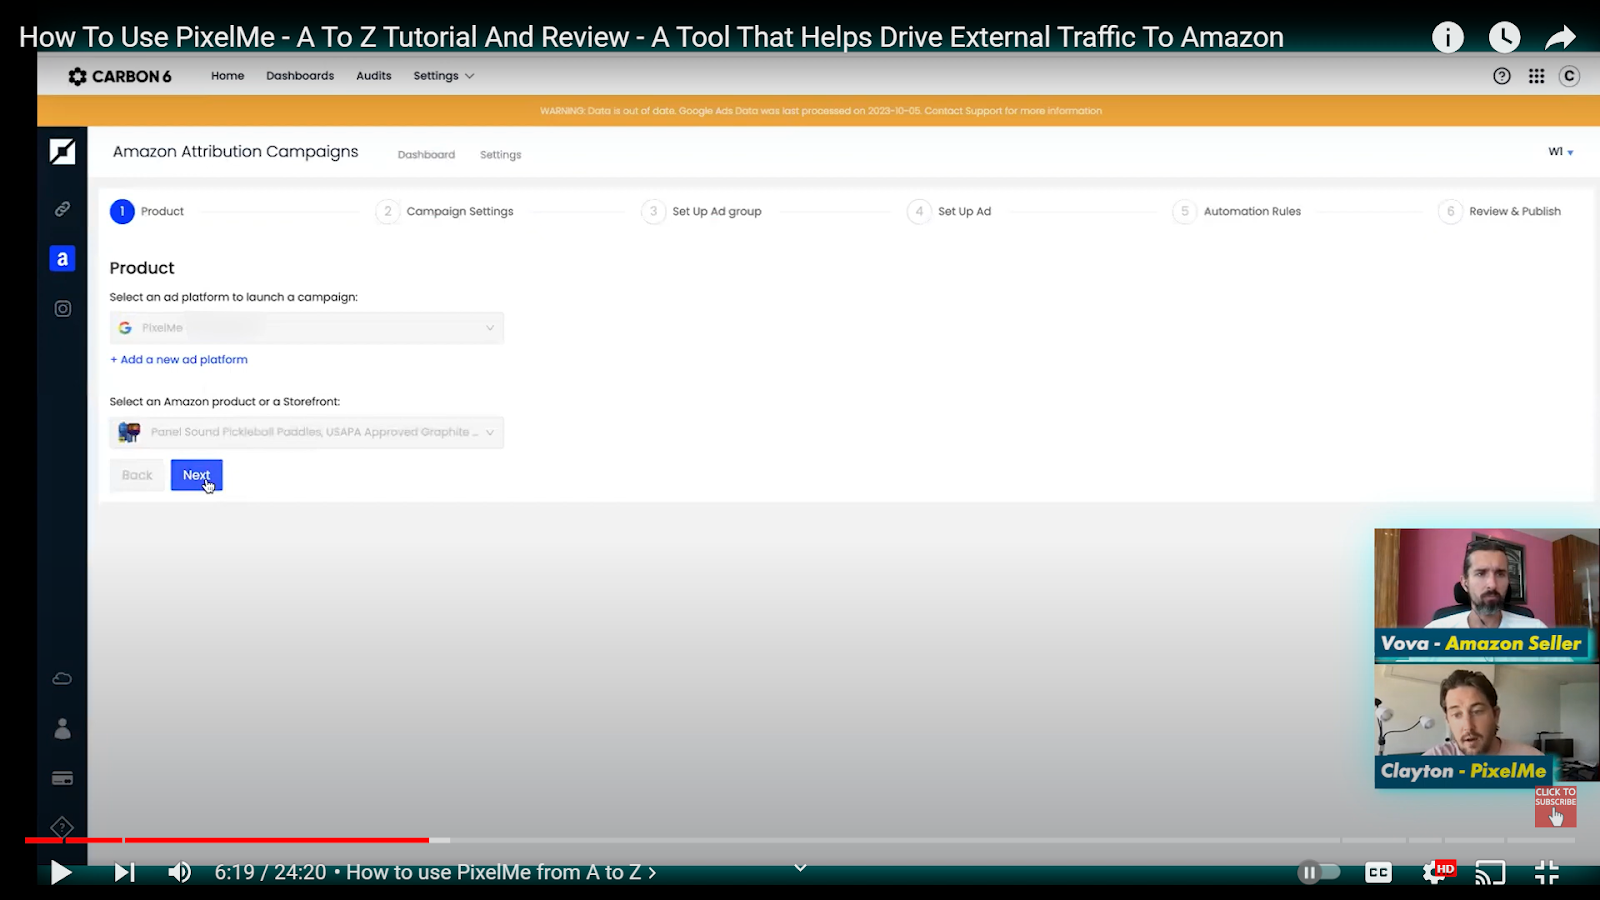
As you can see, my Google Ads account is already linked to PixelMe.
We've selected the product we want to promote, and now we're gonna build a campaign that will run on Google Ads, all from within the PixelMe platform.

Now it's time to name your campaign!
I'll call it something simple, like "PixelmeVOVA."
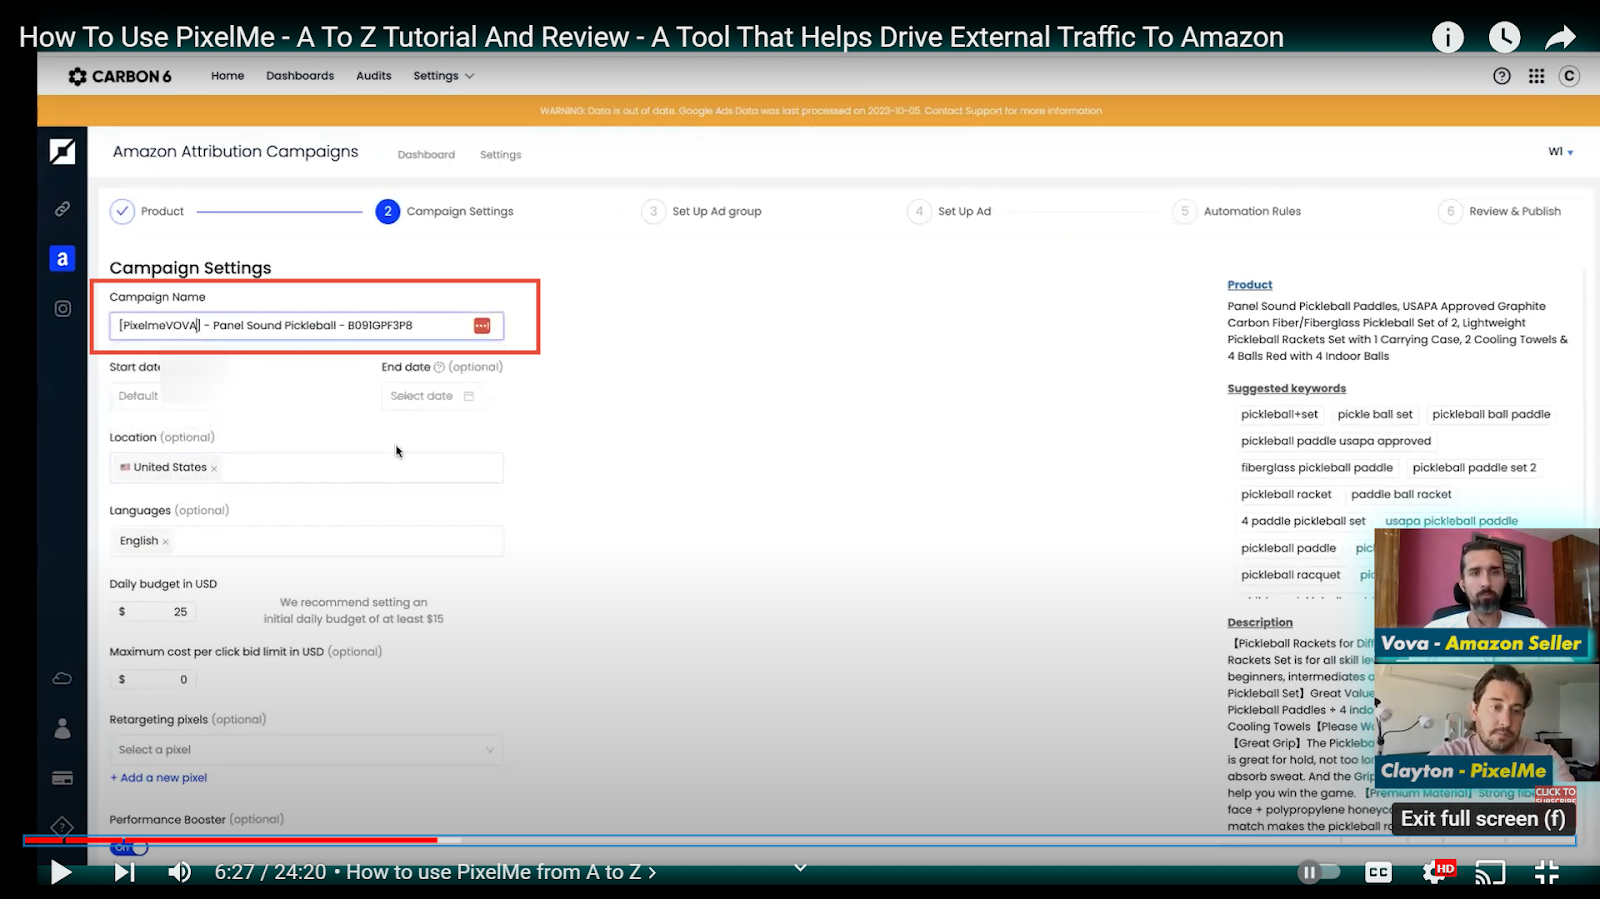
You can also choose the country and language your target audience speaks.
Besides this, there are options to set specific start and end dates for your campaign, but leaving them blank allows it to run indefinitely.
Next, when it comes to ad spend, I usually recommend starting with a budget of $25 per day.
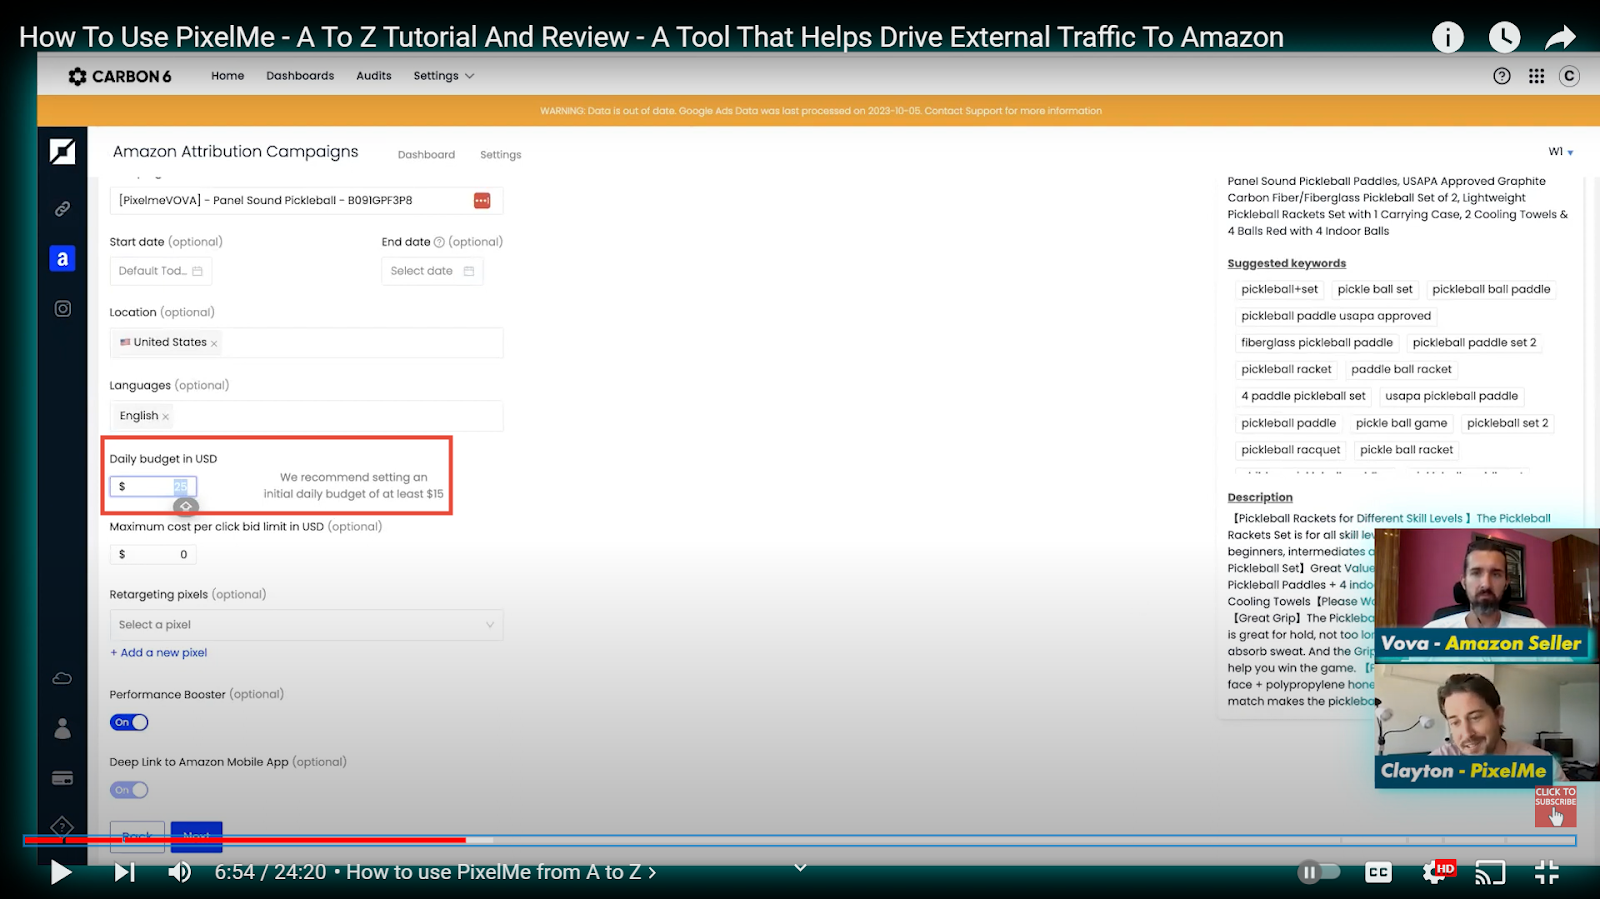
This seems to be a sweet spot for many sellers who are looking to improve their product's organic ranking.
Of course, we have clients who've started with $25 and seen great results, eventually scaling up to budgets of $1,500 per day for a single product.
But that kind of high spend is definitely not necessary when you're first getting started.
Here, you can set a maximum cost-per-click (CPC) bid limit.

This means you tell PixelMe the most you're willing to pay each time someone clicks on your ad.
Let's set a limit of $2 per click.
One of PixelMe's unique features is the ability to add "Pixels."

These pixels are like tiny tracking codes that you can place on other advertising platforms like Facebook and TikTok.
When someone clicks on your Google ad, PixelMe uses these pixels to try to identify that person.
This creates an audience that you can then target with future ads on those other platforms!
While retargeting them isn't automatic (you'll need to create a separate ad campaign), it's a powerful strategy based on a lot of data.
PixelMe even has partners who can help you create retargeting campaigns.
Here's a feature we call "Performance Booster."
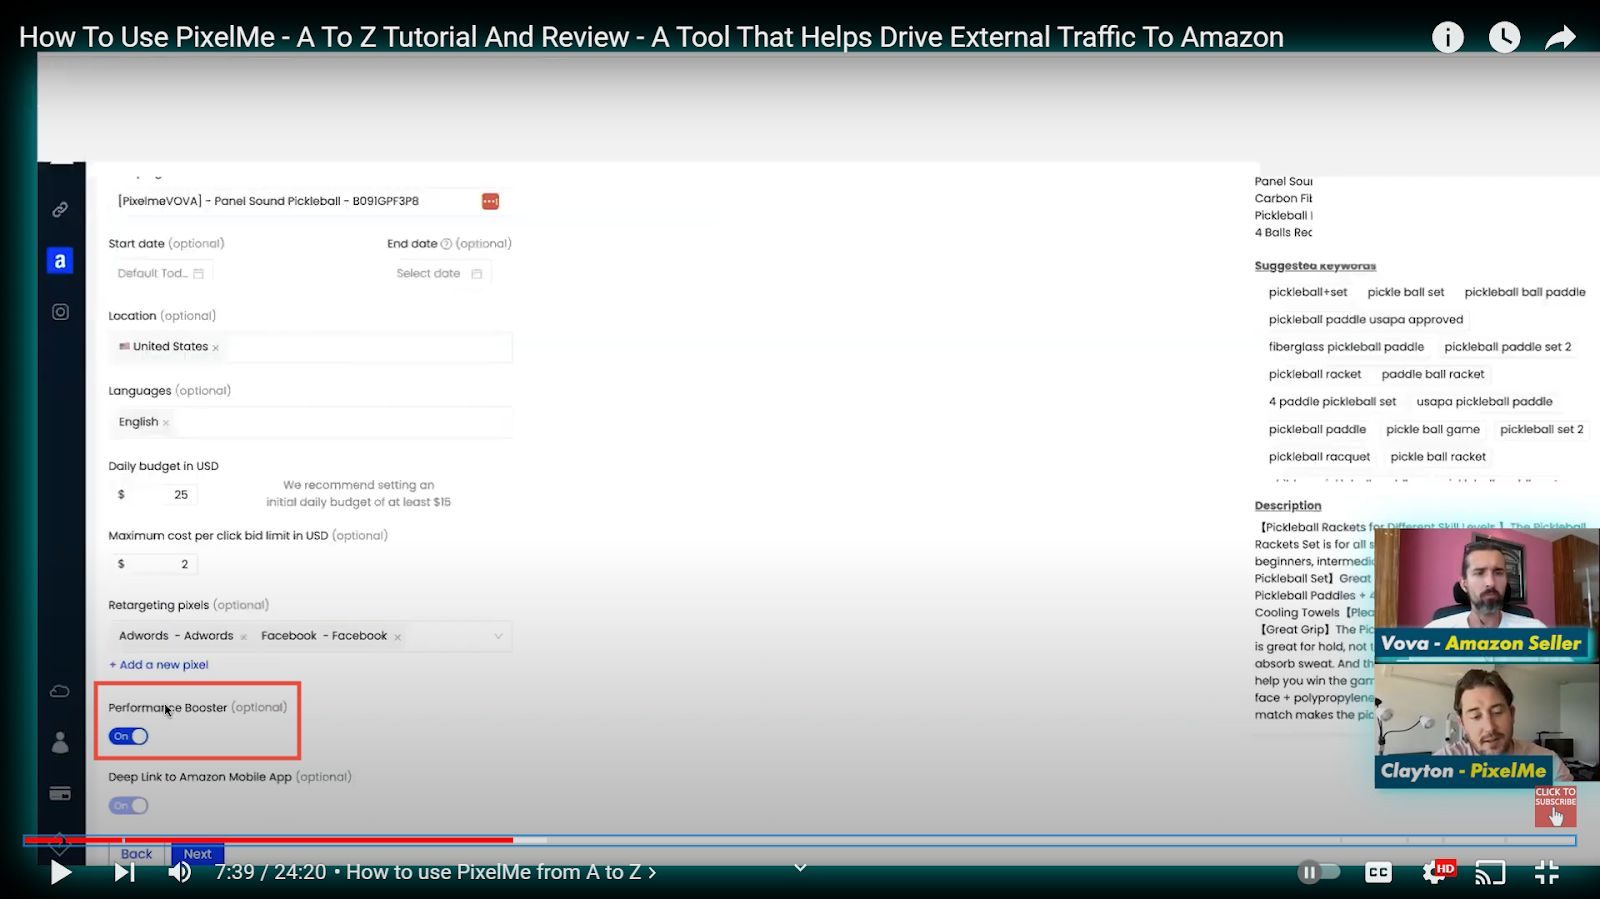
It might sound complicated, but it basically means we help optimize your campaign for conversions while staying within Amazon's terms of service.
Traditionally, there's a bit of a disconnect between what data Google Ads can see and what Amazon knows about your customers.
For instance, if you run a website where you sell directly to consumers (D2C), you might share detailed customer information with Google Ads, such as whether someone viewed a product page, added an item to their cart, or made a purchase.
Over time, Google uses this data to get better at understanding your ideal customer and showing your ads to the most relevant people.
This can include factors like age, gender, time of day, location, income level, and even marital status.
As I mentioned, PixelMe bridges this gap between Google Ads and Amazon in a way that follows Amazon's terms of service.
By using our system, we've seen some sellers experience a fourfold increase in performance after optimizing for conversions.
Let me explain this process a bit more simply.
At first, we told Google Ads to focus on getting clicks to your ad.
This is because Google needs some initial data to work with before it can truly optimize for conversions (sales).
Think of it like training a puppy – you wouldn't expect it to perfectly fetch the ball right away!
Once you start seeing conversions coming in, typically around 20 sales within 40 days, PixelMe can then switch things over to prioritize conversions.
That's when the magic happens!
With more data about who's actually buying your product, Google Ads can become much more effective at showing your ad to the right people.
Another important setting here is deep linking.
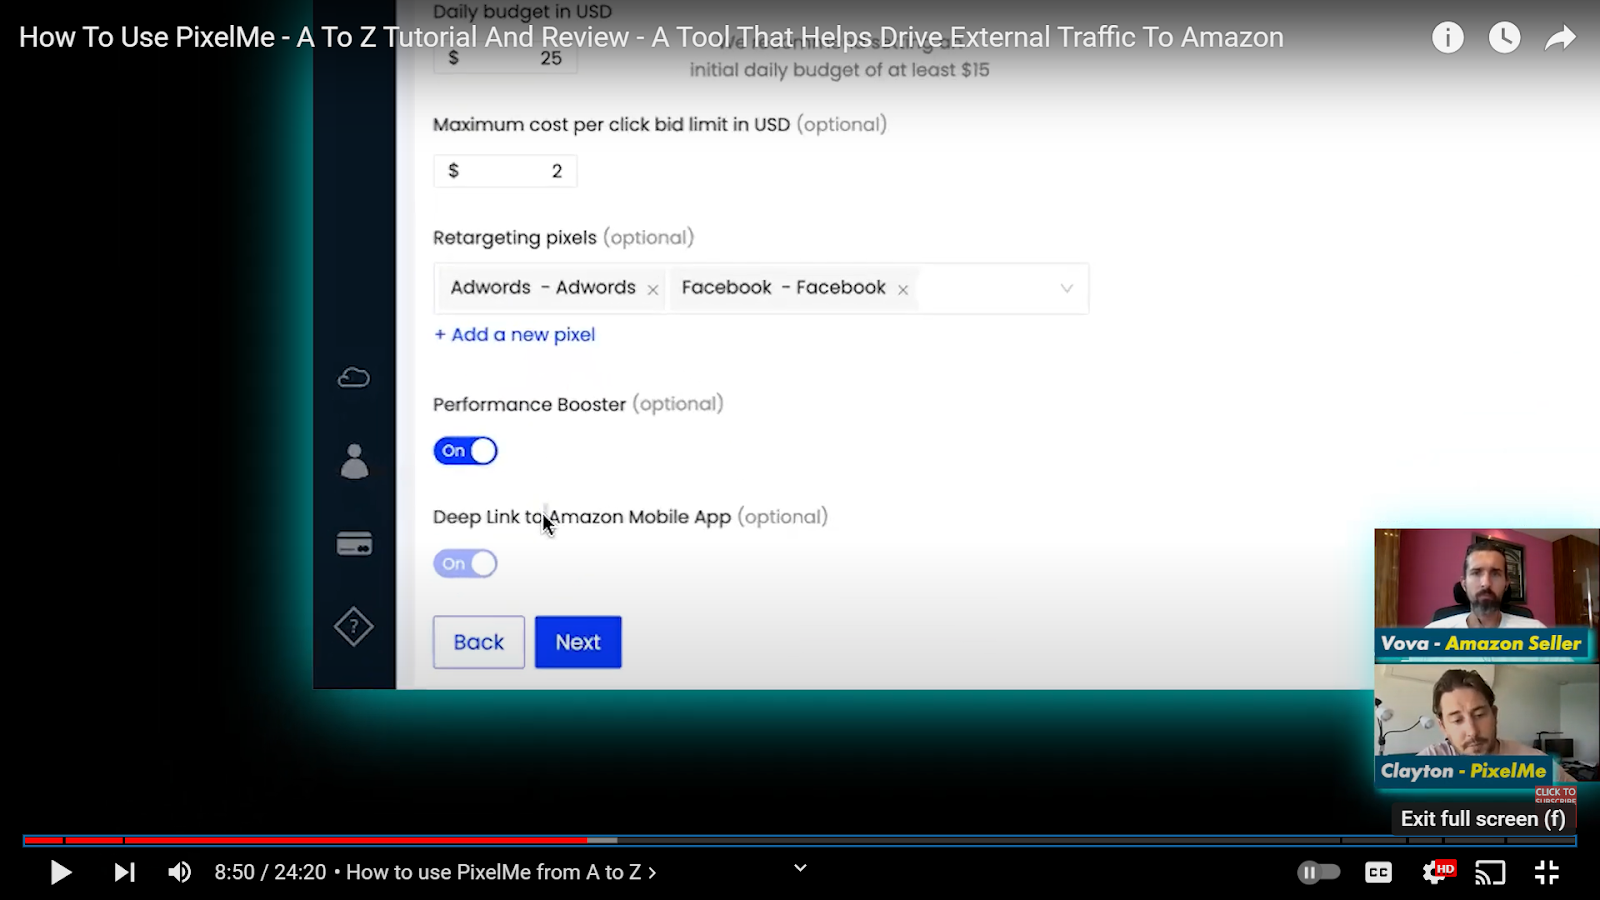
Make sure this is always turned on.
Why?
When people click on your ad from their phone, you want them to land directly within the Amazon app (if they have it installed).
This is much better than sending them to a web browser like Safari or Chrome.
Because many people aren't logged into their Amazon accounts when browsing the web.
They might not have their payment information or shipping address saved in a web browser.
By using deep linking, you increase the chances of people being able to smoothly complete their purchase within the familiar Amazon app environment.
Studies show that this can lead to about three times more conversions (sales)!
Moving on, you'll see your product title displayed here, along with some suggested keywords for your advertising campaign that come directly from Amazon.

Product description and bullet points are also given.

I'll explain why this information is important shortly.
For now, let's take a look at the "View Keyword Suggestions" feature.
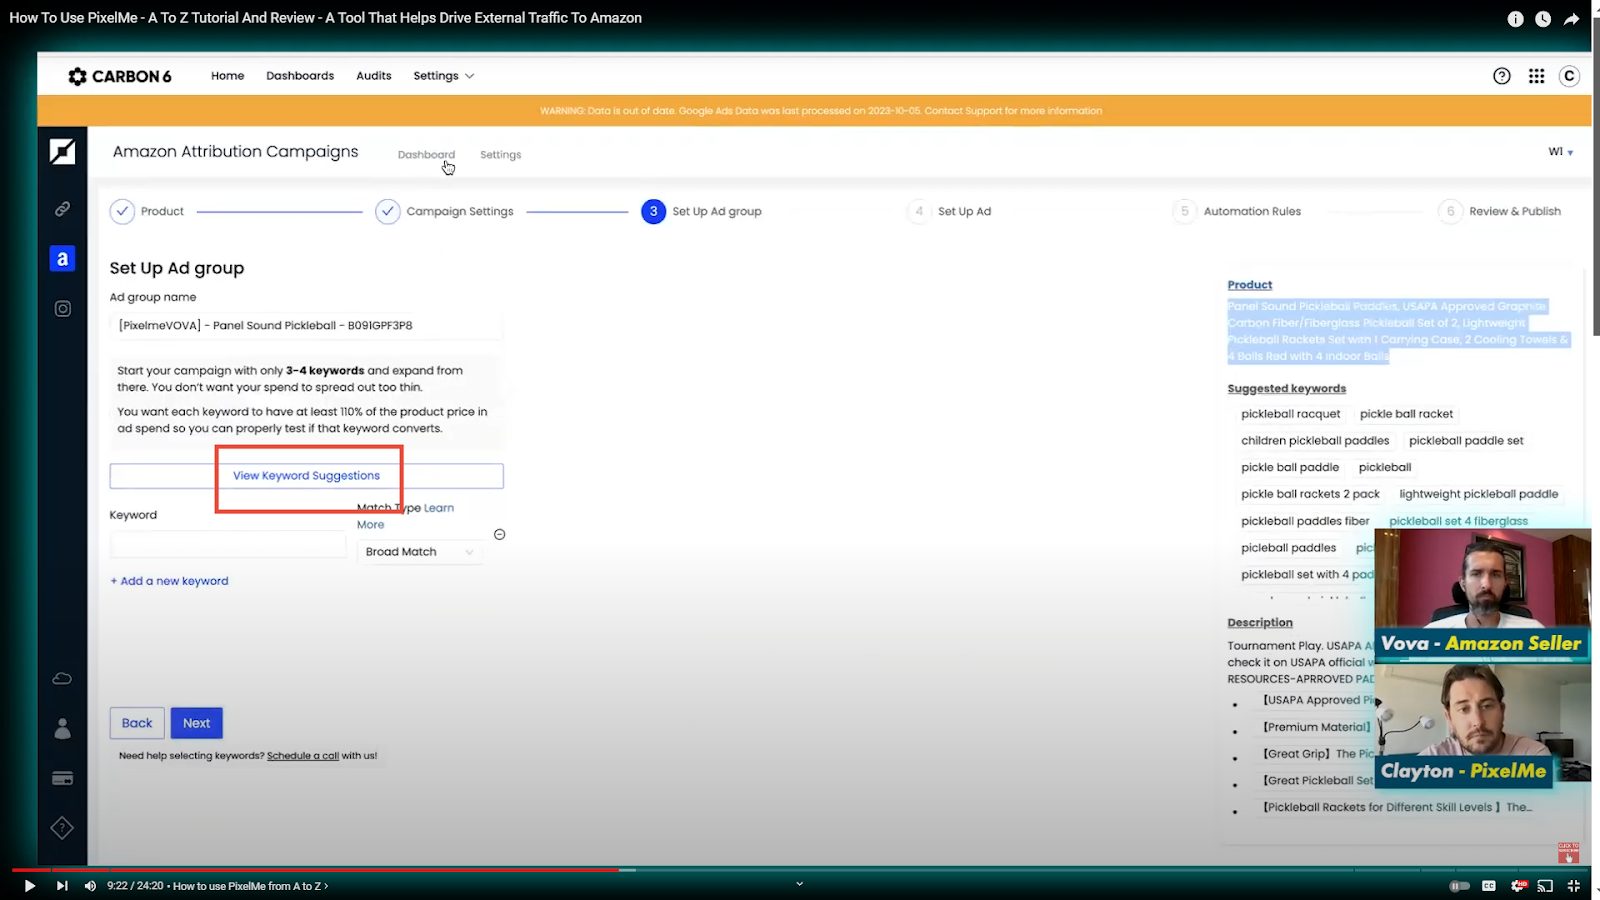
This is here to help you identify keywords to target on Google Ads.
If you already know which keywords are most profitable for your product, you can enter them manually.
But if you're unsure or haven't checked recently, this tool can be a handy way to find some of the top keywords related to your pickleball set.
While this broad term might not be ideal, it can still be helpful for finding relevant keywords that meet this criteria:
Similar Products: We want to target keywords related to products that are very similar to our own pickleball set.
Non-Sponsored: Ideally, we want to find keywords that aren't being heavily promoted by competitors through sponsored ads.
High Ranking: It's helpful to target keywords that other products similar to ours are already ranking well for on Amazon.
Competitive Price Point: The best keywords will likely be for products priced similarly to our own pickleball set.
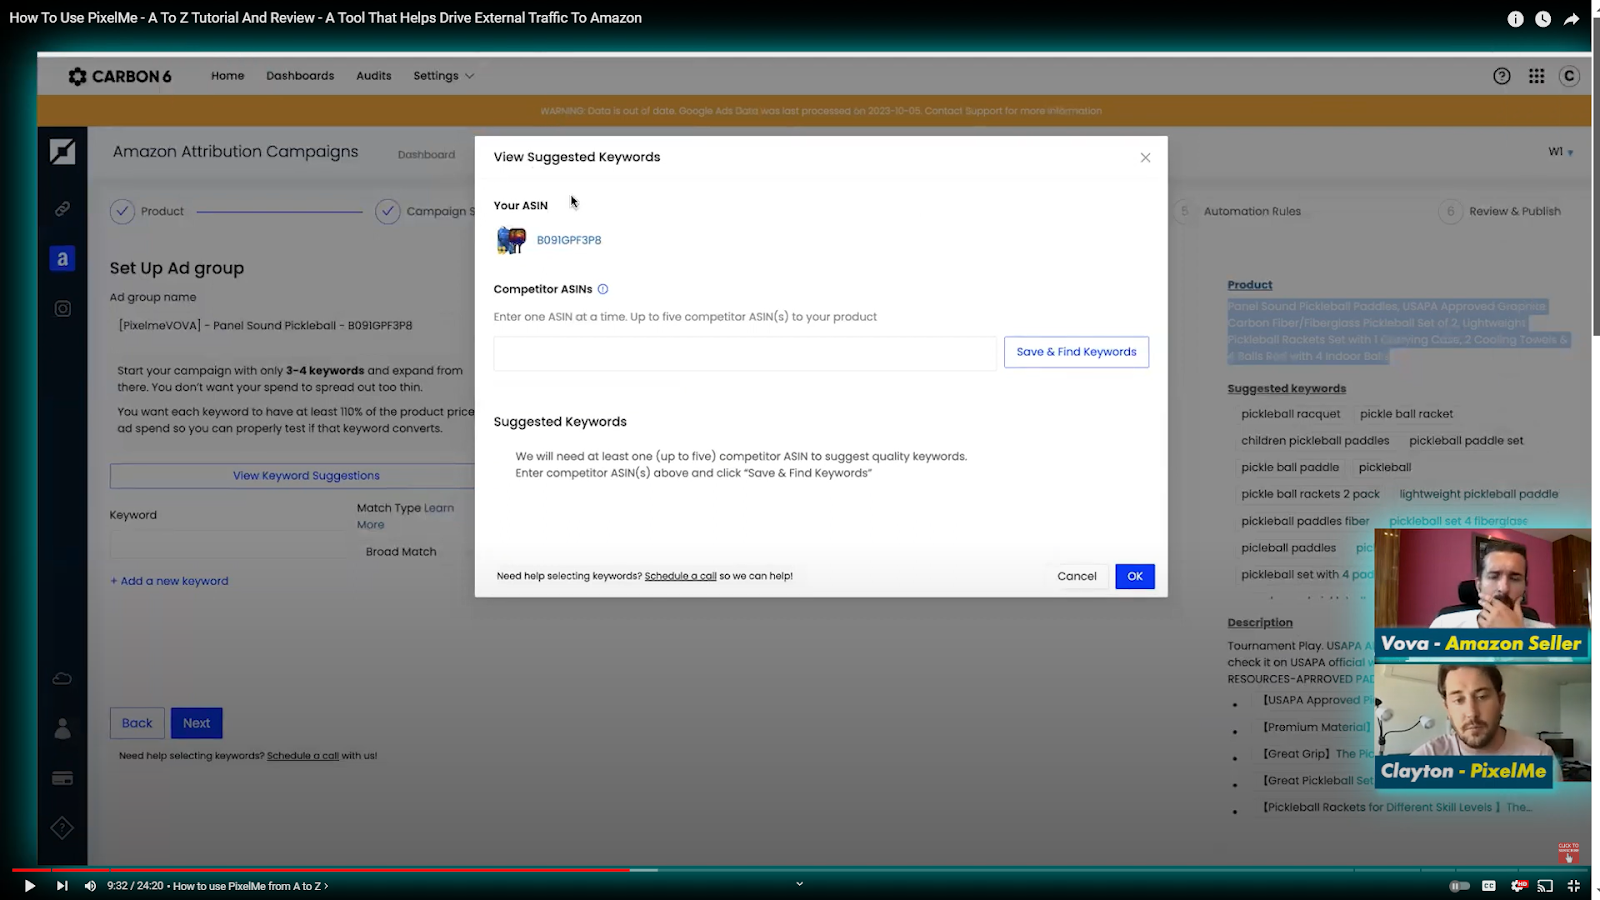
We can usually add up to five ASINs, but to save time, I'll just choose three for now.

Once you've selected the ASINs, PixelMe gets to work!
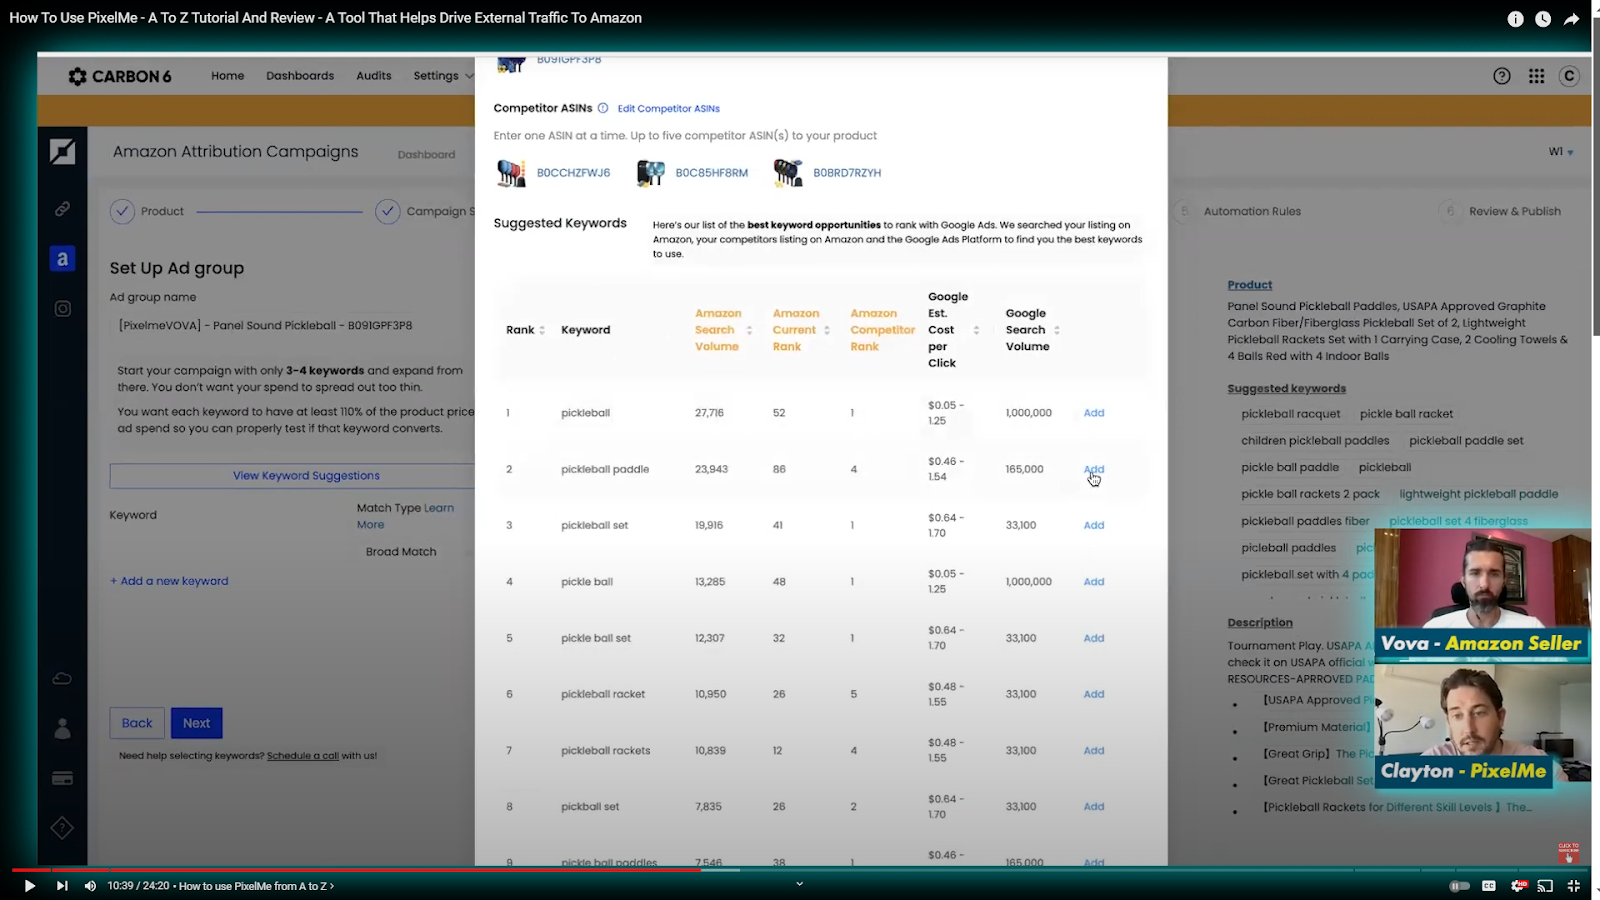
It automatically gathers valuable data for each of their relevant keywords, including:
Amazon Search Volume: This shows how often people search for that specific keyword on Amazon.
Google Search Volume: This shows how often people search for that keyword on Google.
Your Current Rank: This lets you see where your product currently ranks on Amazon for that particular keyword.
Competitor Rank: This reveals how the top three competing products rank for that same keyword.
Estimated Cost Per Click: This provides an idea of how much it might cost you each time someone clicks on your ad when using that keyword.
By considering all this information, you can make informed decisions about which keywords to target in your Google Ads campaign.
Although we have a team available to assist you, you can also select them yourself.
Here are some general tips to keep in mind:
Specificity: A broad term like "pickleball" might not be as effective as something more specific like "pickleball paddle." The more specific your keyword, the more likely it is that people searching for that term are genuinely interested in buying a product like yours.
Search Volume: Ideally, you want keywords with a decent search volume on both Amazon and Google. This means a good number of people are searching for those terms, increasing the potential reach of your ad. PixelMe provides suggested keywords with search volume data to help you make informed choices.
Cost-Per-Click (CPC): This refers to the estimated amount you'll pay each time someone clicks on your ad for a particular keyword. While some keywords might have a higher search volume, they may also come with a much higher CPC. You want to find a balance between reach and cost.
PixelMe generates a list of 100 suggested keywords, ranked based on our system's prediction of which ones will be most effective.

However, you can browse through all 100 options and choose the ones that best fit your product and budget.
Once you've chosen your keywords from PixelMe's suggestions, you can even manually add any other relevant terms you think might be missing.
By default, PixelMe sets keywords to a "broad match" type.

This means your ad might appear for searches that include your keywords, but also for searches with similar terms or variations.
Broad match keywords also tend to be cheaper than other options, because they can reach a wider audience.
-----
I invite you to get a free ASIN audit by PixelMe. You'll see if it fits your Amazon business and specific ASINs and products, and it's honestly fully free!
-----
So, we generally recommend starting with them, especially since we have teams who constantly monitor campaign performance.
They'll identify any keywords that aren't delivering results and automatically exclude them from your campaign (negative targeting).
We've also recently rolled out two new automation features.
Automated Keyword Negation: This will take the guesswork out of removing poorly performing keywords, saving you time and money.
Automated Keyword Harvesting: If a broad match keyword like "pickleball set" leads to a lot of success with a specific variation (like "pickleball set yellow balls"), PixelMe will automatically add that variation as an "exact match" keyword to your campaign. This ensures your ad shows up for those specific searches going forward.
These will streamline your campaign management even further.
Now, after you've chosen your keywords, the next step is to create headlines for your ad.
PixelMe uses ChatGPT to help with this process.
We've trained ChatGPT to understand the types of headlines and descriptions that are most likely to convince viewers to click on your ad.
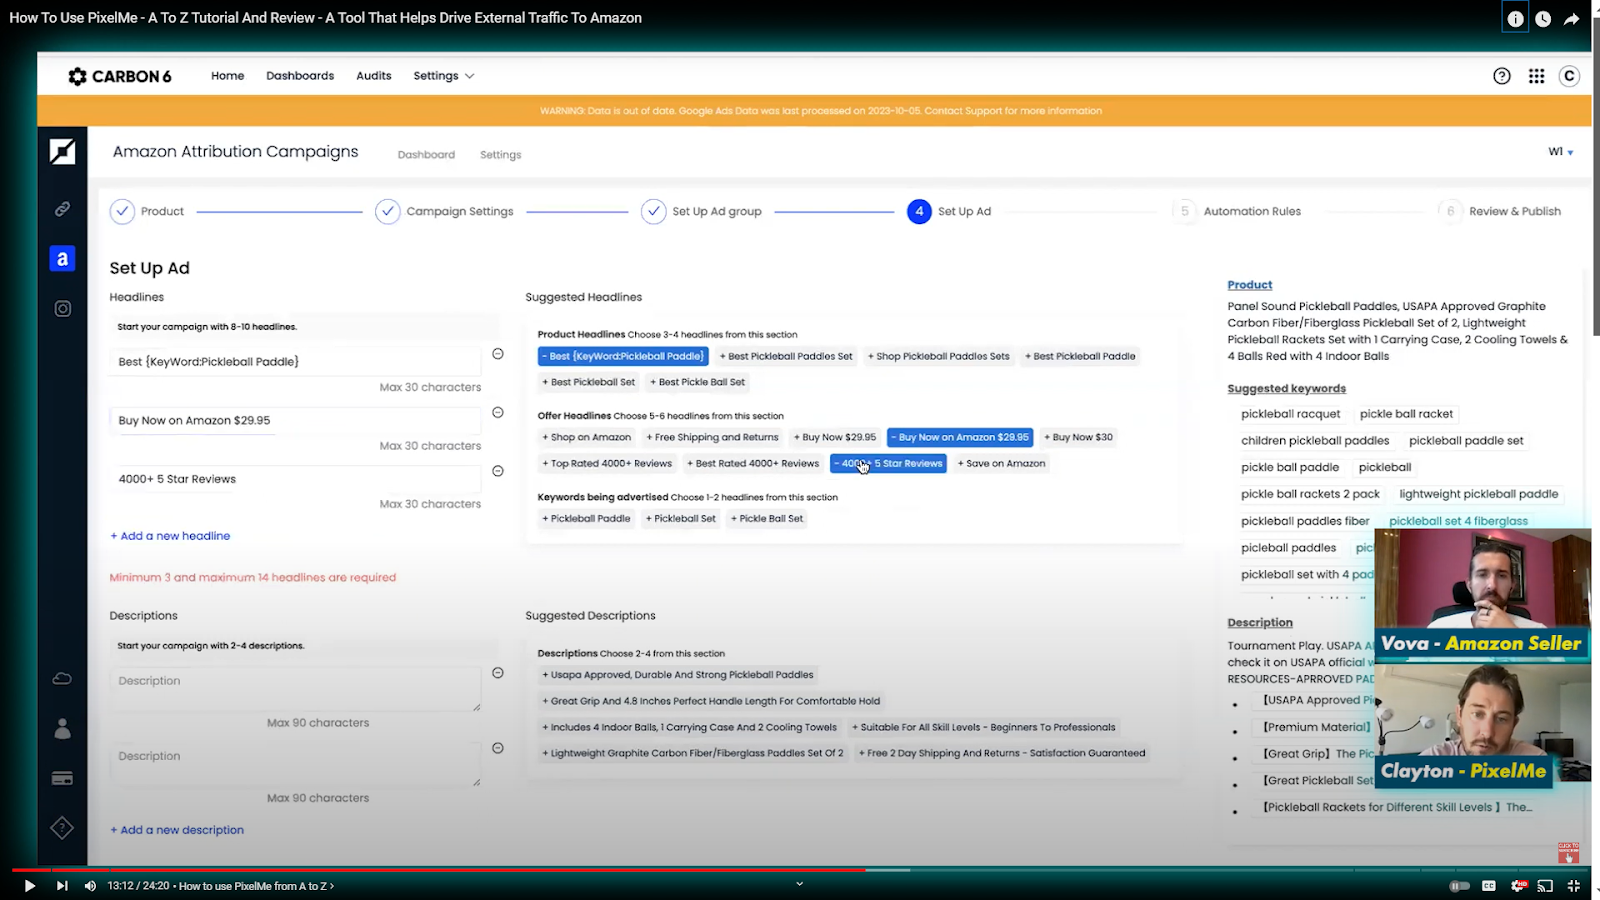
Here's a valuable tip for your headlines: always pick the first option that starts with "Best" and includes a special symbol (like a colon or squiggly line) where the keyword will be inserted.
For example, if someone searches for "pickleball paddle," your ad headline would automatically change to "Best Pickle Paddle" (Format: Best [KEYWORD]).
Likewise, if they search for "pickleball set," it might say "Best Pickleball Set."
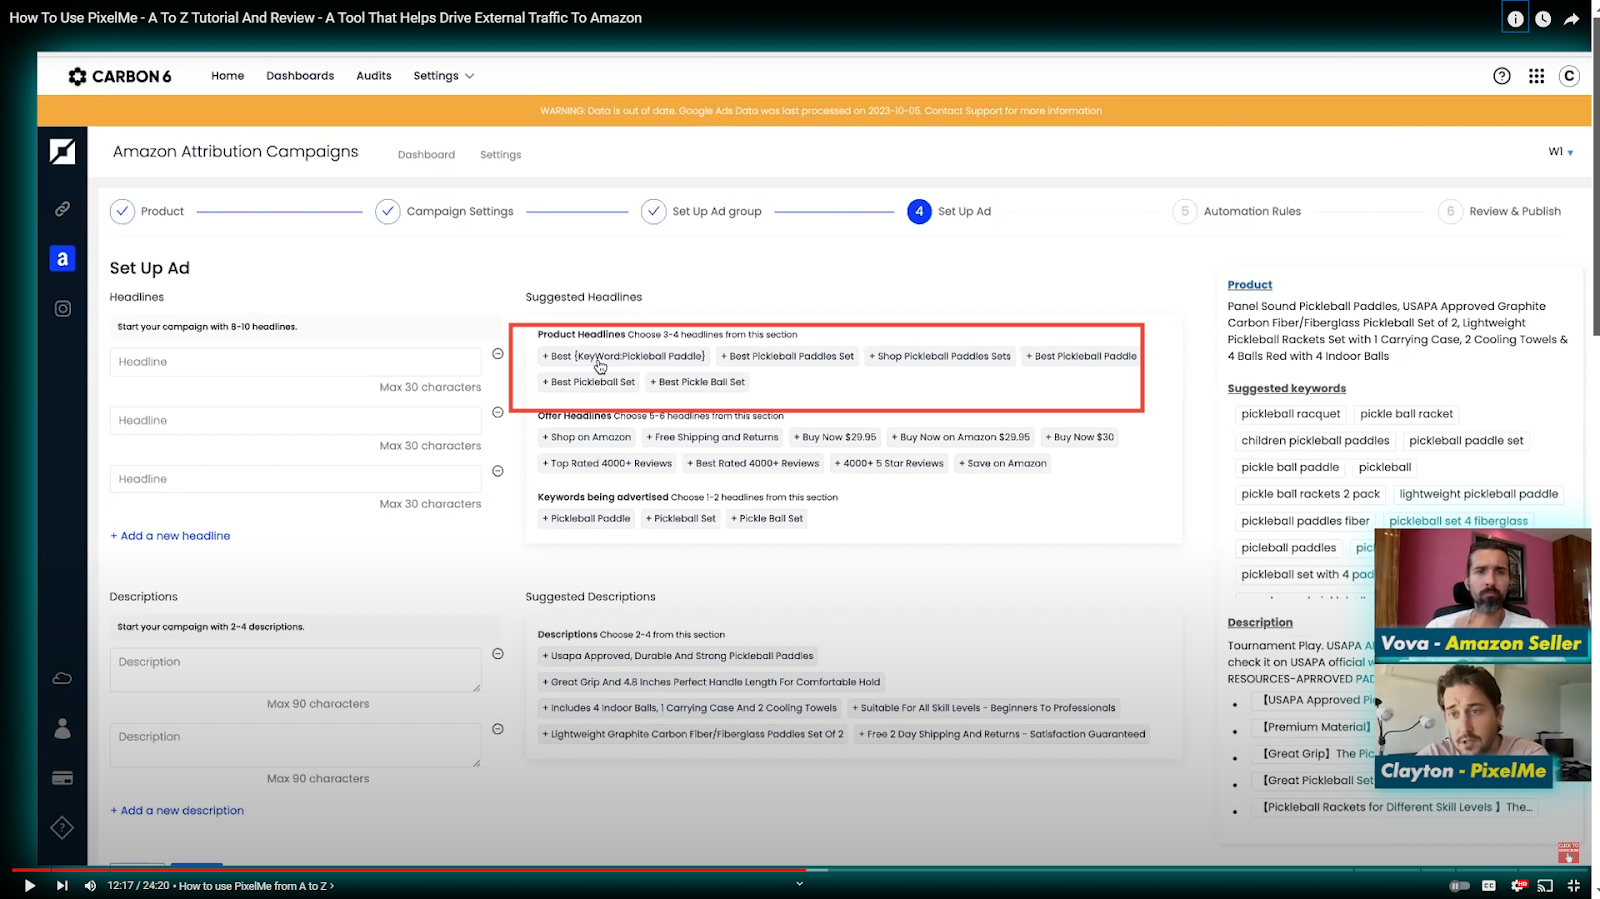
This is called dynamic keyword insertion, and it's a powerful way to make your ads more relevant to each search.
We also recommend pinning this headline to the top spot within your Google Ads account.
But if you're not familiar with pinning headlines, don't worry!
Our team is happy to help you with any questions you might have.
Another attention-grabbing headline option we recommend is "Buy Now on Amazon."

This is another good candidate for "pinning" to a top spot in your Google Ads settings because Google Ads allows you to use the word "Amazon" in your headlines – as long as your ad ultimately directs users to amazon.com.
As for including price in your headlines, here's the tip: Apparently, it seems like including your product's price could lead to fewer clicks overall.
However, it can actually be a good strategy, especially for higher-priced items.
When people see the price upfront, they'll have a clearer idea of what they're getting and are less likely to click out of your ad if they find the price too high later.
This helps avoid what we call "bounce rate," which is when someone clicks your ad but then quickly leaves the Amazon page because the product isn't what they expected.
So, by including the price in your headline for premium products, you attract viewers who are genuinely interested in that price range, potentially leading to more qualified clicks and sales.
So, I recommend pinning both of these for your campaign.
Besides them, you can pick some offer headlines.
For example, using a line like "4,000+ 5 Star Reviews" can give potential customers confidence in your product.
Likewise, a headline like "Free Shipping and Returns" would be a major perk for many online shoppers, so be sure to mention it if it applies.

Now it's time to craft the description lines for your ad.
PixelMe offers some suggestions, but these can always be customized to better reflect the unique selling points of your product.

Taking a closer look at the product itself can help you identify other compelling details to include.
For instance, is it approved by a relevant governing body like the USA Pickleball association?
Does it have unique features like perforated tape?
Focus on these special characteristics and the benefits they provide to potential buyers.
The goal is to create a description that encourages viewers to click on your ad and learn more.
After finalizing the description, you can quickly scan the suggested bullet points.
While PixelMe offers recommendations here too, I recommend checking the product details to see if there's anything even more specific you can mention.
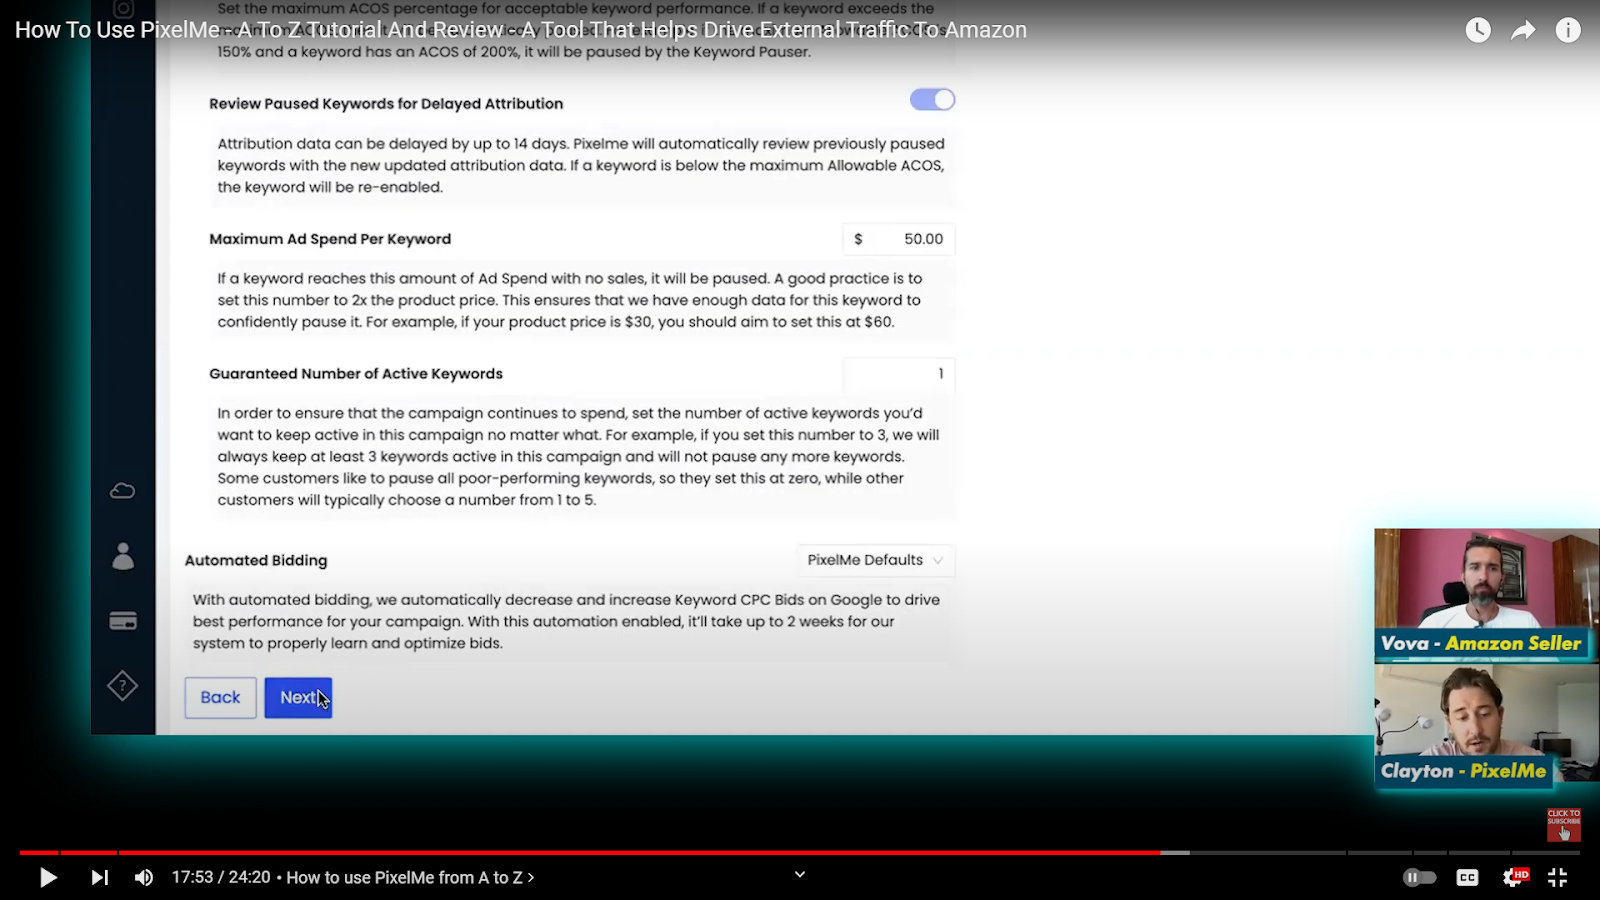
With the descriptions and bullet points in place, I can click "Next" to move on to the automations section – nearly the final step in this ad creation process!

PixelMe comes with some default automation settings that I generally recommend keeping enabled.

However, you do have the flexibility to:
Disable Automations: This is generally not recommended, but you can choose to turn off all automated features if you prefer.
Create Custom Automation Rules: PixelMe allows you to create your own custom rules for managing your ad campaign. While we provide helpful defaults, you might have specific preferences for how you want your budget to be spent.
One of the most important automations PixelMe offers is automatic pausing of underperforming keywords.
Here's how it works:
ACOS (Advertising Cost of Sale): This metric tracks how much you spend on advertising to generate one sale. A higher ACOS indicates that your ads are less efficient at converting clicks into sales.
Spend Limit: You can set a maximum amount you're willing to spend on a particular keyword. A common recommendation is to set this limit at around double the price of your product.
For example, let's say you set a maximum spend of $50 on a keyword, which is roughly double the price of your product (a common recommendation).
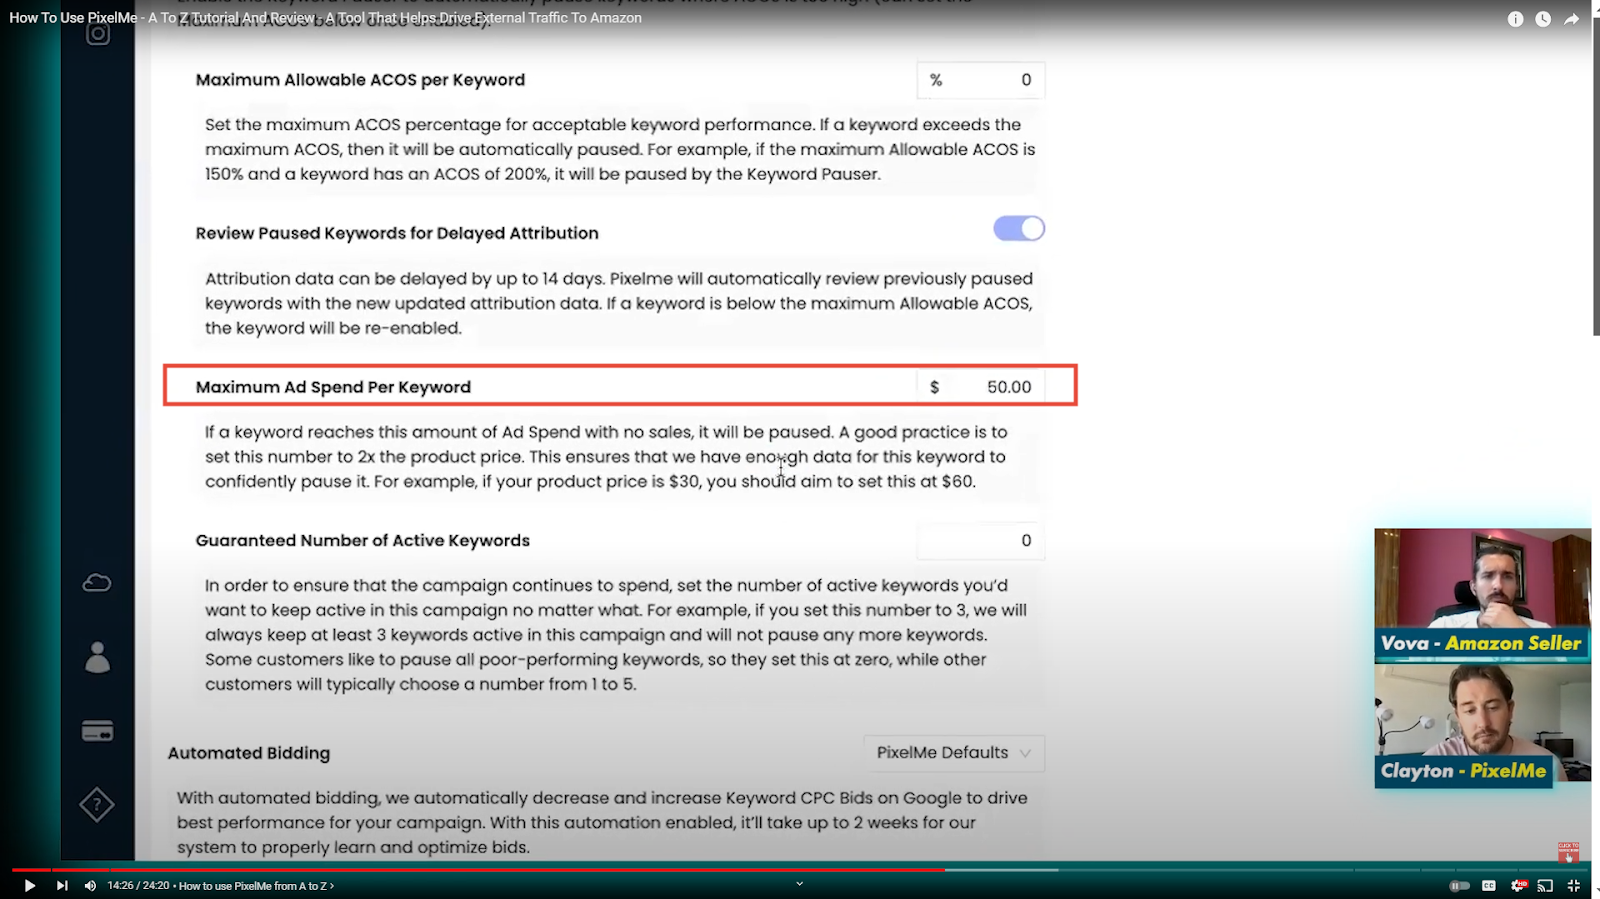
If that keyword has an ACOS exceeding 100% (meaning you're spending more than you're earning) and has already reached the $50 limit, PixelMe will automatically pause it.
This prevents you from continuing to invest in a keyword that isn't performing well.
Together, these two automations optimize your campaign.
But remember, optimizing your Google Ads campaigns doesn't always lead to immediate sales (conversions).
It can also drive valuable traffic that builds brand awareness and fosters leads for future conversions.
Here's how and why:
Top-of-Funnel Awareness: While some Google searchers might be ready to buy right away, others are still in the research phase. By appearing in relevant Google searches, you can introduce your product to potential customers who might not be aware of it yet.
Boosting Organic Rank on Amazon: This might sound surprising, but driving traffic from Google Ads to your Amazon product listing can actually improve your organic ranking on Amazon itself! When Amazon sees external interest in your product, they may view it more favorably and increase its visibility in search results.
We've seen this happen with some clients who had an ACOS as high as 150% on their Google Ads campaign.
However, even though their Google Ads weren't generating a direct profit, their overall TACOS went down significantly.
This is because the increase in organic rank on Amazon led to more sales without any additional ad spend.
In these cases, the client saw the value in continuing to invest in Google Ads, even though the ACOS was high on its own.
Next, let's talk about the impact of product price on your advertising strategy.
Generally, cheaper products tend to have a higher ACOS on Google Ads compared to what you might see with advertising directly on Amazon.
This is because the cost per click often stays around the same regardless of your product's price.
For instance, you might pay $1 per click whether you're advertising a $10 item or a $500 item.
However, there are ways to make this work to your advantage, especially with higher-priced products.
Here's why:
Cost Per Click Stability: As mentioned before, the CPC on Google Ads often remains consistent even for expensive products. So, while a $10 product might only yield a $1 profit from a Google Ads click, a $500 product could potentially bring in a $499 profit (after accounting for the cost per click).
Brand Referral Bonus: If you're selling in the USA, Amazon offers a 10% brand referral bonus. This means you get an extra $50 back for every $500 item sold through your ad. This sweetens the deal even further for expensive products.
So, if your primary goal is immediate profit from Google Ads conversions, then focusing on higher-priced products can be a good strategy.
However, there's another way to look at it: As discussed earlier, sending traffic from Google Ads to your Amazon listing can improve your organic rank on Amazon itself.
This can lead to more sales without any additional ad spend.
You might also be willing to accept a higher ACOS on Google Ads in this case.
This allows you to focus on the overall cost of acquiring a sale (TACOS) instead of just the ad cost itself.
In short, any product can potentially benefit from Google Ads, depending on your overall goals.
Anyways, that was a bit of a detour, so let's get back to automations again.
As mentioned, you can customize these settings to fit your preferences.
For example, you can set maximum ACOS for pausing keywords. This automation lets you set a threshold. You can create a rule that automatically pauses any keyword with an ACOS exceeding 150% after it's spent at least $50.

This helps prevent you from wasting money on poorly performing keywords.
Then, you can review paused keywords for delayed attribution.
What that means is there can sometimes be a delay in how Amazon attributes sales to your advertising efforts.
A keyword might be paused due to high ACOS, but then additional sales linked to that keyword could trickle in over the next two weeks.
PixelMe addresses this by automatically recalculating the ACOS when new data becomes available.
If the recalculated ACOS falls within your acceptable range, the keyword will be automatically re-enabled.
For added security, you can also set rules to prevent PixelMe from pausing all your keywords at once.
For instance, you can create a rule that instructs PixelMe to always keep at least one keyword running, even if the others are temporarily paused due to performance issues.

You can also instruct PixelMe to keep the single best-performing keyword active no matter what.
Finally, our tool offers automated bidding strategies.
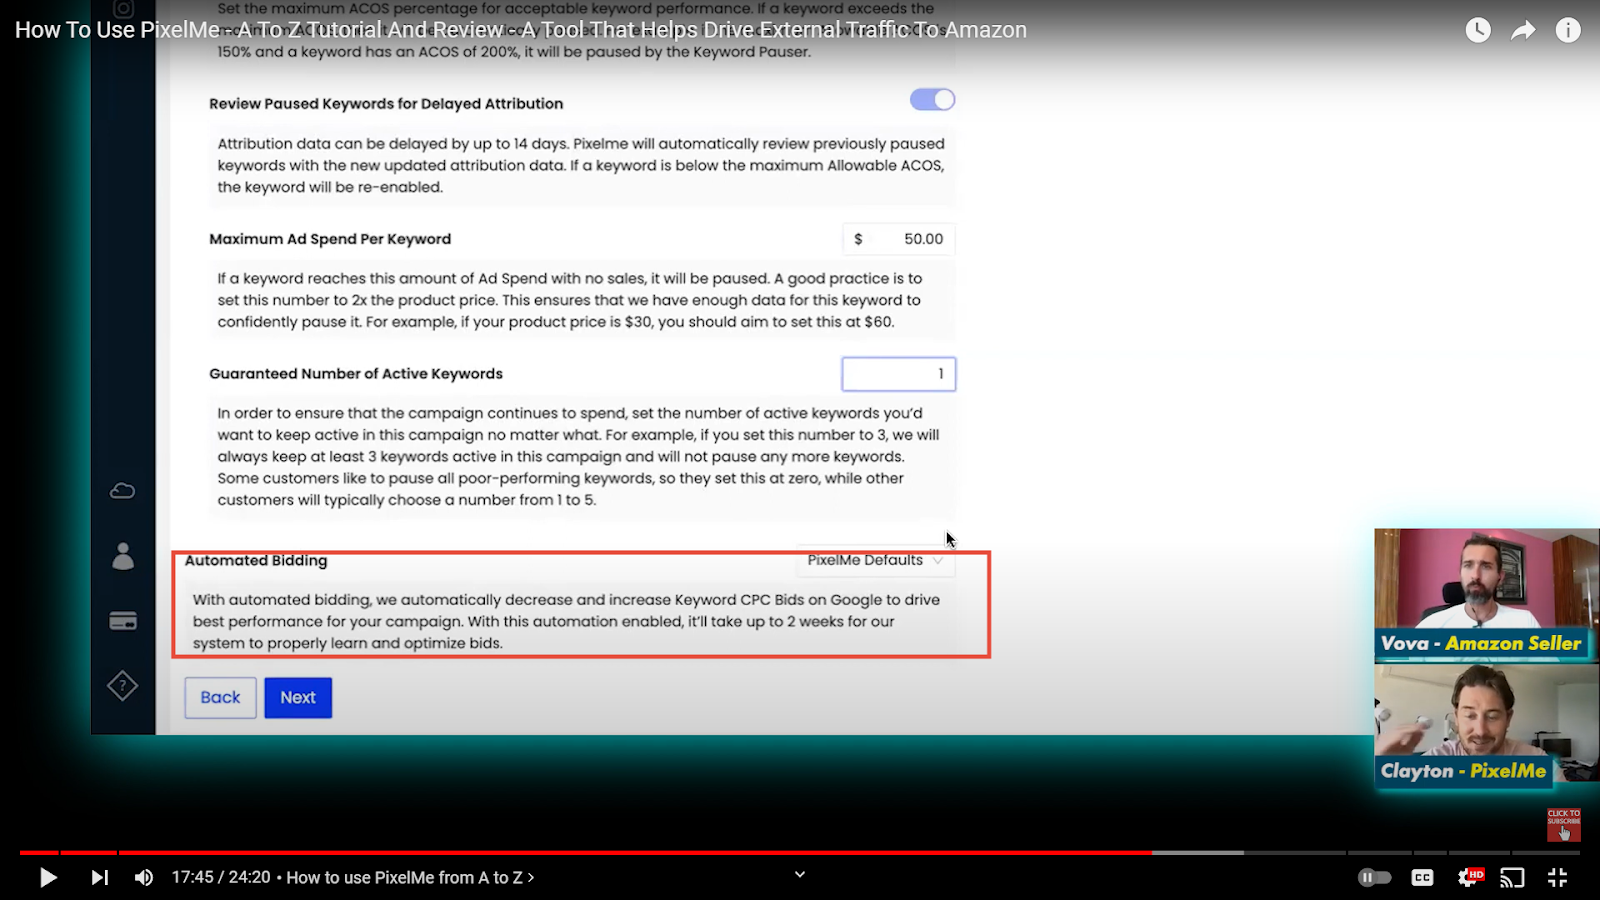
We'll delve deeper into this topic later, but here's a quick overview:
The tool typically starts by aiming to maximize clicks for your campaigns.
It then transitions to a manual CPC strategy, gradually lowering your bids to optimize your return on ad spend.
If a keyword is underperforming before we pause it, PixelMe takes steps to try and improve its outcome.
It will gradually lower the bid on that keyword, essentially telling Google you're willing to pay less for each click.
This incentivizes Google to show your ad to users who are more likely to be interested in your product, hopefully leading to a better ACOS.
Of course, there's a limit to how low you can set your bid.
Eventually, Google might decide your bid is too low and stop showing your ad altogether.
If that happens, PixelMe will automatically raise the bid slightly to get your ad back in circulation.
The same logic applies when PixelMe switches your campaign to optimize for conversion.
In this case, you set a target Cost Per Acquisition (CPA), which is basically the amount you're willing to spend to get someone to take a desired action, like making a purchase.
PixelMe will then automatically adjust your bids up or down depending on whether Google is meeting your CPA target.
Since implementing these automated bidding strategies, we've seen a significant improvement in campaign performance for many clients.
Click "Next" and you'll see the preview.

It's not the final product, but it should give you a general idea of what your ad might look like.
Remember that while PixelMe offers a solid foundation, there are additional steps you can take to optimize your campaign, especially when it comes to identifying and removing irrelevant keywords (negating).
Our team offers comprehensive launch services that include adding features like callout extensions and adding images to your campaign.
We don't try to replicate everything Google Ads offers within PixelMe – that would be redundant.
Instead, we focus on providing valuable tools and automation while giving you the option to leverage additional functionalities directly within Google Ads.
This covers the basics of using PixelMe for your ad creation.
If you'd like a copy of our Standard Operating Procedure (SOP) that outlines the entire launch process, including adding price extensions and callouts, feel free to reach out to me or the team.
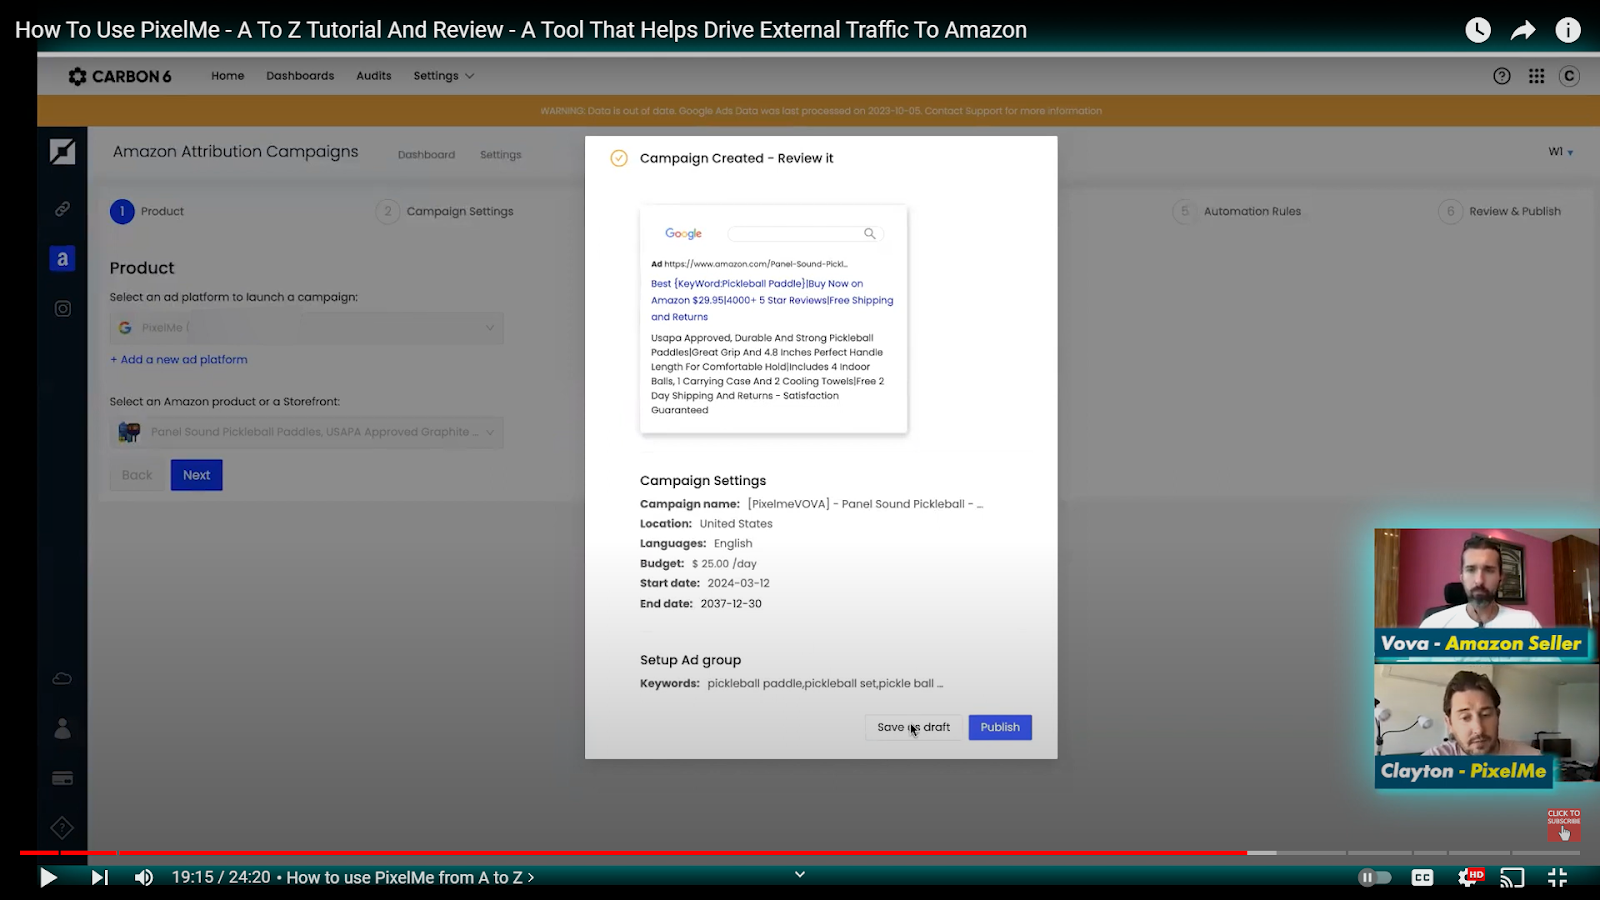
Once you've finished creating your ad campaign, this screen provides a summary of all your selections.
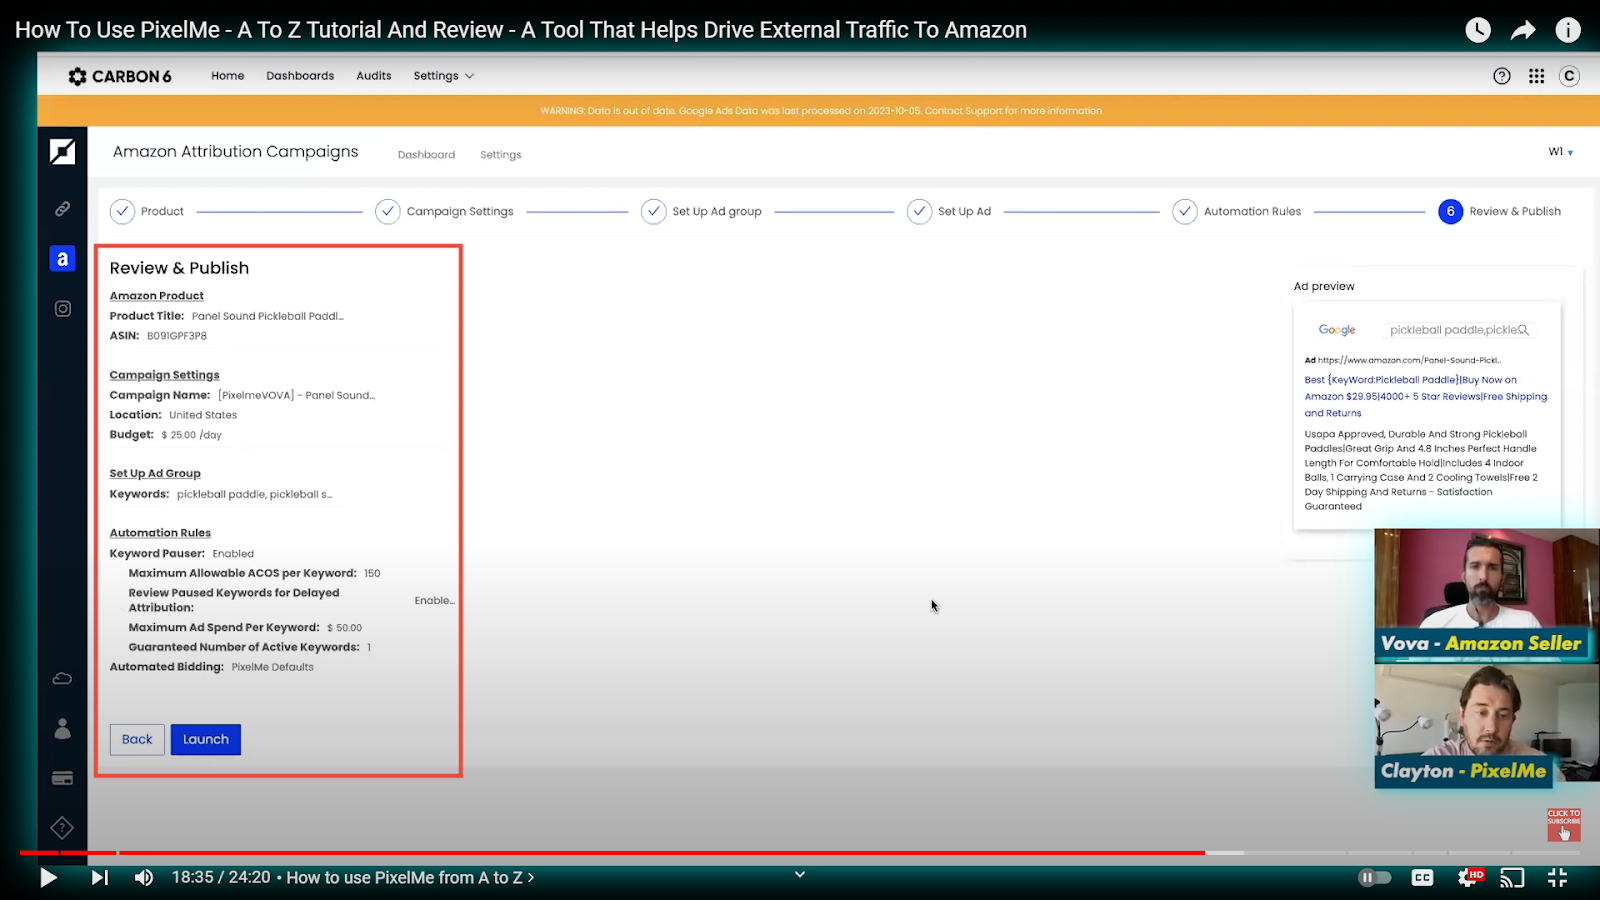
Clicking "Launch" will make your ad live on Google, typically resulting in impressions within 24 hours.
This is where the real work begins – monitoring and evaluating your campaign's performance.
We recommend checking in after a few weeks to see how things are going.
Here are some key metrics to watch:
Keyword Rank: Are your ads appearing higher in search results for relevant keywords? This is a good sign that your campaign is gaining traction.
Total Advertising Cost of Sale: Ideally, you want to see your TACOS decrease over time. This indicates that you're getting more sales or conversions for the same amount of advertising spend.
Best Seller Rank: An improvement in your product's BSR on Amazon can be another positive indicator of your campaign's effectiveness.
It's important to remember that achieving optimal campaign performance takes time.
-----
I invite you to get a free ASIN audit by PixelMe. You'll see if it fits your Amazon business and specific ASINs and products, and it's honestly fully free!
-----
It doesn't happen overnight and can take up to three or four months to reach the "optimization for conversion" stage.
Then, you can expect to see a decrease in TACOS, an increase in keyword rank, and a boost to your product's BSR.
I'm going to save my ad campaign as a draft for now.
THis type of ad creation is not suitable for all products.
For instance, our data suggests that products with a customer rating below 4.3 stars tend to have a harder time achieving success through advertising.
Additionally, certain categories can be more challenging.
For example, if you're selling something like clothing, jewelry, or other highly personal items, potential customers might be more likely to browse and compare options before making a purchase.
They might not be as likely to click on the first ad they see and buy right away.
The same goes for essential, non-customizable products like hammers.
Someone searching for a hammer likely has a specific need and isn't interested in browsing various options – they just want to find a hammer quickly and efficiently.
So, products that are typically researched or browsed before purchase might not be the best fit for this type of advertising strategy.
So, that covers the basics of creating a campaign in PixelMe – it should take about 10-15 minutes from start to finish.
This walkthrough hopefully gives you a good idea of the process involved and the different elements you'll be working with.
The good news is that creating links for influencers follows a similar approach.
Here's a quick overview:
Create a Link: Instead of building a full campaign, you'll focus on creating a single link specifically for an influencer.

Organize by Partner: For easy identification, you can assign a label to the link, such as the influencer's social media handle (e.g., "Instagram Influencer").

Track Performance: PixelMe allows you to add tracking pixels to these links, providing valuable data on how effective they are in driving traffic to your product on Amazon.
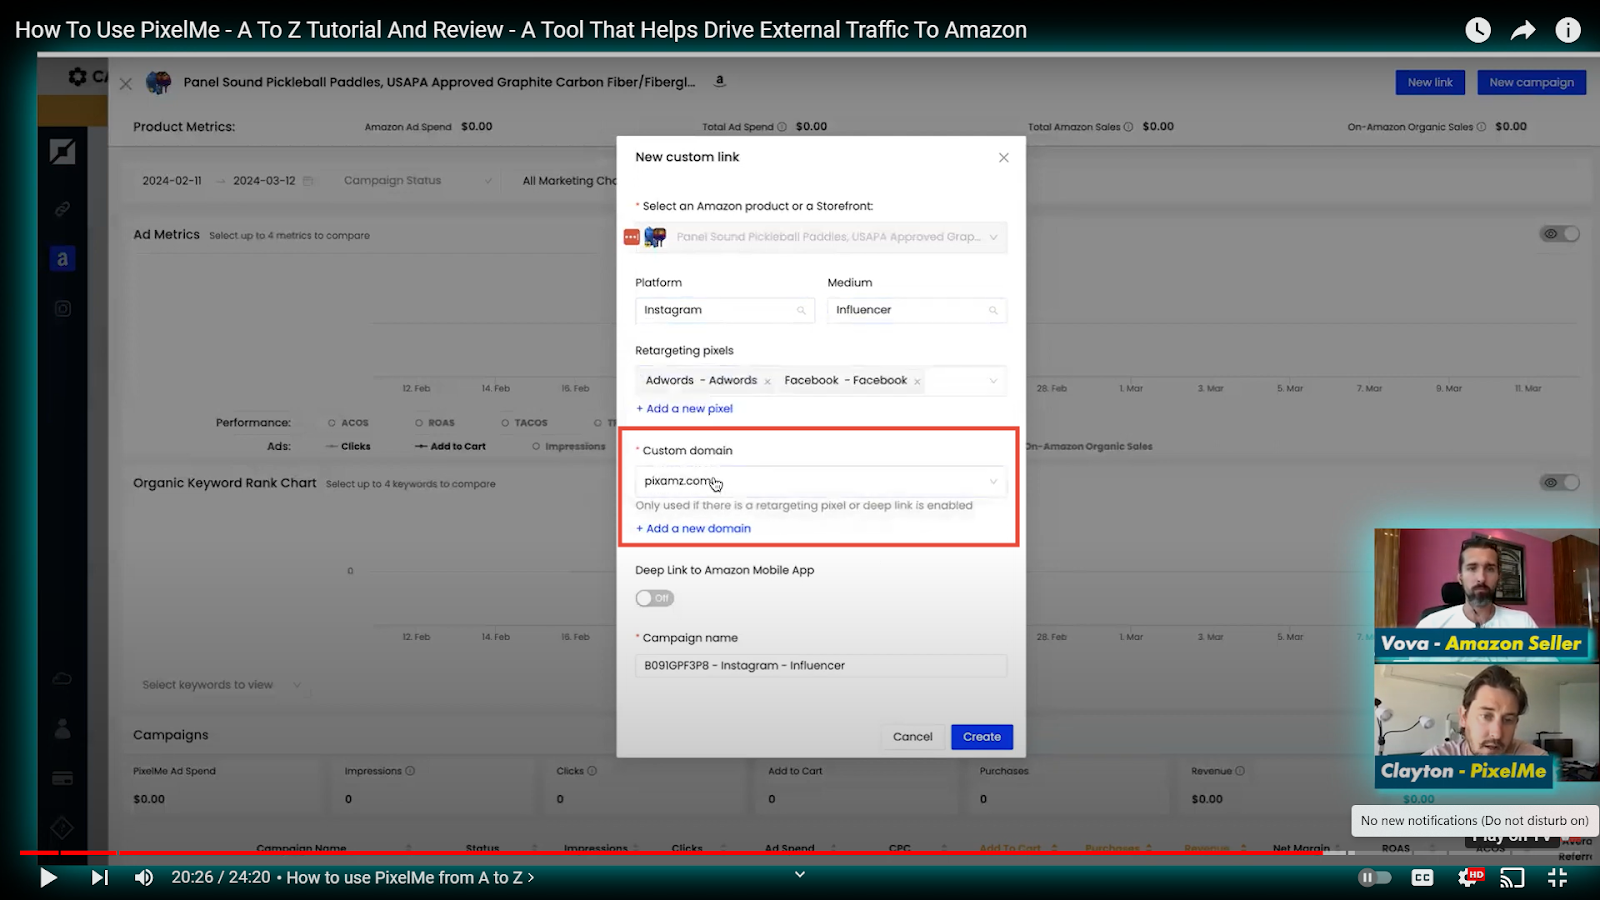
Customize Domain: You have the option to use either your own custom domain or PixelMe's deep link domain for the influencer link.

Simple Link Creation: Once you've entered the necessary details, PixelMe generates a unique link that automatically includes Amazon attribution tags. This means that when someone clicks the link and makes a purchase, you'll receive credit for the sale.
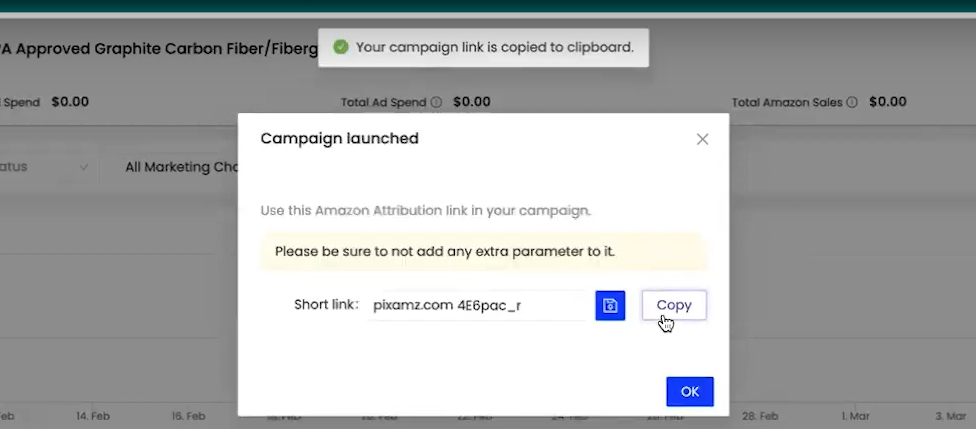
Easy Sharing: Simply copy the generated link and provide it to your influencer partner to include in their content. Clicking the link will take users directly to your product page on Amazon.
As you can see, creating influencer links in PixelMe is a quick and straightforward process.
Vova: That covers most of the important points, Clayton!
Here's a quick rundown for our viewers:
If you're interested in trying PixelMe to manage your own Google Ads campaign, click on the button below.
This is a good option for folks who are already familiar and comfortable with Google Ads.
Of course, if you'd prefer some help getting started, PixelMe also offers services to manage your campaign for you.
Here are the two key requirements to get started with them:
An active Google Ads account: This is where you'll create and manage your actual advertising campaign.
An active brand on Amazon, registered through Amazon Brand Registry: This allows PixelMe to track sales accurately and attribute them to your advertising efforts. You'll also want to enable the brand referral bonus program if you'd like to take advantage of that additional benefit.
Once you have these two things in place, PixelMe can integrate them seamlessly to help you launch and optimize your advertising campaign.
Clayton: That's absolutely correct.
As you mentioned, there are a couple of other platforms you can connect to PixelMe besides Google Ads, but my focus is on Google Ads for now.
Here's a quick overview of the setup process:
Connecting Accounts: Within your PixelMe dashboard, you'll find a section for account connections. Here, you can link your Google Ads account to PixelMe. This allows PixelMe to access and manage your advertising campaigns directly.
Amazon Integration: There's also a dedicated section for Amazon Attribution. This involves connecting PixelMe to your Amazon Seller Central account through two unique codes: the Amazon Attribution API and the Seller Central API. It's important to ensure these two codes match for accurate data tracking.
Once you've completed these connections, you're ready to start using PixelMe to manage your Google Ads campaigns for your Amazon products.
An additional tip for those new to Google Ads is that Google often offers a promotional credit for new users.
For example, you might be able to get a $500 credit where Google will match your initial advertising spend of $500.
This can be a helpful way to test out the platform and see how it works for you.
Vova: Absolutely! If you have any questions as you read this article, feel free to leave them in the comments section of its video and we'll do our best to answer them.
As Clayton mentioned, the process of setting up and managing PixelMe campaigns is fairly straightforward.
-----
I invite you to get a free ASIN audit by PixelMe. You'll see if it fits your Amazon business and specific ASINs and products, and it's honestly fully free!
-----
We've aimed to provide a clear step-by-step explanation throughout these installments.
For those who are looking to achieve the absolute best results, using a service like PixelMe can be a smart investment.
PixelMe team consists of experienced professionals who manage a vast network of ASINs.
Their expertise allows them to stay up-to-date on what's working best in the world of Amazon advertising.
This can be a significant advantage when it comes to crafting high-performing ad campaigns.
Of course, the choice ultimately depends on your comfort level and budget.
While there is a cost associated with using PixelMe's services, the potential return on investment can be substantial, especially when you factor in the time saved and the potential for increased sales.
The ultimate goal, as Clayton mentioned, is to improve your organic ranking on Amazon.
By strategically using advertising to drive traffic to your product listings, you can climb the ranks for relevant keywords.
And let me tell you, seeing your products appear higher in search results is definitely a rewarding experience!
Clayton: That's right!
We have numerous case studies on our website that demonstrate a clear link between using PixelMe and an increase in organic rank on Amazon.
In fact, some clients have even seen their ranking drop after stopping PixelMe and their advertising campaigns.
Vova: Yeah, so I highly suggest you check out the PixelMe website and see how their services can help you achieve your goals on Amazon.
Hopefully, with the right strategies in place, you'll be able to climb the organic ranking ladder and experience the satisfaction of increased sales and a thriving Amazon business.
On that note, Clayton, thanks again for joining me today!
Your energy and enthusiasm are always a pleasure to have on the channel.
You're a welcome guest anytime.
Clayton: The feeling is mutual, Vova.
Despite a long day traveling back from Prosper, I always enjoy our conversations and being a part of your channel.
The valuable content you provide truly benefits a lot of people.
Vova: Thanks, Clayton!
Conclusion
That wraps up my conversation with Clayton about PixelMe!
If you're selling on Amazon and considering advertising to boost your sales, this article should be a helpful resource.
We covered a lot of ground, from setting up PixelMe to understanding how it can help you climb the organic ranking ladder on Amazon.
Thanks for tuning in, and don't forget to utilize the offer I shared for PixelMe!
Until next time.
Best,
Vova :)
-
PixelMe for Amazon FBA: A-Z Tutorial and Review to Drive External Traffic and Get Sales
- Introduction
- Meet My Guest – Clayton Atchison
- How to Use PixelMe – A to Z Tutorial
- Conclusion
Disclosure: Hi! It's Vova :) Some of the links in this article may be affiliate links. I get a commission if you purchase after clicking on the link, this does not cost you more money, and many times I can even get a nice discount for you. This helps me keep the content free forever. For you. Thank you! :)