Sellerboard For Shopify - Settings Tab Tutorial And How To Invite Users To Your Account

-
Understanding the Settings Tab in Sellerboard for Shopify
- 1. Refund Calculation
- 2. Shipping Calculation
- 3. Cost of Goods (COG) Defaults
- 4. Excluding Orders from Calculations
-
Inviting Users to Your Sellerboard Account
-
Why These Settings Matter
-
Final Thoughts
Disclosure: Hi! It's Vova :) Some of the links in this article may be affiliate links. I get a commission if you purchase after clicking on the link, this does not cost you more money, and many times I can even get a nice discount for you. This helps me keep the content free forever. For you. Thank you! :)
Ever wondered how to fine-tune Sellerboard for Shopify so it works exactly the way your business needs?
In this guide, I’ll walk you through the Settings tab step-by-step and show you how to invite other users to your account.
Whether you’re selling solo or working with a team, this will help you set up the platform for accurate analytics and smooth collaboration.
Before we dive in, here’s something you might want to grab: you can get an extended 2-month free trial of Sellerboard for Shopify (no credit card needed, all features open).
Understanding the Settings Tab in Sellerboard for Shopify
The Settings tab is where you control the behind-the-scenes rules for how Sellerboard calculates your numbers.
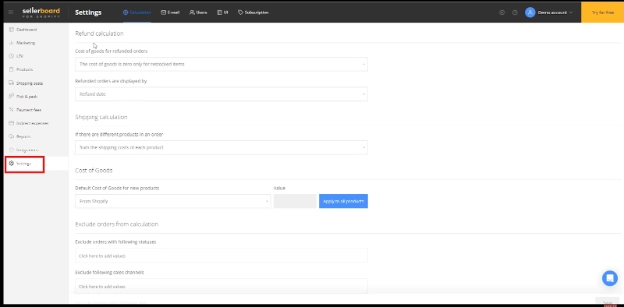
Let’s go through the main sections.
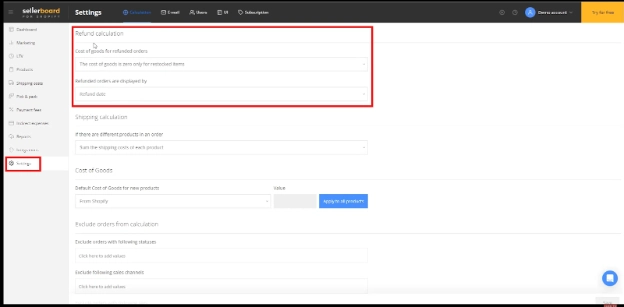
1. Refund Calculation
If you’re processing refunds, Sellerboard lets you decide how the cost of goods (COG) for refunded orders is calculated.
You can choose:
COG is counted only for restocked items.
Refunded orders are displayed by refund date.
This matters because it ensures your profit/loss reports aren’t skewed by refunded transactions.
You can also look at this guide to see how refund tracking works when you’re dealing with lost or missing inventory: How To Get Refunds For Lost Amazon FBA Inventory With Sellerboard
2. Shipping Calculation
If your orders often contain different products, you can decide whether Sellerboard should sum the shipping costs for each item individually.
This gives you flexibility if your shipping pricing structure is complex.

3. Cost of Goods (COG) Defaults
When adding new products, you can set a default COG value to pull automatically from Shopify or enter your own.
This saves time and keeps your reports consistent.
If you sell many SKUs, applying a default COG to all products at once can be a huge time saver.
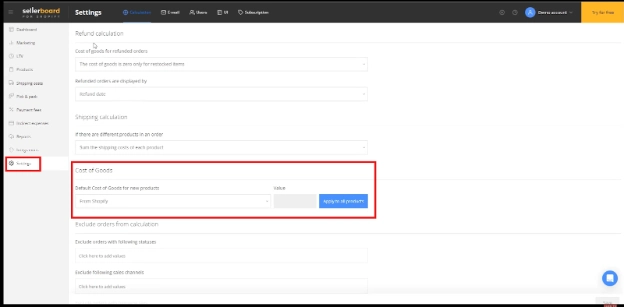
You can also check this guide for a clearer look at how COGs works inside Sellerboard: Sellerboard Cost of Goods Sold (COGS): A Clear Guide for Amazon Sellers
4. Excluding Orders from Calculations
One of the more powerful features here is data filtering.
You can:
Exclude orders with specific statuses (like test orders or canceled orders).
Exclude certain sales channels. For example, if you only want to analyze data from your online store and exclude POS sales, you can do that here.
Exclude orders with certain tags.
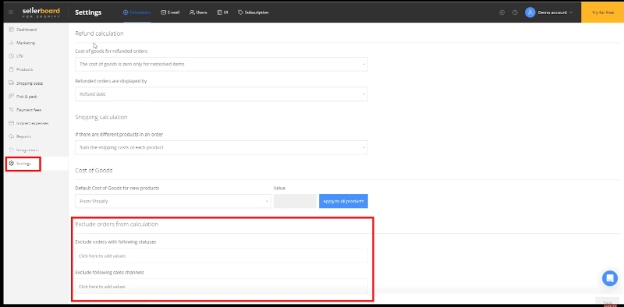
💡 Pro tip: If you sell on multiple Shopify channels, consider analyzing each one separately to see how strategies and profitability differ.
-: Gentle Reminder :-
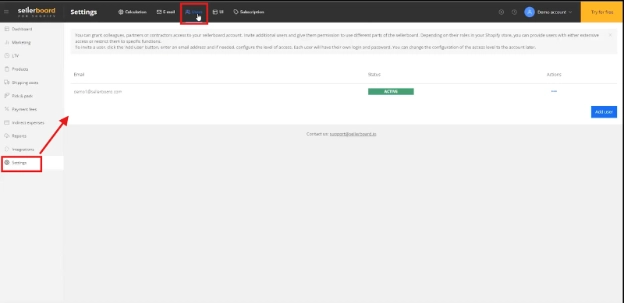
Inviting Users to Your Sellerboard Account
If you’re working with a team, you don’t have to share one login.
Sellerboard lets you add users and control exactly what they can see or edit.
Here’s how:
Go to the Users tab in Settings.
Click Add user.
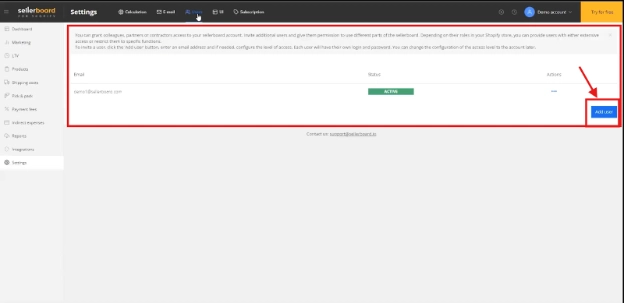
Enter the user’s email address; they’ll get an invitation link.

Choose if they have read-only or editing rights.
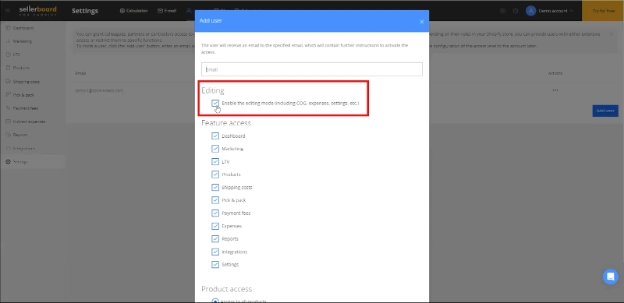
Select which features they can access (Dashboard, Marketing, Products, Reports, etc.).
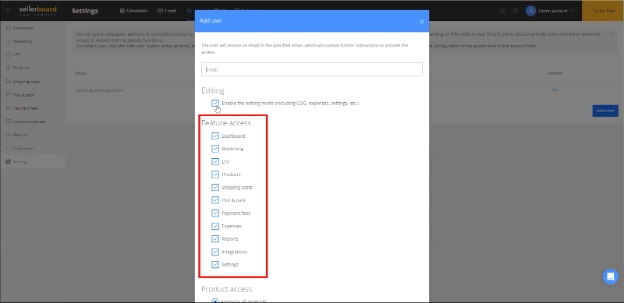
(Optional) Restrict them to specific products if they only manage part of your catalog.
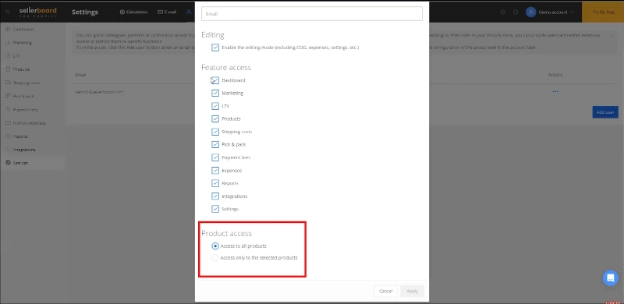
This is perfect for virtual assistants, accountants, or team members who need limited access.
Here’s a quick look at how Sellerboard’s reporting features support these different roles: Sellerboard Reports Explained: What They Are & Why They Matter
Why These Settings Matter
The beauty of Sellerboard is that it’s not just giving you numbers, it’s giving you accurate numbers that reflect your real business situation.
If you leave these settings on default without reviewing them, you might end up making decisions based on incomplete or misleading data.
For example:
Excluding irrelevant sales channels can prevent confusion when analyzing marketing ROI.
Setting default COG ensures your profit calculations stay correct from day one.
Inviting users with tailored permissions keeps operations secure and efficient.
-: Gentle Reminder :-
You can also explore my Sellerboard tutorials and reviews playlist for deeper dives into different features:
Final Thoughts
The Settings tab in Sellerboard for Shopify isn’t just a “set it and forget it” section.
It’s where you can tailor your analytics to give you exactly what you need to make smart business decisions.
And the Users feature makes collaboration easy without compromising security.
You’ll thank yourself when you start getting clean, actionable data from day one.
-
Understanding the Settings Tab in Sellerboard for Shopify
- 1. Refund Calculation
- 2. Shipping Calculation
- 3. Cost of Goods (COG) Defaults
- 4. Excluding Orders from Calculations
-
Inviting Users to Your Sellerboard Account
-
Why These Settings Matter
-
Final Thoughts
Disclosure: Hi! It's Vova :) Some of the links in this article may be affiliate links. I get a commission if you purchase after clicking on the link, this does not cost you more money, and many times I can even get a nice discount for you. This helps me keep the content free forever. For you. Thank you! :)