Maximize Amazon Reimbursements with Sellerise - Amazon FBA Reimbursement Tool, Software and Service

-
Sellerise Reimbursements Tool Review And Tutorial – Amazon FBA Reimbursement Software And Service
- Checking Your Reimbursements
- Why Act Fast?
- The Time Limit Matters
- Be Aware Of The Red Zone
- Navigating the Sellerise Reimbursements Dashboard
- Transparency And No Hidden Fees!!!
- An Astonishing Case That Will Blow Your Mind!
- Easy Reimbursement Steps
- Seamless Integration With Seller Central
- Say Goodbye to Service Provider Hassles (If You Want)
- Stay Informed And Ahead Of Your Competition With Smart Alerts
- Conclusion: Maximize Your Amazon Reimbursements With Sellerise
Disclosure: Hi! It's Vova :) Some of the links in this article may be affiliate links. I get a commission if you purchase after clicking on the link, this does not cost you more money, and many times I can even get a nice discount for you. This helps me keep the content free forever. For you. Thank you! :)
Sellerise Reimbursements Tool Review And Tutorial – Amazon FBA Reimbursement Software And Service
Hey there, fellow sellers!
Today, I want to talk to you about Amazon FBA Reimbursements, and an essential tool that can help you maximize your reimbursements from Amazon.
It's called Sellerise.
But before we dive in, I've got some exciting news to share!
This article is based on a recent video tutorial I did with Dima Kubrak, the mastermind behind Sellerise and a wildly successful 8-figure Amazon seller.
Now, if you prefer watching the video instead of reading this article (don't worry, I've got you covered either way), I've embedded it right below.
You can enjoy the tutorial without leaving this page.
I also welcome you to get the best discount for Sellerise.
How convenient, right? 😉
But wait, there's more!
If you're keen on learning more about Dima and exploring the ins and outs of using Sellerise, I've got you covered with this comprehensive video below:
Oh, and guess what?
For those who prefer the good article format, fear not!
I've got you covered there too.
Feast your eyes on this gem: Unleash the Power of Sellerise: Your Ultimate Amazon Selling Companion
Now, let's get back to the topic at hand: The Amazon reimbursements feature of Sellerise!!!
Trust me, it can put a significant amount of money in your pocket in a short amount of time.
So, let's dive in and understand why it is so crucial.
Psst…Just a little insider info for you.
The majority of the video tutorial for this article was actually presented by Dima himself.
But to make things easier to follow, I've gone ahead and written it in a more casual, first-person style.
So, no worries, you'll still get all the information you need in a straightforward and understandable way.
Let's dive in!
Checking Your Reimbursements
When you first join Sellerise, I recommend heading straight to the Reimbursements section.
I also welcome you to get a free trial of Sellerise, so you can follow along.

This is where you'll find out how much money Amazon actually owes you.
Yes, you heard it right—Amazon may owe you some cash, and it's essential to claim it!
Why Act Fast?
The reason you need to act promptly is that Amazon has a specific time limit for submitting reimbursement requests.
This time limit represents a window of opportunity during which you can claim your money back.
It's divided into different periods: 0 to 9 months, 9 to 18 months, and 18 months plus.
The Time Limit Matters
During the initial period of 0 to 9 months, you can easily request reimbursement for any potential money that has been sitting idle.
However, things change as time passes.
In the 9 to 18-month period, you still have a chance to claim some money back, but it becomes more restricted.
Be Aware Of The Red Zone
When we talk about the 18-month-plus category, requesting reimbursement becomes even trickier.
In certain cases, you may have to wait for at least 90 days before you can even think about getting your money back.
That's why we've highlighted this period in red—it's crucial to understand that once this time limit passes, the money becomes irreversible.

Sadly, there's no way to retrieve it from Amazon.
Actually, I've got a story to tell you, and it's a cautionary tale.
There was a seller who lost a whopping $33,000 because they didn't take action to request their money back from Amazon.
Don't let that happen to you!
It's easier than you think to claim what's rightfully yours.
Let me break it down for you.
Navigating the Sellerise Reimbursements Dashboard
The guys at Sellerise have designed a user-friendly dashboard that makes managing your reimbursement cases a breeze.
Take a look at the different categories available.

Now, keep in mind that this is just a demo account, so the real deal will have even more categories once you enable our system.
Calculating Your Losses
Once you've activated the system, Sellerise will recalculate everything within your accounts.
Sellerise will uncover the money Amazon owes you for various reasons, such as destroyed inventory, damaged inventory, or missing FBA shipments.
Let's focus on getting money back for "Destroyed Inventory" as an example.
Creating a Reimbursement Case
Within the designated category, select the option for the destroyed inventory.
Click "Next" to proceed.

Now, choose the specific product for which you want to be reimbursed.

Select the appropriate reimbursement type, confirm your selection, and click "Next."

.
Here's where the magic begins.
With a simple click, you can create the case and confirm it.

Guess what?
You don't even have to log into Seller Central.
Sellerise automatically generates the case for you, saving you time and effort.
Now, you can easily manage the case and keep track of Amazon's response to your reimbursement request.
Oh, and once you've created the case, you'll find it in your Seller Central account.
Check the status to see if it's pending or if Amazon has provided an answer.

Keep an eye out for any updates regarding the money they're sending back to you.
It's all about staying informed and engaged in the process.
Monitoring Your Cases
Oh, and here's some great news—Sellerise also keeps an eye on the entire process.
We'll monitor who submits the cases and who opens them.
This way, you'll always know what's happening with your reimbursements.
Transparency And No Hidden Fees!!!
Now, let me tell you about another fantastic aspect of Sellerise—we don't charge any commission or percentage for our services.
That's right, there are no hidden fees lurking around the corner.
Everything you need is included in your subscription.
This means you get to keep every penny that Amazon owes you.
It's all about transparency and ensuring that you receive what you rightfully deserve.
Other reimbursement services like GETIDA or Seller Investigators usually charge % of the reimbursed fees, however, their software is free to use.
They work in a pay-per-recovery model.
I'd also recommend you check my list of the 7 best Amazon reimbursement tools.
An Astonishing Case That Will Blow Your Mind!
Now, hold on to your seats because I have a jaw-dropping story to share.
Brace yourselves for this one—a seller discovered that Amazon owed them a staggering $500,000.
Yes, you read that correctly, half a million dollars!
Can you imagine the excitement and anticipation of receiving such a significant reimbursement?
But here's where it gets even more interesting.
The seller had enlisted the help of a service provider to assist them in claiming the money back from Amazon.
To their surprise, in July, the service provider informed them that they had been reimbursed.
The seller expected these funds to be deposited into their Seller Central account.
However, the money never arrived, and to make matters worse, the service provider charged them a commission of 10% or 20% for their "services."
Now, as I mentioned earlier, Amazon may not give you your money back, and you end up paying a commission.
Well, imagine being in a situation where time is running out, and you're on the verge of losing that money forever.
That's exactly what happened to this seller.
But fear not!
Dima was able to guide them through the process using Sellerise, and they successfully requested their money back from Amazon.
The result?
A whopping $100,000 reimbursement!
Now, that's what I call a fantastic case study.
I also have a case study about Helium 10 Refund Genie, which helped me get about $2,118 from Amazon.
It's an Amazon reimbursement tool by Helium 10.
You can watch it below.
Easy Reimbursement Steps
Getting money back from Amazon can be much simpler than you might think.
With Sellerise, it's just a few clicks away.
Most reimbursement cases are straightforward and require minimal effort on your part.
So you just need to follow the steps I shared with you, and you'll be well on your way to reclaiming what's rightfully yours.
It's that easy!
Only FBA shipments can require a bit more of your attention.
But with Sellerise, this process too can become a breeze for you.
Let me show you!
Select the "Missing FBA Shipments Category."

Click "Next" to proceed, and then choose the shipment you want to work with.

Once you've done that, we'll provide you with clear instructions on how to go about requesting reimbursement from Amazon.
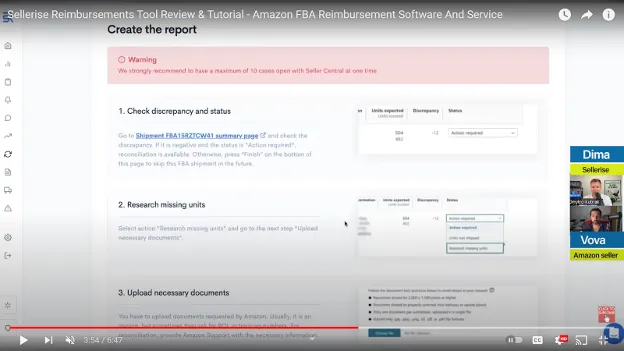
We even offer handy templates to guide you through the process.

It couldn't get any simpler!
Seamless Integration With Seller Central
To make your life even easier, Sellerise seamlessly integrates with Seller Central.
With a simple click on the link shown in the screenshot below, you'll be taken directly to Seller Central, where you can open a reimbursement case for the specific transaction and shipment ID.

Now, let's talk about this essential feature called "Shipment Documents."

This handy tool is designed to keep you organized and ensure that all the necessary documentation is easily accessible in one place.
No more hunting for invoices or bills of lading (BOLs).
It's all right here at your fingertips!
Take a look at this section right here.

It's live and it's ready to make your life easier.
Suppose you're working on a specific item and need to gather all the necessary paperwork for a reimbursement case.

Simply locate the corresponding shipment and upload your documents.
Whether it's BOLs, invoices, or any other important paperwork, this feature allows you to centralize everything in one spot.
The beauty of having your shipment documents readily available is that it fosters seamless collaboration within your team.
Imagine this scenario: someone from your logistics team sends inventory to Amazon, and they generate a unique shipment ID.
They can use Sellerise to upload the relevant documents for that shipment.
Now, when it's time for the reimbursement process, the person handling the case can easily access those documents within Sellerise.
It's all about optimizing your workflow and reducing the time and effort spent searching for the correct invoices and BOLs.
You can also easily check how much money Amazon has reimbursed you right here on your dashboard.

Here, we have different scenarios to consider.
If Amazon has lost your inventory, they will likely reimburse you in cash.
It's a straightforward process where you get back the monetary value for the items that went missing.
On the other hand, if they find your inventory, they will typically return the actual units to you.
Remember, receiving the units back is still valuable because you can resell them and generate income.
Here's an interesting development—Amazon is becoming more efficient in handling reimbursements.
They are now taking proactive measures to pre-calculate reimbursements on your behalf.
This means they identify cases where reimbursement is required and automatically initiate the process.
You may come across an "Auto Reimb. Cash" (automated reimbursement cash) on Sellerise, indicating that Amazon has already done the calculations and is prepared to return the money to you.

It's all part of their efforts to minimize mistakes and provide a smoother experience for sellers.
Say Goodbye to Service Provider Hassles (If You Want)
Now, here's the thing.
If you've been working with a service provider, they might claim that they've done all the reimbursement work for you, but you end up paying a percentage for their services.
I am a user of GETIDA myself, and I even have an in-depth A to Z tutorial of GETIDA to share with you.
With Sellerise, it's different.
Sellersie shows you that the reimbursement has been done automatically, without any additional effort or fees on your part.
It's a transparent and hassle-free process that puts more money back in your pocket.
Stay Informed And Ahead Of Your Competition With Smart Alerts
Let's talk about Smart Alerts and how they can be instrumental in your reimbursement process.
Smart Alerts is a fantastic feature available on Sellerise.
Within Seller Central, you can activate alerts specifically for new reimbursement units.
By enabling this alert through the "Set Configuration" option on the Smart Alert dashboard, you no longer have to log in to the reimbursement section daily, anxiously waiting to see if any money has become available.

Instead, Sellerise will notify you via email, Slack channel, or mobile application whenever there are additional funds waiting for you.
You'll receive a friendly notification saying, "Hey, there's more money we found for you. Please log in to Sellerise and request this money back from Amazon."
It's that simple!
Conclusion: Maximize Your Amazon Reimbursements With Sellerise
In conclusion, Sellerise is an awesome tool for maximizing your reimbursements on Amazon.
With its user-friendly interface, seamless integration, and smart features, Sellerise takes the hassle out of the reimbursement process.
It's time to reclaim what's rightfully yours and unlock the full potential of your Amazon selling journey.
So what are you waiting for?
Start reclaiming your reimbursements and taking your Amazon business to new heights.
Thank you for joining me on this Sellerise reimbursement adventure.
Stay tuned for more exciting updates, tutorials, and success stories.
Together, let's make the most of your selling experience!
Until next time,
Best,
Vova :)
P.S - Sellerise is also one of the GETIDA alternatives and competitors.
-
Sellerise Reimbursements Tool Review And Tutorial – Amazon FBA Reimbursement Software And Service
- Checking Your Reimbursements
- Why Act Fast?
- The Time Limit Matters
- Be Aware Of The Red Zone
- Navigating the Sellerise Reimbursements Dashboard
- Transparency And No Hidden Fees!!!
- An Astonishing Case That Will Blow Your Mind!
- Easy Reimbursement Steps
- Seamless Integration With Seller Central
- Say Goodbye to Service Provider Hassles (If You Want)
- Stay Informed And Ahead Of Your Competition With Smart Alerts
- Conclusion: Maximize Your Amazon Reimbursements With Sellerise
Disclosure: Hi! It's Vova :) Some of the links in this article may be affiliate links. I get a commission if you purchase after clicking on the link, this does not cost you more money, and many times I can even get a nice discount for you. This helps me keep the content free forever. For you. Thank you! :)