Unleash the Power of Sellerise: Your Ultimate Amazon Selling Companion

-
How to Use Sellerise - A to Z Tutorial And Review With Dima Kubrak, the Founder
- Dima Kubrak - The Founder of Sellerise
- Sellerise Tutorial
- Sellerise Main Menu
- PPC Dashboard
- Reviews
- Keywords
- Reimbursements
- Inventory Dashboard
- Adult Checker
- Walmart Beta
- Sellerise Pricing
- Conclusion
Disclosure: Hi! It's Vova :) Some of the links in this article may be affiliate links. I get a commission if you purchase after clicking on the link, this does not cost you more money, and many times I can even get a nice discount for you. This helps me keep the content free forever. For you. Thank you! :)
How to Use Sellerise - A to Z Tutorial And Review With Dima Kubrak, the Founder
Hi there,
Welcome to the exciting world of Sellerise, where your Amazon selling journey is about to take a thrilling turn!
My name is Vova Even, and I'm your host for this review and tutorial.
Today, we're diving deeper into the depths of Sellerise, exploring all its incredible tools, explaining their functionalities, and how they can benefit you and your Amazon business.
We'll even touch upon the pricing details, but fear not my friend, I'll also share a special offer that you can utilize to claim a free account of Sellerise with a fantastic discount!
This article is jam-packed with information, so I've turned on the Table of Contents, making it super easy for you to jump to the tools that catch your fancy.
Isn't that awesome?
I certainly hope you're as excited as I am about what lies ahead.
By the way, I must introduce Dima Kubrak, the dude behind Sellerise.
He's not just any seller; he's an eight-figure Amazon Seller!
Many, including myself, have learned so much from him, and it's a privilege to have him here.
Oh, and did I mention he has an incredibly positive vibe? It's contagious, trust me!
Alright, enough chit-chat, let's cut to the chase and dive straight into Dima's introduction.
Dima Kubrak - The Founder of Sellerise
Dima is an eight-figure Amazon Seller who has amassed a wealth of knowledge and experience in the business.
Dima is no stranger to the ups and downs of the Amazon selling journey.
He's faced challenges, learned valuable lessons, and achieved remarkable success along the way.
Now, he's eager to share his expertise with all of you as we explore the transformative capabilities of Sellerise.
Sellerise isn't your run-of-the-mill platform—it's a game-changer.
Packed with a wide array of powerful tools and advanced features, Sellerise is designed to revolutionize your Amazon selling experience.
Whether you're an experienced seller seeking operational efficiency or a budding entrepreneur aiming to make a mark, Sellerise has got you covered.
So, fasten your seatbelts as we are about to embark on an exhilarating journey through Sellerise, where success awaits at every turn.
But before we dive into the nitty-gritty, let's take a moment to reflect on the company's journey thus far.
Sellerise wasn't born out of thin air; it was developed to address the market's needs.
Dima, being an Amazon seller himself, initially created these tools for his own brand and company.
However, a moment of inspiration struck, and he realized the immense potential in sharing these tools with others.
Now, at a fraction of the cost, you too can leverage these incredible resources and reignite the growth of your business.
Get ready for a thrilling adventure as we uncover the secrets to Amazon selling success with Sellerise.
Let's get started!
Sellerise Tutorial
At this juncture of our tutorial, I handed the microphone over to Dima, who took the lead in showcasing Sellerise's features.
Dima used a demo version of Sellerise for demonstration which means certain aspects may differ slightly from the real accounts.
Rest assured, though, that the essence will remain the same.
The reason behind using a demo account is just that we refrain from showcasing real accounts to ensure everyone feels comfortable and avoids any unnecessary pressure.
Still, to enhance your understanding and provide a seamless learning experience, I'll make sure to include relevant screenshots throughout the text.
So, let's dive right in and explore the incredible world of Sellerise together.
As we proceed, keep an eye out for the accompanying screenshots that will visually guide you through each step and feature I discuss.
Sellerise Main Menu

To kick off this adventure, let's focus on the left-hand side of the screen.
On this side, you'll discover a treasure trove of tools awaiting your exploration.
Don't worry if it seems overwhelming at first; I'll navigate through each one, providing detailed explanations along the way.
Finances

Alright, let's dive into the first option: Finances.
As you click on it, a sub-menu will appear.
Let's start with the first one: Sales & Profit dashboard!
Sales & Profit
This is one of the go-to dashboards for Amazon sellers, and it provides valuable insights into your sales and profits.
But that's not all—you can also view this detail on Sellerise mobile application that can be downloaded on iOS or Android devices.
This app allows you to connect to your Sellerise account, making it super convenient for checking your numbers on the go.

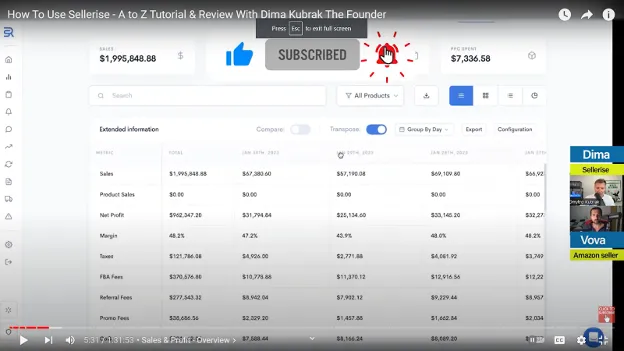
Now, let's focus on the Sales & Profit dashboard itself.
On the topmost, as you can see, there is this Help Hub section that provides quick tours and video tutorials to assist you.

Next, on the right side, there are four different filters that allow you to see your sales and profit details in various timeframes.

Below this, we have these four tiles displaying daily sales, net profit, ROI/margin, and PPC spent.
But wait, there's more!
If you click on one of these tiles, a window pops up where you can enable additional views that you want to see on this dashboard.
You have the power to customize it according to your preferences, making it look clean and organized just for you.

Moving on, we have different products displayed.
Here, you can apply various filters to analyze your sales data.
For instance, if you want to review a 30-day period, you can see your sales day by day, with different metrics at your fingertips.

And hey, you can enable or disable specific configurations to focus on what matters most to you.
There's so much you can explore—organic sales, mobile sales, and more!

Oh, and here's a neat trick! You can download everything with just one click.

Plus, can you see that little export button at the bottom right beside the Configuration button?

Click it, and you can export all the data in CSV format.
It's a super handy feature when you need to dig deeper or analyze the numbers in other applications like Excel.
But wait, there's more flexibility!
You can use the button displayed in the screenshot below to switch between viewing your data by day, week, or month.

In this case, since we're looking at a one-month range, we see it month by month.
But imagine if you had a custom date range spanning multiple months.
The dashboard would intelligently display the data in a monthly format.
It's all about providing you with the right level of detail.
Now, let's talk about the transpose view.

What's that all about?
Well, it's a way to analyze week-by-week performance.
Imagine seeing the dates on the left and the sales metrics on the right.
But with a simple click, you can transpose the view, shifting the metrics to the left and the dates to the right.
It's a fantastic tool when you're delving into week-by-week analysis and want to download reports in a more organized manner.
Every team has its own preferences when it comes to analytics.
Some prefer weekly reports, while others dig into daily reports.
At Sellerise, they find weekly reports to be particularly valuable.
However, Dima said, we do understand that specific days can hold significance too.
So we provide the flexibility to adapt to your needs and preferences.
Now, let's unclick the transpose view and get back to the options that allow you to play with how products are displayed.

When you select the third option, you'll be able to view every product and its corresponding sales and numbers.
This filter is especially handy for those who like to use Excel spreadsheets for their analytics.
But fear not, because, with Sellerise, you can replace those spreadsheets and customize your analytics right here on the platform.
Now, let's talk about product filters.

Currently, we're seeing all the products, but imagine if you have multiple brands under your account.
You might be selling HP products, Apple products, and more.
In that case, you can add different groups of SKUs and combine them together.
For example, you can use the Add New Group option to create a group called "Launch" to monitor the performance of your newly launched products.
This way, you can easily switch between brands and get a clear picture of each brand's sales.
It's like having your own personalized sales analytics tailored to your needs.
But we're not done yet!
The next level of sales and profit analytics takes us inside each product.
By clicking on a specific product, you can access more detailed information about its sales and performance.
For example, if you click the first product here:

You'll be taken to this page:

There are additional filters available too, allowing you to dive even deeper into the data.
I won't go through every single button and feature, as there is plenty to explore.
But the main idea behind the dashboard is to provide you with a bird's eye view of your business.
You can analyze what's been happening in the last 30 days, yesterday, today, or even a custom range.
Then, you can work with the data in a way that suits your preferences.
Some people prefer to analyze their data on a weekly basis, and that's where the transpose view comes in handy.
It allows you to switch the dates and sales metrics, making it easier to analyze week-by-week performance.
By having this flexibility, you can adapt the analytics to match your team's workflow or specific needs.
Now, if you switch to the list view, you'll be able to see how daily sales are being affected.

There are a bunch of financial metrics that you can explore to determine your overall profitability.
As you scroll toward the left, more metrics will come into view, including one of the most critical aspects of your Amazon business: ad costs.

Sellerise provides you with a dedicated section for ad costs, where you can monitor your spending and its impact on your profit.
Now imagine you see your ad costs, and you want to keep a close eye on it.
You can pin that column to the left for easy reference.

As you pin a column, it will get affixed with the Date column as shown below:

In the screenshot above, there are two pinned columns alongside the Date column.
The second, Net Profit column is equally important that's why Dima fixed it on the spot.
By pinning these columns, you can have a clear view of your ad costs and profit side by side.
This allows you to quickly assess whether your advertising efforts are yielding positive or negative results.
In a real account, you might sometimes notice significant differences between your ad spend and profit.
For example, you might have spent $165 on ads but ended up with a negative profit of $80.
This information is crucial because it helps you understand the impact of your ad campaigns on your overall profitability.
By analyzing these metrics, you can make informed decisions about your PPC spending and ensure that you're not wasting resources or going negative with your company.
It's all about maintaining control and finding ways to optimize your PPC campaigns for maximum profitability.
Refunds are another aspect to consider.

Through this option, you can always check the percentage of refunds your products receive.
By analyzing this on a product-by-product basis over a period of two weeks or one week, you can identify which products are causing more issues than others.
When you examine a specific product, you might think, "What if I reduce the cost of goods?"
On the other hand, when you look at refund percentages, a high percentage, let's say 7%, indicates potential problems. In normal categories like beauty supplements, the refund percentage should ideally be around 3 to 4 percent.
However, for clothing or other categories, the percentage could be as high as 15% or even more.
In such cases, you need to think about the type of packaging you should use.
If you've ever been to a store in the United States, you might have noticed blister packaging.
Blister packaging is a type of packaging that consists of a clear plastic shell or blister, typically formed to fit a product, and a backing card or sheet.
It is commonly used to securely encase and display items, providing protection against damage, tampering, and contamination, while allowing consumers to view the product before purchase.
Some blister packaging is tightly sealed, requiring you to break the package to open it.
But there are also packaging options where you can open it and reseal it almost like new.
This way, if a customer returns a product and you can put it back in the package and close it, the product will look brand new, allowing you to resell it as if it were never returned.
The evolving world of Amazon, logistics, and rising storage and fulfillment costs demand that you become a professional in logistics.
Gone are the days when you could simply send products to Amazon without worrying too much about the logistics.
Now, every cent and every dollar in your company count, and optimizing profitability requires careful calculation and analysis.
Let me give you a quick example Dima shared.
He said that they have our own fulfillment center called ASAP Warehouse for Amazon sellers.
We process refunds and returns for one of our clients and repackage their products.
Just from handling their returns, we generate an additional five to seven thousand dollars in profit every month.
That's why I emphasize the importance of considering packaging renovations.
You need to think about how easy it is to make your returned products sellable again.
Packaging plays a crucial role in this process.
Now, let's move on to the list view.
As I mentioned, you can see here various metrics related to your sales, including organic sales, PPC, multi-channel, promotions, and refunds.
There's a wealth of information available in the configurations section as well, such as TACoS (Total Advertising Cost of Sales), ACoS (Advertising Cost of Sales), impressions, coupons, and much more.
This plethora of information provides you with ample insights to analyze and understand your business better.
Now, let's move on to the Orders section.
Here, you can get valuable insights into your order performance.

Take a look at the screen above—it's exclusively designed it to be as visually appealing and user-friendly as possible.
You'll notice that there's a map displaying the performance of your orders by state.
This gives you a clear understanding of which states are generating the most sales for you.
It's always fascinating to see how your products are resonating with customers across different regions.
But wait, there's more!
Dima mentioned that he and his team is constantly working on improving Sellerise and adding new features that will take your Amazon business to the next level.
One of the upcoming additions to the Orders section is an inventory view that shows you the distribution of your inventory across different fulfillment centers.
This will be an invaluable tool for managing your inventory effectively and ensuring that you have the right products in the right places.
Imagine being able to see at a glance how much inventory you have at each fulfillment center and making informed decisions based on that data.
It's going to revolutionize the way you handle your inventory and streamline your operations.
I can't wait to unveil this feature—it's going to be a game-changer for sellers like you.
Now, let's dive into the Shipments section.
This is where you can view and manage all the shipments you've sent to Amazon.

As you can see on the screen above, each shipment is listed separately, making it easy for you to navigate and track your inventory.
One of the frustrations many sellers encounter on Amazon is the lack of organization when it comes to shipments.
Amazon lists them based on the latest update, which can make it challenging to identify a specific shipment, especially if you're looking for one sent a while ago.
But fear not, because Sellerise has your back!
In Sellerise, they've designed the Shipments section to provide you with a clear and organized view of your shipments.
You can see each shipment day by day and product by product, eliminating any confusion.
If you ship multiple products in one shipment, Sellerise separates them, allowing you to easily track each product's journey and inventory status.
But that's not all!
According to Dima, Sellerise can also help you detect and address discrepancies.
"We understand that discrepancies can occur during the shipment process. Sometimes Amazon might receive one unit less than what you sent, or there could be instances where they receive more than expected. Such issues can impact your inventory management and profitability. That's why we've built a robust system within Sellerise to help you detect and address these discrepancies."
~ Dima Kubrak
This view too incorporates various columns.
For example, there is Unit Costs, which enables you to assign specific unit costs to each shipment.
Let's say you usually ship products from China by ocean, but during a busy holiday season, you decide to expedite some inventory by air.
Shipping by air incurs higher costs, but most tools in the market calculate your cost of goods (CoG) using average or default prices.
With Sellerise, you have the power to set custom unit costs for each shipment.
The dashboard also displays a default price, but you can easily modify it according to your specific circumstances.

Let's say the default price is $178, but due to the air shipment, you want to adjust it to $200.
Once you make the change, all future shipments will reflect this new unit cost, ensuring accurate calculations of your profits.
Moreover, Sellerise allows you to set group prices for multiple shipments.
Let's say you've completed four shipments and want to assign a group price of $200 to all of them.

With a simple click, you can make that adjustment, and only those four shipments will be affected.
This eliminates the need to manually modify each individual shipment, saving you time and effort.
"We've designed Sellerise to be precise and efficient when it comes to tracking your costs of goods and ensuring accurate profit calculations. Unlike other tools that recalculate your entire year's data when you make a price adjustment, Sellerise focuses on the specific shipments you want to update. This way, you can have a clear understanding of your profits without any unnecessary recalculations."
~Dima Kubrak
Now, let's move on to the Promo and Coupons section of Sellerise.
Here, you have a comprehensive view of all the coupons, promotions, and Subscribe and Save offers associated with your products.

Sellerise is the only tool that allows you to track the performance of your Subscribe and Save (SnS) program.

You can see how well your products are doing under this program and analyze the impact it has on your sales.

In addition to Subscribe and Save, you can also monitor the effectiveness of your promotions and coupons.
Whether you're running dollar-off coupons or percentage-based promotions, Sellerise keeps a record of all your coupon activities throughout their history.
This allows you to track the success and impact of your promotional strategies over time.
"We understand that managing finances can be overwhelming, so we've designed Sellerise to provide you with the most important and relevant financial information. We aim to minimize the clutter and present you with the key data that will help you make informed decisions about your business."
~ Dima Kubrak
Now, let's dive into the Profit & Loss (P&L) section of Sellerise.
Profit & Loss
This is a tool that is familiar to many, especially accountants and CPAs.
When you access the Profit & Loss section, you get a top-level view of your numbers.
You can see your cost of goods and analyze how it's progressing over time.
But it's not just about numbers; it's about strategic thinking and understanding your true net profits.

In the Profit & Loss section, you'll find percentages that give you valuable insights into your business.
For example, you might see that your sales account for 88% of your revenue, while your cost of goods represents 12%.
This prompts you to ask, "How can I reduce my cost of goods to 10%?"
It's a strategic analysis that helps you identify areas for improvement and optimize your profitability.
Like with Sales & Profit, you can export your Profit & Loss data as well.

If you export it to Excel, you'll get a report with detailed numbers and expanded information.
This is useful when you want to delve into the numbers yourself and understand the intricacies of your entire business.
You can examine each category and make informed decisions based on the data.
While accountants may prefer simplified reports, exporting the detailed data allows you to uncover insights and find ways to address challenges.
For example, if you notice high refund rates, you can brainstorm strategies to reduce refunds.
You might consider adding clear instructions, bonus materials like e-books, or inserts with detailed manuals.
These small changes can have a significant impact on customer satisfaction and ultimately reduce refunds and returns.
It's worth mentioning that not everyone is naturally inclined to understand business and financial matters.
That's why additional education is essential. Even with Sellerise, we've encountered users who are proficient with numbers but still require guidance on understanding taxes and other business aspects.
It's encouraging to see people seeking additional education because it signifies their growth as professionals.
Let me share a personal anecdote by Dima.
In the past, he sold bicycle seats, and while it seemed straightforward to him, he realized that many customers needed detailed instructions on how to remove the old seat and install the new one.
Clear and quality instructions can make a world of difference in reducing refunds and returns.
So, it's crucial to invest time and effort into creating instructional materials that leave no room for confusion.
Remember, every dollar saved is equivalent to a dollar earned.
It's a universal principle that holds true no matter where you are in the world.
Saving money and optimizing your business operations ultimately leads to greater profitability.
Now, let's refocus on the Profit & Loss dashboard and pay attention to the parameter names in the first column.
Can you see Additional Expenses?

What does this mean?
It's related to the Manual Adjustments feature in the side menu.

Here's how it looks like:

Manual adjustments allow you to add expenses that were not accounted for in your Seller Central account.
For example, let's say you have a designer working for your brand.
You can assign them to specific products and enter the date and amount you paid them, such as $375.
Once you save it, this expense will be applied to your Profit & Loss (P&L) and other financial calculations.
The main idea behind all these financial calculations and numbers is to gain better insights into your business.
In my company, we have a CPA who acts as our financial advisor.
Their primary responsibility is to analyze the numbers and help us make informed decisions.
You'd be surprised at how much the direction of a company can change when you start paying attention to financial analysis.
For instance, when people ignore financial analysis, they may not realize how much they're spending on one-time projects with external designers.
If you find yourself paying $800 for each one-time project and completing two or three projects per month, you could consider hiring an in-house designer for $1,500 a month instead.
This way, your designer can better understand your brand's values, complete tasks faster, and you won't have to explain everything from scratch each time.
I'm not against using external service providers; in fact, I occasionally rely on them too.
However, delegating tasks to others is a key factor in achieving continuous growth.
So, from Profit & Loss, we moved on to Manual Adjustments, where we can manually add expenses such as payments to photographers or consulting calls with experts.
These adjustments will be reflected in the Profit & Loss section as well.
Once you dive into detailed analytics, you'll see these expenses at various levels of your financial analysis.
You can also delete or edit manual adjustments as needed.
Moreover, you have the option to set up monthly costs, such as your subscription fee for Sellerise.

Adding these recurring expenses allows for a better understanding of your financials.
You can anticipate future adjustments and track your books more effectively.
If you cancel any services, you can easily update or remove them in this section.
Now, let's dive into the ABC Analysis.
ABC Analysis
ABC Analysis is a tool designed for companies with extensive catalogs, enabling them to determine which products generate the most profit.
It categorizes products into three categories: A, B, and C.

The goal is to understand which products require the most attention and focus.
By utilizing ABC Analysis, companies can identify if certain products should be moved from one category to another or even discontinued.
Like the other options, the ABC Analysis screen too includes various columns.
And you can always click on Configuration to add more columns such as cost of goods (CoG), ROI (Return on Investment), and margins.
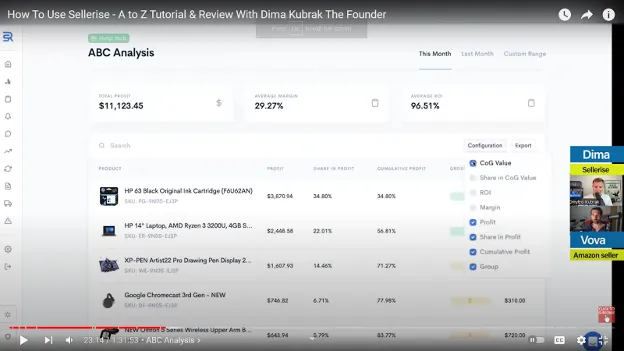
It provides you with valuable insights into the profitability of each product.
For example, you may discover that a particular product brings in significant profit, but the ROI is unexpectedly low.
This information prompts you to reevaluate your strategy and consider potential improvements.
Let's walk through a practical example to better understand how ABC Analysis works.
Imagine you're launching a new product, and let's assume it has a profitability of 100% with a corresponding ROI of 100%.
Now, when you're operating in the physical product sales space, expanding your sales means increasing your inventory.
However, growing your price to compensate for the increased inventory doesn't always make financial sense.
As a result, many sellers, especially in their early years on platforms like Amazon or other eCommerce platforms, face challenges with cash flow.
Typically, the cycle of production involves two months for production in China and an additional two months for delivery.
To ensure a safety buffer, you may need to add another two months.
So, the entire cycle of production sums up to about six months.
Here's where the cash flow struggle comes into play.
Even if your cash flow is 100% or less, or even 200% or less, ordering more inventory becomes a financial challenge.
The previous inventory order may not have been fully sold, and you haven't generated enough revenue to cover the upcoming inventory costs.
ABC Analysis helps you prioritize your efforts and allocate resources to the products that contribute the most to your profitability.
It allows you to make informed decisions about inventory management, marketing strategies, and product optimization.
By identifying products with high profit potential and improving the ROI of those with lower profitability, you can streamline your operations and maximize your financial success.
Generally, many sellers struggle with managing their finances because they lack a clear understanding of their profitability.
This is where Sellerise comes in handy. It's a unique tool that acts as a crystal ball, giving you insights into your profitability and guiding your decision-making process.
When your funds are being withdrawn from Amazon to your bank account, it's crucial to have a plan in place for managing your finances effectively.
If you find yourself in a situation where you don't have enough money for inventory or growth, there are two options you can consider.
The first option is acquiring a loan.
It's true that nowadays there are numerous companies offering funding options, such as inventory loans and advanced loans.
While I'm not affiliated with any of such companies, I've been in business for a long time, and I know that loans can be beneficial if used wisely.
However, it's essential to approach loans with caution and ensure that you're not using them to cover operational expenses.
The second option is to evaluate your growth strategy and find ways to optimize it.
While it may be tempting to slow down your growth to conserve funds, I typically recommend taking a proactive approach and aiming for higher growth.
Slowing down your growth can have unforeseen consequences, as it may affect your sales performance or advertising efforts on platforms like Amazon.
Speaking of advertising, let's touch on the topic of pay-per-click (PPC) campaigns.
It's common to encounter PPC campaigns that aren't profitable or have a high ACoS (Advertising Cost of Sale).
In such cases, it may be necessary to terminate those campaigns.
However, it's crucial to exercise caution and avoid killing profitable campaigns just to maintain growth.
This delicate balance ensures the long-term sustainability of your business.
With that said, let's dive into another fantastic tool we have called the Payouts.
Payouts
According to Dima, Sellerise has just recently released this feature, and it's a game-changer.
So, what does a Payout report do?
Well, every time you receive a payout from Amazon to your bank account, let's say they deposit $12,000 or $50,000, many sellers struggle with understanding how to allocate that money.
How much should be reinvested in inventory?
How much should go towards PPC advertising?
And what about expenses charged to your credit card that aren't directly assigned to your Seller Central account?
It can be quite a puzzle to figure out your actual profit and make informed decisions, especially if you have business partners.
Now, let me show you the demo screen of this feature.
Keep in mind that as this is a demo account, some details might not be visible.

Here you can see a breakdown of a withdrawal from Amazon for $87,000.
At first glance, it might seem like a significant sum, but we need to understand what happened with this money.
If we scroll down, we can see that Amazon actually deposited $28,925 into your bank account.
That's the amount you can work with, but before you go wild and think about pre-ordering a Lamborghini, hold on!
One essential aspect is the cost of goods, which is not displayed here in the demo account, but it's something you need to calculate.
Let me activate it for demonstration purposes.

There you go!

So, the cost of goods was $18,091.
Out of the $28,925 deposited, $18,091 is locked.
This locked amount represents the money you need to use to purchase inventory because, let's face it, inventory is what generates sales and profits.
So, those funds are off-limits for now.
That leaves us with $10,834 which you can decide how to allocate.
You might want to use it for paying services, covering employee salaries, or even taking a personal withdrawal.
It's up to you!
However, let me share Dima's personal approach.
He usually followed a 50/50 split.
Half of the profit would go back into the business, ensuring its health and continued growth.
The other half was his to do with as he pleased.
This approach allowed him to balance reinvestment and personal rewards.
That's the simplest rule, my friends.
While there may be plenty of financial advisors out there, I'm here to share my practical approach based on my own experience.
When it comes to payouts, it's crucial to understand their significance and how to handle them wisely.
Every withdrawal you receive, every payout that happens, is an opportunity for you to take control of your finances.
To begin, it's crucial to check the cost of goods and ensure that you allocate the required funds for inventory.
If you're located in the USA, it's relatively easy to manage your bank accounts within the same company.
You can have separate accounts dedicated to holding inventory funds, ensuring that you never touch that money.
Trust me, when everything is in one bucket, it may give you a false sense of having abundant funds.
But once you start paying bills and expenses, you'll realize the importance of keeping your finances organized.
There's a remarkable book called "Profit First" by Mike Michalowicz that I highly recommend.
It delves into the concept of allocating your profits intelligently.
Some people fall into the trap of thinking that making more money will magically solve all their problems.
But the truth is, when your business grows, so do the challenges. You'll face even bigger issues that demand your attention.
At the beginning stages of your company or growth, reducing personal expenses might help you overcome certain hurdles.
However, as your company expands, simply cutting personal expenses won't have the same impact.
Of course, I'm not suggesting you be reckless with your spending, indulging in luxurious extravagances.
But at a certain point, you'll realize that you need to focus on understanding the ROI, optimizing production cycles, reducing refunds, and improving packaging, among other critical factors.
Let me share an intriguing example of a company Sellerise is currently assisting.
The company uses poly bags as packaging for their products.
However, when these bags arrive at Amazon, they are opened and examined from all angles.
Amazon measures them, even though poly bags are soft materials that can easily be compressed.
So, the team at Sellerise devised a solution for them.
"We took the corners of the poly bags, used tape to make them smaller, and transformed the packaging into a completely different size category. This simple adjustment resulted in lower fulfillment costs."
~ Dima Kubrak
The numbers need to be pre-calculated because you don't want any surprises.
You might pay, let's say, eight dollars for the packaging improvement, while your competition is shelling out 14.75 dollars.
They're losing $6 on every sale simply because they neglected to address the corners.
That's a significant advantage for you!
Understanding the intricacies of your business, including ROI, production cycles, and cost-saving measures, is crucial for long-term success.
Sellerise is here to guide you, not just with tools and features, but with actionable insights and knowledge.
It's developed to help you make smart financial decisions that propel your business forward.
Let me share another gem with you: "Financial Intelligence."
It's an excellent book that I highly recommend for those seeking a deeper understanding of finance.
Now, I know some of you might say, "Hey, I'm not an accountant or a CPA."
But here's the thing—you're the business owner.
You're the one with the highest interest in making more money.
So, take the time to educate yourself.
Dima is an avid reader too. And during this conversation, he shared an interesting story.
He recently shared a cool piece of advice with his wife that I'd like to pass on to you.
She asked him, "How do you manage to read so many books all the time?"
And he replied, "Well, here's a trick for you. Make a list of books in a specific category, like finances, personal performance, or meditation. Then, go on YouTube and search for the book title followed by 'summary.' You'll find concise summaries of these books in just 15 minutes. You can acquire a wealth of compressed knowledge during activities like going to the gym. For instance, when I'm on the treadmill for an hour, I listen to summaries of around four books. It's not the entire book, but you don't always need to read the whole thing. You just want the best advice and insights. Of course, you can always read the complete book later if you desire."
Woah, after this insightful and informative detour, let's refocus and continue our exploration of the remarkable features Sellerise has to offer.
With the Payouts feature in Sellerise, you can gain a clear understanding of your actual profits, factor in costs of goods, and make informed decisions on how to allocate your funds.
It's like having a financial GPS for your business!
Now, let's delve into another feature in Sellerise called the PPC Dashboard.
PPC Dashboard
I must admit, Sellerise's PPC Dashboard isn't the most advanced feature out there.
Initially, Dima created it for his personal use to get a bird's-eye view of the numbers.
However, later on, when he realized the immense value it provided in optimizing and maximizing PPC campaigns, he decided to make it available to all Sellerise users.

The PPC Dashboard compresses the data from multiple campaigns, giving you an overview of impressions, clicks, and more.
However, if you're looking for a more comprehensive PPC Dashboard, there are plenty of options available in the market.
-: Other PPC & Inventory Management Tools :-
"We're constantly working on improving our PPC dashboard to provide you with more detailed insights. I've noticed some areas where other companies' dashboards fall short, and we aim to address those shortcomings. Currently, you can access the sponsored brands display and sponsored video performance sections. Simply click on the respective sections to view the performance metrics of each video."
~ Dima Kubrak
As a business owner, your time is precious, and you want to quickly assess the performance of your PPC campaigns.
That's why Sellerise's dashboard focuses on providing you with a top-level overview of the essential information.
You can swiftly find details like how much money you've spent on video ads this month and the gross profit generated from those ads within your company.
If you need more specific insights, you can dive deeper into each video campaign that you've run.
This way, you can analyze individual campaign performance and make informed decisions.
"We understand that you don't want to spend hours sifting through hefty Excel files or complex dashboards. With our PPC dashboard, you can access the key metrics you need without any hassle."
~ Dima Kubrak
Alright, let's now dive into the Smart Alerts feature in Sellerise.
Smart Alerts
About this tool, Dima mentioned an interesting fact.
Smart Alerts is what kickstarted Sellerise's journey about six years ago when Dima and teammates were growing their presence on Amazon.
Back then, they had around 300 SKUs and they loved to challenge themselves by operating in highly competitive niches.
"I'm not sure why, but I've always been drawn to the thrill of intense competition," said Dima.
Let me share his quick success story with you.
There was this one SKU Dima and his partner started with, investing $2,500 each.
They had a modest budget of $5,000, but within just one year, they generated a staggering $2.5 million in revenue from that single product.
It was an incredible ride, but unfortunately, their success caught the attention of their competitors.
Soon, they found themselves under attack, receiving a relentless stream of 30 to 40 negative one-star reviews every single day.
On a side note, if any of you ever come across a similar situation, let me assure you that no attack lasts forever.
Just like success, adversity is temporary.
It's crucial to be prepared for any ups and downs in your business or personal life.
I too have weathered numerous attacks, and one thing I've learned is that most attackers have weak marketing strategies.
They often lack a deep understanding of the actual business fundamentals.
That's why I always emphasize the importance of learning how business works, beyond just understanding the Amazon platform.
To thrive as an Amazon seller, you need to grasp the broader principles of running a business.
Take the time to learn about financial situations, analyze your profit and loss statements (P&Ls), and acquire a solid foundation in business intelligence.
These skills will empower you to navigate through challenges and make informed decisions.
Remember, you're not just an Amazon seller; you're a business owner, and that comes with a responsibility to educate yourself on the intricacies of running a successful enterprise.
Now, let's talk about Smart Alerts.
This feature was born out of Dima and his partner's experiences in those fiercely competitive niches.
"We needed a way to stay on top of critical events and changes in our listings. Smart Alerts became our trusty sidekick, keeping us informed and alert in real-time."
~ Dima Kubrak
With Smart Alerts, you'll receive notifications about important metrics such as reviews, rankings, sales, and more.

By staying in the loop with instant alerts, you can swiftly respond to any negative developments and take proactive measures to protect and grow your business.
Smart Alerts are designed to be your vigilant companion, ensuring that you're always aware of what's happening with your listings.
You'll have the power to respond swiftly, make data-driven decisions, and maintain a competitive edge.
Let me tell you a little secret that can help you level up your game and break free from being a small player in the eCommerce world.
It all starts with education. If you want to grow your business and truly understand every aspect of it, you need to educate yourself.
This knowledge will empower you to build a stable and long-term company that can withstand any challenge that comes your way.
Now, let's talk about Smart Alerts and how they revolutionized Dima's approach to monitoring his Amazon listings.
Back in the day, they didn't have a tool like this.
They had a team of 15 people in the Philippines whose sole job was to manually go through our listings multiple times a day, meticulously checking every detail, from images to reviews.
It was a tedious process, but it was necessary to ensure that our listings were flawless.
That's when the idea for Smart Alerts was born.
"We wanted to create a system that could monitor our listings 24/7, constantly on the lookout for any changes, attacks from competitors, or even mistakes that Amazon itself might make. And that's exactly what Sellerise does. It becomes your ultimate guardian, keeping a watchful eye on your Amazon listings and seller account, never resting, and always ready to alert you to any potential threats or issues."
~ Dima Kubrak
Smart Alers is one of the most remarkable features of Sellerise.
It also gives you the flexibility to create different channels for monitoring specific aspects of your listings.

It's like having your own private detective constantly scanning the Amazon landscape for any signs of trouble.
Just imagine the peace of mind of knowing that Sellerise is diligently monitoring your listings while you focus on other aspects of your business.
Let me give you a quick example to demonstrate the power of Smart Alerts.
As you click on Set Configuration, you'll be able to create marketplace configurations.

The options are plenty so you can scroll through the list to select the type of configuration you want to set.
For example, you can set up an alert for large orders.

The threshold of 20 units means that if someone places an order for more than 20 units, Sellerise will trigger an immediate alert.
This is unusual because most customers don't typically purchase such large quantities in a single order.
I remember receiving an alert from Sellerise notifying me that someone had placed 10 consecutive orders for 20 units each. That was a clear red flag for me. Without wasting a moment, I jumped into my Seller Central account and made a critical change to my listing. I set the maximum number of units one person could buy to just one. And you know what? The attacks stopped. It turned out that someone was trying to buy out my entire inventory, likely in an attempt to leave me out of stock right before the lucrative Q4 season. But thanks to Sellerise and its timely alert, I was able to take swift action and protect my business.
~ Dima Kubrak
This is just one example of how Smart Alerts can save the day and prevent potential disasters.
By being proactive and setting up intelligent monitoring points, you can stay one step ahead of the game, anticipate threats, and maintain control over your inventory and sales.
Don't let unforeseen circumstances ruin your chances of success, especially during crucial events like Black Friday.
Oh, and let me tell you another fascinating fact that Dima shared with me.
The number of attacks he's witnessed in his eight years of working with Amazon is staggering.
But here's the thing he learned: Acting swiftly can solve the majority of these issues within minutes.
Take, for example, when Amazon decides to remove your main image, which can seriously impact your conversion rates.
If you receive an alert from Sellerise fast enough, you can rush back to Amazon and change the image back to its original state.
And here's a little pro tip: always have a backup file handy.
Sometimes Amazon removes your image due to a few competition complaints, even if there was nothing wrong with it.
Having a second set of images that you can quickly upload without Amazon detecting any changes can save you from policy violations and headaches.
Now, let's talk about the power of notifications.
With the Smart Alerts feature in Sellerise, you can receive notifications for any changes that occur with your listings.
For example, if you tap on the BuyBox alert, a screen will pop up, displaying all recent events that might pose a threat to your ownership of the Amazon Buy Box.

So, it's like having a personal assistant who keeps you informed and on top of everything.
You can configure the notifications according to your preferences, and it's all possible on just one screen.

Besides this, if you're a wholesaler and you don't want to be bombarded with alerts for every single listing, especially if you only have a few units and don't care about minor changes, you can simply disable alerts for those listings.

"We understand that different sellers have different needs, and Sellerise provides the flexibility to adapt to your specific requirements."
~ Dima Kubrak
Speaking of configurations, check this out: you can disable alerts for new products.
This feature is a favorite among wholesale sellers who add hundreds of SKUs daily.
They don't want to be overwhelmed by a barrage of alerts for each new listing, so they can easily disable those alerts.
We automatically add products to the monitoring list from your Seller Central, but if you prefer more control, you can manually add them as well.
Now, let me introduce you to one of the most crucial alerts in Sellerise—new reimbursable units.

You can set this alert in markerplace configuration settings to ensure that Amazon doesn't continuously hold onto your money, and you don't miss any deadlines for reimbursement.
Trust me, guys, this feature is a game-changer when it comes to protecting your finances and making sure you get what you're owed.
But wait, there's more!
Sellerise doesn't just cater to individual sellers; it also has an advanced system for enterprise-level companies and those with multiple employees and departments.
You can go to the Channels section and assign different alerts to specific teams, ensuring that the right people receive the right information at the right time.
Plus, you can choose where the alerts are sent—to mobile apps like Channel or to specific email addresses.
This level of customization and organization is what sets Sellerise apart from the competition.

Let's dive into more exciting features!
Smart Alerts feature offers a fantastic customization system that allows you to assign teams to specific brands or seller accounts.
Picture this: Team A takes charge of one brand while Team B handles another brand.
You can assign them specific seller accounts, maybe one or two accounts per team.
It's all about streamlining and understanding your company better.
You can even have one team focusing on the USA Marketplace while another team conquers the Canadian Marketplace. Different people, different time zones, maximizing efficiency. It's like a synchronized dance of Amazon domination!
And guess what?
I've got a video tutorial explaining this advanced system right below.
You'll get a quick, comprehensive explanation of how it all works.
It's like having a personal guide showing you the ropes. Nice, right?
Reviews

Alright, the second option we have is Reviews.
So, my fellow Amazon adventurers, let's now explore the Reviews Dashboard in Sellerise.
Review Dashboard
Trust me, this is where the magic happens!
Once you enter the Review Dashboard, you'll be greeted with a plethora of statistics for all your products.
It's like having a bird's-eye view of your review kingdom.
Let me show you how it works.

Imagine clicking on a specific product, and voila!
You'll see a treasure trove of data—ratings, review counts, and even the number of reviews that appear on page one.

Why is this important?
Well, it allows you to monitor and even clean up negative reviews.
It's like wielding a powerful sword against the forces of negativity.
But hey, I'm not here to give you advice on how to improve your main page strategy.
Some strategies can be a bit dicey when it comes to compliance.
But trust me, you can find fantastic resources in the Review dashboard to master the art of review management.
And now, I'll share with you how this dashboard can help you delete those pesky negative reviews and gather more glorious positive ones.
And the best part?
It is 100% compliant with Amazon's guidelines.
That's right, the team at Sellerise works hand in hand with Amazon's team to ensure everything they offer is top-notch and aligned with Amazon's requirements.
Now, let's delve into the different options and tabs available in the Review dashboard.
I've already shown above how the Overview tab looks like.
Now, once you're in your real account, you'll be able to see common phrases that reviewers use.
It's like having a sneak peek into their minds.
You can observe the combinations of words they use when describing your product, whether it's a five-star review or a not-so-glowing one.

Imagine discovering that people are constantly complaining about the size of your product.
It makes you wonder, "Are we missing something in our bullet points, title, or description? Are customers getting confused when they make a purchase?"
These insights will empower you to improve your product and provide a better customer experience overall.
But wait, there's more!
We've got a nifty Goal Calculator in Sellerise.

Let's say your current star rating is 4.5, but you have your sights set on achieving a glorious 4.7.
Fear not, because the Goal Calculator will show you exactly how many reviews you need to gain or remove to reach your desired rating.
It's like having a compass guiding you toward success.
You can set additional goals and watch as your rating soars to new heights.
And if you're a visual person, Sellerise has got you covered here as well.
The Review Gains tab allows you to see how reviews have been added to your listing over time.
You can analyze the growth of your review kingdom over the past year or even the last 30 days.
It's like witnessing the rise of an empire!

But hey, if you ever have any ideas on how Sellerise can improve the Review Dashboard or any other dashboard within Sellerise, always feel free to reach out to them.
You'll find Sellerise's friendly chat feature on the right-hand side of the screen.

"Our dedicated team tries their best to be available on live chat at all times. However, if they happen to be busy assisting others, just leave a request, and we'll make sure to get back to you as soon as possible. We're here to answer all your questions and provide the help you need. However, it's important to note that while our support chat in Sellerise is designed to assist you with understanding how to use the tools and navigate the platform, it's not intended to provide consulting on how to sell on Amazon. This sometimes becomes a challenge because we receive inquiries like, "Hey, how can I get more reviews? How can I increase my sales?" As much as our chat team would love to help you with those specific questions, they cannot take responsibility for providing consulting advice on growing your Amazon business. They'll kindly let you know that they cannot offer guidance on specific strategies for business growth."
~ Dima Kubrak
To help you make informed decisions about your business growth, Sellerise has other resources!
They have a YouTube channel called Sellerise.
Here, you'll find a treasure trove of weekly videos packed with valuable tips and tricks on how to grow your Amazon business.
And the best part?
Sellerise also offers a free account and discounts to further educate yourself.
It's like having a secret passage to knowledge and savings!
Now, let me share a personal opinion.
Sometimes, it's beneficial to invest in a complete course that covers all the intricacies of Amazon selling.
However, a lot of times, what worked for me was good old-fashioned self-learning.
I dove deep into the numbers, explored every metric possible, and immersed myself in Seller Central.
That's how I acquired knowledge and practical experience.
I experimented, tested different strategies, and observed the results.
And you know what?
Sometimes, people would come to me and ask, "Hey, which of these two types of campaigns should I activate?"
And my answer?
Activate both!
Try it out, see how it goes, and then scale it based on your results.
Everything in the Amazon business is a journey of testing, learning from failures, and celebrating successes.
Once you have a proven track record of success with certain strategies, then you can confidently scale them to larger numbers.
But remember my friends, don't rush to scale unless you have solid proof of concept.
Scaling prematurely can be quite costly.
Review Requester
Alright, my adventurous comrades, let's dive into the next tool we have at our disposal within Sellerise.
It's called the Review Requester, and let me tell you, it's one of the most popular tools on the market right now.
In fact, Sellerise was one of the first companies to enable this feature for Amazon sellers.
It offers a free Chrome extension for beginners, which is used by approximately 10,000 users every day.
But for those serious about making money on Amazon, Sellerise has the paid desktop version of the Review Requester right here in Sellerise.
This advanced version is a game-changer, and if you're committed to Amazon success, it's a must-have for your seller account.

Now, you might be wondering, what sets our Review Requester apart from all the others out there?
Well, let me enlighten you.
The majority of requesters on the market operate through browser manipulation.
Essentially, they use Chrome extensions to click buttons within your seller account, replicating your manual work.
But our Review Requester is different.
It's a fully approved system by Amazon that works through user permission, revolutionizing the way Amazon looks at review requests.
But wait, there's more!
We offer a plethora of filters that you can set up to tailor your review requests.
For example, you can set a configuration to choose to send review requests only to people who have left you seller feedbacks with five stars or higher.

It's a way to ensure you're targeting satisfied customers who are more likely to leave positive reviews.
On the flip side, you can also prevent review requests from being sent to those who have left you a one-star seller feedback.
After all, if they didn't like your product, requesting a review from them might result in a negative review.
We want to save you from that.
But that's not all.
The dashboard also has the option to focus on repeat buyers.
These are customers who have purchased from you more than once, and they're like gold mines for positive reviews.
Why?
Because they keep coming back for more, indicating their satisfaction with your product.
Repeat buyers are the loyal souls and by targeting them, you're practically guaranteed to receive positive reviews because they already adore your offerings.

Additionally, the dashboard provides you the ability to exclude customers who have requested refunds.
If someone asked for a refund, chances are they weren't thrilled with your product, and you wouldn't want them to leave a negative review, right?
Now, let's talk about the concept of time.
We have multiple fascinating two options: AI time and Buy time.

AI time relies on our system's analysis of when you receive the most reviews per day.
Based on that data, we strategically schedule review requests during those peak times.
It's like having an automated review-requesting wizard working for you.
On the other hand, the Buy time is based on customer behavior.
For example, if a customer purchased your product at 5 PM two weeks ago, we assume they might be more active online around that same time, say, five days later or two weeks thereafter.
You can choose which time strategy suits you best and test them out for optimal results.
Personally, my favorite is Buy time, but still, you can experiment and find your own sweet spot.
Everything else about the Review Requester is simple and straightforward.
You can select from options like morning, afternoon, evening, or ASAP.
It's all about customizing your review request experience to align with your business and customer behavior.
Also, I want to emphasize that if you're new to Sellerise and want to ease into the review requesting process, you can set a daily limit for the number of requests you send out.
This ensures you don't overwhelm yourself or your customers right from the start.
Take it at your own pace.

Oh, and here's a clever feature: Sellerise is so sophisticated that it even tracks who has already received a review request from other tools.
So, if someone has already been asked for a review by another system, you'll be able to see it on your Sellerise screen.
You won't be double-dipped, my savvy comrades.
Sellerise will analyze the situation and skip that order, saving you from pestering customers with redundant requests.
Isn't that delightful?
But wait, there's more!
Suppose you're running giveaways or you have a list of buyers who purchased your products at a discount.
In that case, you might not want to request reviews from those individuals.
No worries!
Sellerise allows you to upload a list of orders and exclude those customers from receiving review requests.
It's all about customization and targeting the right audience for your review requests.
To upload the list, simply click on Exluded Orders.

And you'll be presented with this option to import excluded orders.

Now, let's talk about custom configurations for other products.
Within Sellerise, you have the power to disable specific products from review requests.

Picture this: You've been working with a factory for ages, and you've just ordered another batch of products.
However, this batch turns out to have an unpleasant smell—like they used plastic that emits an odor.
It has happened to Dima before.
And if it happens, you suddenly start receiving a flurry of returns, and it's not the ideal time to request reviews from these disappointed customers.
That's when the disable option comes to the rescue.
You can temporarily disable the product until the faulty batch is sold out or until you resolve the issue.
Acting swiftly and decisively is key to maintaining your business's success.
So, my intrepid comrades, with the Review Requester at your fingertips within Sellerise, you have the power to send targeted, strategic review requests, ensuring that your positive reviews flow like a mighty river.
Get ready to witness the impact of personalized review requests on your Amazon journey!
Review Downloader
Nowww, let me introduce you to the magical tool known as Review Downloader, which resides within the realms of Sellerise.
It's a tool similar to Helium 10 Review Insights.

Picture this: You're on any Amazon marketplace, and you stumble upon a listing that catches your eye.
With a single click of a button, this exceptional tool called Review Downloader springs into action.
It acts like a Chrome extension—swiftly downloads all the reviews from that Amazon listing and brings them to your fingertips.
Now, here's where the real adventure begins.
You see, Walmart has opened its gates for you to add reviews to any of its listings.
What you can do with this edge is to take those downloaded reviews, bring them into the Keyword Processor feature in Sellerise, and upload the entire collection.
Then, like a skilled alchemist, you remove words like "Amazon" and "Prime delivery" from the list.
What do you have now?
A beautiful compilation of reviews.
But here's where the magic truly unfolds.
You journey to your Shopify store, armed with your treasure trove of reviews.
From there, you boldly march to Walmart and proclaim, "Hey, good folks of Walmart, behold my product and the wealth of knowledge and praise contained within these reviews! Please connect these reviews to my Walmart listing!"
Ultimately, your Walmart listing will be adorned with those reviews, seemingly appearing overnight.
It's a wondrous hack, a shortcut to success. No need for giveaways or begging for reviews.
It's a masterstroke that can work wonders for you.
Review Puncher
Let's now shift our focus to the Review Puncher feature in Sellerise.
Picture this: Just as a review request helps you gather more positive reviews, the Review Puncher comes forth to aid you in the battle against negative reviews.
It's a formidable tool within Sellerise, and I have a captivating case study to share with you soon.
But for now, let me unravel its secrets.
The Review Puncher takes action by sending requests to buyers who have left you one, two, or three-star reviews.
By offering a currency refund or a replacement, it extends a helping hand to these dissatisfied customers.

Now, hold on to your hats because here comes the magical part.
Imagine a review on Amazon, where a customer was contacted by the Review Puncher.
The Review Puncher engaged in conversation, offered a refund or replacement, and behold!
The person's heart was filled with joy.
They not only removed their negative review but transformed it into a glorious five-star review!
Truly, it would be a wondrous transformation to witness.
What makes the Review Puncher even more awesome is its full compliance with Amazon's Terms of Service.
It has been crafted to assist you in combating those negative reviews while ensuring you stay in line with Amazon's guidelines.
It's a fully automated tool, just like the other enchanting tools within Sellerise.
They exist to ease your burdens as an Amazon seller, freeing you from distractions that come with the territory.
With so much to juggle—reviews, rankings, product optimization, conversion optimization, inventory, and shipments—tools like the Review Puncher offer the gift of automation.
As you embark on your Sellerise journey, make sure to activate all these fantastic tools.
By activating and utilizing these powerful resources, you'll equip yourself with the necessary arsenal to streamline your operations, optimize your listings, and propel your business to new heights.
Keywords

Now, let us venture forth into the realm of keywords, where we have four marvelous tools awaiting our inspection.
Keyword Tracker
The first one on the list is Keyword Tracker.
This tool serves as a valuable asset in your Amazon selling journey, empowering you to track the positions of your products based on specific keywords.
Similar Keyword Tracker by Jungle Scout is an alternative.
By monitoring the performance of your chosen keywords, you can gain valuable insights into their effectiveness and make data-driven decisions to optimize your product listings.

With the Keyword Tracker, you can closely monitor the positions of your products for specific keywords on Amazon's vast marketplace.
By tracking keyword rankings over time, you gain valuable data that allows you to make informed decisions regarding your product listing optimizations.
This powerful tool also provides you with a comprehensive overview of your keyword performance, allowing you to identify trends, track progress, and fine-tune your strategies accordingly.
Whether you're launching a new product, optimizing existing listings, or conducting competitor analysis, the Keyword Tracker equips you with the information needed to stay ahead of the game.
Plus, with its user-friendly interface and intuitive features, the tool makes it effortless to track and analyze the performance of your selected keywords.
By leveraging this valuable data, you can refine your keyword selection, optimize your product listings, and ultimately improve your visibility and conversion rates on Amazon.

Now, I must confess that as this is a demo account, the numbers before you are mere figments of our imagination, created for the purpose of this demonstration.
But fret not, for when you embark on your own Sellerise journey, the true numbers shall be unveiled, allowing you to witness the power of the Keyboard Tracker in all its glory.
Keyword Processor
Let's now explore the Keyword Processor feature in Sellerise.
This powerful tool will assist you in efficiently managing and refining your keyword collection, allowing you to optimize your Amazon product listings with precision.
Imagine facing a sea of keywords, overwhelmed by duplicates and repetitive variations.
Fear not, for the Keyword Processor is here to aid you in this daunting task.
Let me guide you through its impressive capabilities.
Within the Keyword Processor, you'll discover a range of practical options to enhance your keyword management.
With just a few simple steps, you can effortlessly separate keywords by space or comma, effectively organizing and categorizing them for maximum clarity.

But that's not all!
The Keyword Processor offers additional features to streamline your keyword collection.
You can remove duplicates, isolate single keywords, and eliminate common words, enabling you to fine-tune your keyword selection with ease.
Furthermore, you have the power to exclude your competitors' brand names, banish numbers and ASINs, and even remove specific phrases from your keyword arsenal.
With such flexibility and control at your fingertips, you can shape your keyword strategy according to your unique goals.

Keyword Hunter
Let us now explore the Keyword Hunter feature in Sellerise, a tool that greatly assists you in your quest for effective product research.

As an Amazon seller, I've come across numerous keyword research tools that bombard me with thousands of keywords, many of which don't make any sense.
It's frustrating to sift through this overwhelming data, especially when I don't have a clear understanding of which keywords are most relevant for ranking my products.
Fortunately, Sellerise's Keyword Hunter feature simplifies this process and provides valuable insights.
To demonstrate its power, let's dive into the example of bicycle seats.
With just a click on the search button, I unleash the potential of the Keyword Hunter.

Now, what exactly does this tool do differently?
Unlike other keyword research tools that focus solely on search volume, Sellerise's Keyword Hunter takes a unique approach.
It disregards search volume because the number of searches a keyword receives doesn't necessarily translate into actual purchases.
Instead, Sellerise prioritizes the number of sales per keyword on Amazon, along with conversion rates.
These are the metrics that truly matter when analyzing a niche.
For instance, when I explore the bicycle seat niche, I discover that out of the vast number of keywords available, only 120 of them are actually generating sales.
This means that the rest of the keywords, often provided by other tools, are simply a waste of time and money.
If I want to rank my product effectively, I need to focus on those 120 keywords that truly drive sales on Amazon.
Furthermore, the Keyword Hunter provides me with additional valuable information about my competition and market availability.
In this case, I see that there are 52 other products competing with me in the bicycle seat niche, and the average market availability is 56.02 percent.
Market availability is an important number as it helps me gauge the level of saturation in the market.
With this knowledge, I can make informed decisions about my product positioning and marketing strategies.
Now, let's explore the Keyword Performance chart.

By scrolling to the right, you can see the sales per specific keyword.

Please note that I'm using a demo account, so the data is from August, but it still gives us a sense of the information we can gather.

Each keyword's performance is displayed, revealing the amount of sales per day associated with that specific keyword.
It's crucial to understand that Amazon's algorithm expects sellers to generate sales within a certain range for each keyword.
Attempting to manipulate the system by giving away excessive units or not meeting the expected sales can lead to negative consequences.
Therefore, it's essential to align your sales with Amazon's expectations for optimal results.
So, if the expected sales for the top position in the bicycle seat niche on Amazon is only 12 per day, then you shouldn't aim for more than that initially.
Attempting to generate an abnormal number of sales, such as 25 per day, will raise suspicions and may result in losing your ranking.

It's not just about reaching the top; it's about staying there.
It's crucial to follow Amazon's expectations and maintain a natural sales velocity.
I hope you're following along because this is important for everyone to understand.
To make the data more visually appealing, you can also download the report in an Excel file.

Let me scroll down a bit to show you the Semantic Core, which is a list of the 120 keywords that are actually driving sales.

The first metric we use here is called Search Rank, which is similar to Amazon's Best Seller Rank (BSR).
It reflects the position and power of the keyword, not its search volume.
On the right-hand side, you can see the sales data, and please note that these sales are purely organic and do not include PPC (pay-per-click) campaigns.
Now, let's talk about the third metric, conversion rate.
It's a crucial factor in keyword ranking.
We aim to target keywords with a conversion rate of 18% or higher, with a personal preference for 20% or higher.
Why is conversion rate important?
Well, if you manage to rank for a keyword with a high conversion rate, such as 19 percent, you are more likely to maintain your position at the top.
On the other hand, if the conversion rate is low, you risk being pushed down the rankings.
This not only affects your visibility but also results in a waste of money spent on ranking campaigns.
Therefore, it's essential to prioritize keywords with a strong conversion rate.
Now, talking about the search volume, here's an interesting fact: it doesn't always equal sales.
Many tools display search volume data for keywords, but it doesn't accurately reflect the actual sales generated.
"This is something we acknowledge and account for within Sellerise. Our focus is on sales and conversion rates, which provide a more accurate representation of a keyword's performance and its potential to drive revenue."
~ Dima Kubrak
Most tools in the market provide estimated search volume, which is not always reliable for assessing a keyword's true power and its potential impact on your ranking campaign.
Even within Amazon's Product Opportunity Explorer, the combined search volume for a few keywords or category keywords doesn't accurately estimate the strength of a specific keyword.
To truly dominate in your niche, you need a more comprehensive understanding of keyword performance.
Let's take the example of the keyword "bike seats for women comfortable" with a conversion rate of 17% (almost 18%).

This keyword shows promising potential with 880 sales per month.
But alongside, there's a worth-mentioning metric we can consider called "Other Sales."
This metric refers to sales generated outside of the top three positions on Amazon's search results page.
When conducting a ranking campaign, we want to ensure that keywords ranking for other sales have a percentage higher than 40%.
This is because if the Other Sales percentage is low, such as the conversion rate being 29% but other sales only at 8 percent, it means that most of the sales occur within the top three positions.
If we invest in a ranking campaign and fail to secure one of the top three positions, we won't be able to recoup our investment through sales outside of the top three.
However, if a significant portion, let's say 60% or even 49% or 47%, of the sales occur outside of the top three, we have a better chance of recovering our investment.
That's why we prioritize keywords based on their conversion rates and other sales percentages.
But that's just a bird's-eye view of our analytics.
There's a wealth of information we consider when strategizing ranking campaigns.
For example, we also take into account the concept of saturation, which is represented in the Semantic Core table's second parameter (metric).
Saturation refers to the number of ASINs (Amazon Standard Identification Numbers) that are currently using a specific keyword.
If a keyword has a high saturation level, it means that many competing products are already targeting that keyword.
In some cases, if a keyword is a brand name like "Starbucks," it's best to skip it since it may not be relevant to your product.
However, overall, if a keyword is powerful and has a low saturation level, it indicates an opportunity for dominance in the niche.
The parameter Saturation in the Semantic Core section, not only measures how many ASINs are using the keyword but also reveals how dominant those ASINs are in the search results.
Essentially, saturation helps us assess the level of competition and determine the viability of a keyword for ranking purposes.
A higher saturation number also indicates that more competitors have been juggling for the top positions over the past 640 days.
It could mean that they weren't able to hold onto their positions for long, or perhaps there's fierce competition in the niche.
Now, let's move on to the "Related Products" section beside Semantic Core.

These are the products that were used to compile the Semantic Core.
"We gather keywords from these products to ensure that we cover all the relevant keywords in the niche," said Dima.
But Sellerise also features another powerful tool called Keyword Re-Ranker.
This tool helps uncover additional keywords that might have been missed in the Semantic Core but are more specific to the niche.
For example, let's say you want to sell a bicycle seat with an LED light.
When you search for "bicycle seat" in Sellerise, we'll find all the products that have been sold under the category of bicycle seat.
However, if there's only one ASIN that has sold a bicycle seat with an LED light, that keyword won't appear in the results.
But don't worry, there's a way to access this valuable keyword.
Here's what you can do: Download the data from the top-ranking product that sells the LED light bicycle seat.
By doing this, you'll be able to obtain a list of keywords associated with that product, including the highly relevant keyword "bicycle seat with LED light."
Combine this list with the keywords from the Semantic Core, and voila!
You'll have the most comprehensive and powerful collection of keywords that will help you dominate the bicycle seat niche on Amazon.
Also, here's a pro strategy to nail this approach: Use big keywords with high sales and smaller keywords with sporadic sales!
We can definitely leverage those smaller keywords that have shown some sales activity.
After all, every sale counts.
However, it's crucial to consider relevancy in your keyword strategy.
For instance, if you specialize in selling bicycle seats without LED lights, it wouldn't make sense for you to target the keyword "bicycle seat with LED light."
Even if that keyword has recorded sales, ranking for it would be counterproductive and a waste of your ranking budget.
Relevancy is the key factor to guide your keyword selection.
Focus on the keywords that align with your product and target audience to drive the most effective and efficient ranking campaigns.
Sellerise provides a holistic approach to keyword research and analysis, giving you the tools to identify the most relevant and high-performing keywords for your product.
By combining the features Keyword Hunter offers, and by utilizing the Keyword Re-Ranker (we'll talk about it in detail right after), you'll have a comprehensive list of keywords that will propel your product to the top of Amazon's search results.
Keyword Re-ranker
The Keyword Re-Ranker tool within Sellerise is a powerful feature that allows you to analyze the keywords associated with any ASIN.
You can simply input the ASIN and click on the search button to access valuable insights.

Let me walk you through how it works.
You can either copy/paste your desired product ASIN in the search bar and click the Search button or if you're using the Keyword Hunter tool and exploring related products, you can click on any ASIN to be directed to the Keyword Re-Ranker.
Once you're there, you'll see the product's name and photo, followed by the performance metrics associated with that specific ASIN.

In the past, this ASIN had 300 keywords driving sales, but now, you see only 7 keywords at the top.
This indicates a loss of 293 keywords, which is quite significant.
It suggests that the product may not be performing as well as it used to.
What's fascinating is that you can examine the exact keywords that previously generated sales for the ASIN, as well as the keywords that are currently driving sales.
By analyzing this list, you can identify keywords that include brand names.
Losing organic positioning for those keywords could explain the decline in sales.
Additionally, the tool allows you to see when the ASIN lost its position for a specific keyword.
This information is vital because if you recently lost your position for a keyword, it's recommended to prioritize ranking efforts for that keyword.
Amazon still considers your product relevant, making it easier for you to regain your ranking.
Now, here's where the competition analysis comes into play.
If you're examining competitor ASINs, take note of the keywords they lost positions for three months ago, four months ago, or even six months ago.
These keywords could present an opportunity for you to rank higher if they are relevant to your product.
For instance, if you're selling a bicycle seat with an LED light, and a competitor lost their ranking for the keyword "bicycle seat with LED light" three months ago, it would be easier for you to rank for that keyword.
The Keyword Re-Ranker feature also allows you to download reports for further analysis.
However, delving into the details of this process would require more time and explanation.
You can find in-depth tutorials in my playlist about Sellerise that demonstrate practical keyword research using the Keyword Hunter and Re-Ranker tools.
These videos cover a wide range of information and can extend for a couple of hours, providing you with a comprehensive understanding of the process.
Also, there is another feature within Keyword Hunter called Titles' Founder.
It's a beta testing tool that allows you to build titles based on selected keywords.
Let me tell you how it works.

When you find a keyword that you like, you can click on it to add it to the Titles' Founder tool.
It acts as a title builder where you can construct a title based on the keywords you've added.

Now, the exciting part is that you can see all the data about the keywords right here in the tool.
You have the flexibility to modify the keywords as needed.
You can remove certain keywords or make changes, and the tool instantly updates to show you the matches based on your modifications.
Additionally, the tool calculates the power of the title, which represents the combined strength of all the keywords you've added.
This way, you can gauge how impactful your title is.
However, Dima mentioned one thing here. He said that there is one challenge with the Titele's Founder feature and his team is still working on.
The issue is that it can sometimes show duplicate keywords.
"I understand the importance of having a readable title that includes the best keywords without repetition. So, the goal is to refine the Title Founder feature a bit further. The idea is to build a title right within Sellerise, ensuring that it contains the most powerful keywords while being coherent and optimized for readability. Once we achieve that, you won't have to work with Excel files separately; all the necessary data will be readily available, and you can effortlessly combine and create the perfect title."
~ Dima Kubrak
Moreover, you can also copy and paste a title from your competitors into the tool.
It will show you the combined power of your competitor's title, providing valuable insights and information to assist you in optimizing your own title.
I must say, Titles' Founder is still a work in progress, but it already offers significant benefits by streamlining the title creation process and analyzing keyword data simultaneously.
It saves you time and effort by presenting all the necessary information in one place, allowing you to make informed decisions about your title strategy.
"I'm constantly working on improving this tool to ensure it becomes even more user-friendly and efficient. With Sellerise, we aim to provide you with innovative and valuable features that simplify your Amazon journey and help you achieve success. So, give Titles' Founder a try and leverage its capabilities to optimize your title and enhance your product's visibility. I hope you find this tool as exciting as I do!"
~ Dima Kubrak
Reimbursements

Let's dive into the topic of Amazon reimbursements because it's an essential tool for everyone who signs up for Sellerise.
Reimbursement tool by Sellerise can be a game-changer, allowing you to recoup a significant amount of money from Amazon in a short period of time.

When you register for Sellerise, one of the first things I recommend is to check how much money Amazon actually owes you.
This is crucial because Amazon has a specific time limit within which you can request reimbursement.
In Sellerise, we provide you with a reimbursement dashboard that shows you the potential money that Amazon owes you.
It's categorized based on different time frames.
You'll notice categories like "0 to 9 months," "9 to 18 months," and "18 months plus."

Sellerise is one of the best Amazon reimbursement tools.
It's important to understand that once the time limit for reimbursement passes, that money becomes irreversible, meaning it's impossible for you to get it back from Amazon.
I want to emphasize this because I've seen cases where sellers lost significant amounts of money, such as $33,000, simply because they didn't take action to request reimbursement within the allotted time frame.
Now, let me walk you through the process of requesting reimbursements using Sellerise.
Within the Reimbursements dashboard, you have various categories to choose from.
In a real account, you'll find even more categories available.

For the purpose of understanding, let's say we want to get money back for the Destroyed Inventory.
We select this category, click "Next," and then choose the products for which we want to get reimbursed.

After that, we choose the type of reimbursement, confirm the details, click "Create a Case," and then "Finish."

Sellerise automatically creates the case for you within Seller Central, so you don't even need to log into Seller Central separately.
You can now manage the case directly within Sellerise and track the response from Amazon.
For example, you might see the status as "Pending Answer" or any other relevant updates.
Sellerise also provides monitoring features that track who submitted the cases and who opened them.
This is useful because many sellers already work with service providers to handle their reimbursement cases.

With Sellerise, there are no hidden fees or commissions.
Everything is included in your subscription, and you receive the full amount of money back.
Sellerise is one of the GETIDA alternatives.
It's a transparent and straightforward process designed to maximize your reimbursements without any additional costs.
Now, let me share a fascinating case Dima encountered.
One seller discovered that Amazon owed them a staggering amount of over $500,000!
Yes, you heard that right, half a million dollars.
The most amusing part of the story was that the seller was already working with a service provider who had informed them that they had been reimbursed $107,000 in July.
However, upon closer inspection, it turned out that the money hadn't actually been deposited into their Seller Central account.
To make matters worse, the service provider charged a commission of around 10% to 20% for their services.
So imagine this: Amazon didn't give you the money back, you paid a commission for it, and now you're running out of time to retrieve the funds.
It's a frustrating situation.
Luckily, they reached out to the team at Sellerise, and they (the team at Sellerise) were able to assist them.
"Our team requested the invoice from Amazon, and with that documentation, they successfully reclaimed the money owed to them. Can you imagine the joy of receiving $100,000 from Amazon, all thanks to Sellerise? It was an incredible case study for you all, showcasing the power of our platform. We strive to make these reimbursement processes as seamless as possible, ensuring you receive the money you're entitled to."
~ Dima Kubrak
For most reimbursements, the process is straightforward.
As I mentioned earlier, it's only a matter of a few clicks to initiate the reimbursement.
However, FBA shipments require a bit more effort. Let me guide you through the steps.

After selecting the "Missing FBA Shipment Units" category, you proceed to the next screen where you choose the specific shipment you want to work with.

Once you click "Next," Sellerise provides you with detailed instructions on how to proceed with reclaiming the money from Amazon.
To make it even easier, you are offered templates and guidelines to follow.
You can even click on the provided link, which takes you directly to Seller Central, where you can open a case specifically for the relevant transaction and shipment ID.

But that's not all! Sellerise goes the extra mile to streamline your reimbursement process.
It offers a feature called "Shipment Documents."

If your logistics team is responsible for sending inventory to Amazon, they can upload all the necessary documents, such as BoL (Bill of Lading) invoices, directly into Sellerise.

This way, when you or your team members are working on a reimbursement case, you can access these documents effortlessly.
No more wasting time searching for the correct invoices or documentation.
It's all organized and easily accessible within Sellerise.

By optimizing your workflow and reducing the time spent on administrative tasks, Sellerise empowers you to focus on what matters most—growing your business and maximizing your profits.
"We understand that every minute saved is a minute you can invest in strategic decision-making and driving success."
~ Dima Kubrak
Let's get back to the fascinating Reimbursements feature.
On the Sellerise dashboard, you can easily keep track of how much money Amazon owes you in Reimbursements.
If they lost your inventory, they'll likely compensate you with cash.
But if they found your inventory, they'll return the units instead, which are still valuable.
Now, here's an interesting tidbit: It's important to note that Amazon has become more efficient in handling reimbursements.
They now pre-calculate reimbursements for sellers, automating the process to minimize mistakes and ensure prompt payouts.
You might come across the term "Automated Reimbursement" within Sellerise, indicating that Amazon has automatically calculated the reimbursement on your behalf.
In this case, Sellerise didn't intervene or charge any percentage for the service.

And do you remember, we discussed Smart Alerts earlier in the blog?
These alerts save you time and effort by keeping you informed about new reimbursement units becoming available.
By activating the alert through Smart Alert's configuration settings, you'll receive notifications via email, Slack channels, or even our mobile application.

This means you don't have to log into Sellerise daily to check for updates.
Instead, you'll be notified when there's money waiting to be claimed.
Imagine the convenience!
If there's additional money available for reimbursement, Sellerise will send you a notification saying, "Hey, we found more money for you! Please log in to Sellerise and request it back from Amazon."
It's a simple yet powerful way to ensure you never miss an opportunity to claim what's rightfully yours.
And there you have it—the power of reimbursements with Sellerise.
It's a tale of triumph over lost money, of streamlined processes, and of ensuring you receive every penny you deserve.
So my comrades, embark on this journey with us, armed with the knowledge and tools to reclaim what is rightfully yours.
Sellerise stands by your side, ready to navigate the intricate world of FBA Amazon reimbursements and pave the way for your financial success.
But wait, we're not done just yet!
There's still more to discover and explore within Sellerise.
Let's delve into the details of Sellerise's Inventory Dashboard.
Inventory Dashboard

Just like Sellerise's PPC tool, the Inventory Dashboard is designed to simplify your experience.
Here, you're provided with essential information about your inventory, such as the cost of goods, estimated sales, and potential profit.

In this demo account, you won't see the daily average units or days left, but on a real account, you'll have access to these valuable metrics.
You can easily track how many units you're selling on average each day and how many days of stock you have remaining.
Additionally, the Dashboard offers detailed insights into your inventory, giving you the power to optimize your operations and increase efficiency.
Now, it's important to note that if you're looking for highly advanced inventory management dashboards or tools, you may need to explore options outside of Sellerise.
As a seller, we too utilize different tools in our own warehouse, such as ShipStation and custom-made software that aids in scanning each unit. While our capabilities might not match Amazon's sophisticated robotic systems, we strive to provide effective solutions for our users.
Next, let's explore the intriguing world of Adult Checker.
Adult Checker
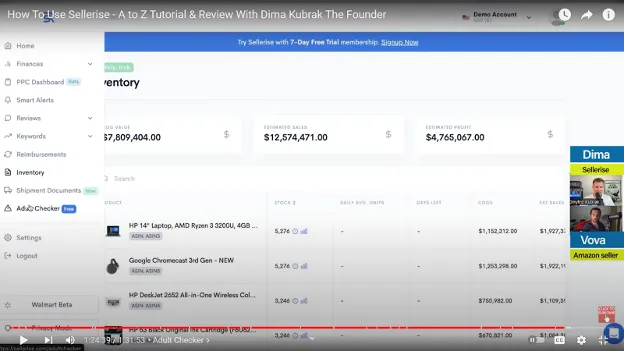
The best thing about the Adult Checker is, it's a free tool that doesn't even require registration with Sellerise.
If you log out of your account, you can directly access Adult Checker.

But what exactly does the Adult Checker do, you ask?
Well, sometimes Amazon mistakenly assigns a product to the adult category known as "Sexual Wellness."
Although your listing remains active, your PPC (pay-per-click) campaigns are disabled, and your product loses keyword ranking.
This means your product becomes virtually invisible to potential customers on Amazon, even though it's still technically available.
Thankfully, Sellerise has your back. Its Smart Alerts system includes an Adult Checker alert, ensuring you stay informed.
But if you prefer to manually check the status of your product, you can simply enter the ASIN in the Adult Checker tool.
Let's take a quick example using a product like a garlic press.
We'll enter the ASIN and hit the "Check on Adult" button.

As you can see in the screenshot below, the garlic press is not categorized as an adult product.
However, there are instances where Amazon might incorrectly assign an ASIN to the adult category, so it's crucial to monitor your listings and take swift action if needed.

Now, if you find yourself in the unfortunate situation of having your product incorrectly assigned to the adult category, fear not!
You'll need to head over to Amazon's Seller Central and navigate to the seller support section.
Send them a clear and specific request, stating that your product has been mistakenly categorized as adult and kindly ask for their assistance in resolving the issue.
This is crucial because if you approach Amazon with a vague complaint about keyword ranking or underperforming PPC, you might find yourself going in circles with templated responses, wasting precious time.
But when you provide them with a clear problem and request, it expedites the resolution process significantly.
Oh, the woes of lost impressions in PPC!
It can be baffling, to wonder why your campaigns are suddenly underperforming.
It could be a sneaky competitor playing dirty tricks or even a simple mistake on Amazon's part.
Sometimes, products can get flagged as an adult, leading to disabled PPC and a decline in keyword ranking.
It's frustrating, but knowing the root cause helps you navigate the solution more effectively.
Walmart Beta

On another exciting note, we also have something special for our Walmart sellers—a beta tool specifically designed for Walmart.
It's completely free to use and falls under your Sellerise subscription.
I'd also recommend Helium 10 for Walmart.

With this tool, you can monitor your Walmart PPC, track your sales, and enjoy ongoing optimization and improvements.
Sellerise is committed to providing the best experience for Walmart sellers, so jump on board and explore Sellerise's Walmart features.
Sellerise Pricing
Now, let's shift gears and talk about pricing.
But before we do, remember that I have a special free trial offer and an exclusive discount courtesy of Sellerise.
It's a fantastic opportunity to try out Sellerise's services at a reduced rate.
So, what are the prices like?
Well, let me show you, my friends.

So, the pricing starts as low as $19.99 per month.
The Starter account includes one seller account and can handle up to 1,000 orders.
As you move up the ladder, the pricing adjusts based on the size of your account.
The largest Pro-Seller account, priced at $299.99 per month, allows for ten seller accounts and a whopping 150,000 orders per month.
That's some serious scalability right there!
If you're interested in accessing Sellerise's powerful keyword tools like Keyword Hunter or Keyword Re-Ranker for in-depth keyword analytics, they start at $99.99 per month through the Advanced plan.
These tools provide invaluable insights to help you optimize your keyword strategy and boost your visibility.
And remember the Reimbursement tool?
It's a game-changer when it comes to getting your money back from Amazon.
This tool starts at just $39.99 per month under the Growing platform, giving you access to streamlined reimbursement processes and ensuring you never miss out on what you're owed.
Now, when you register for Sellerise, you'll enjoy a free trial for the first seven days.
During this trial period, you can test out every tool and feature that Sellerise has to offer without any cost.
It's like having a playground of possibilities at your fingertips.
After the trial period ends, the system automatically calculates the number of orders you have processed.
Let's say you have 5,000 orders per month, then you'll be charged $39.99 per month.
But here's the cool part: Sellerise allows you to customize your plan to fit your specific needs.
Let's say you want to stick with the $39.99 per month package, but you have 6,000 orders.
You don't necessarily need to jump to the next pricing tier, which is $99.99 per month.
Instead, for just $2 extra per month, you can add an additional thousand orders to your plan.
It's all about flexibility and fairness.
Maybe you want to track extra keywords?
Well, you can do that too by customizing your plan.
Sellerise wants to ensure that you get the most out of it while still staying within your budget.
So, no need to worry about breaking the bank or missing out on functionality.
Conclusion
Now, my friends, we've covered a lot today.
We've seen the pricing of Sellerise, witnessed the tools in action, and discussed their pros and cons.
If you have any further queries or need clarification on specific tools, feel free to shoot them in the comments section of my Sellerise YouTube video.
Dima and I will be more than happy to address them.
Also, make sure to check out Dima's YouTube channel for more valuable insights and updates.
Before we wrap things up, let me share a quick update with you.
Sellerise is currently available in the Canadian, US, and Mexican marketplaces.
However, the company is actively working on expanding to the European market.
By the time you're reading this article, they might have already launched in Europe.
As Dima mentioned that his team is constantly adding new tools and features to enhance the users; selling experience.
"Your feedback is highly valuable to us, and many of the improvements and additions in Sellerise have been made based on your suggestions. So please, don't hesitate to reach out to us. Let us know if there's a specific functionality you need or a feature you'd like to see. Your input drives our continuous growth and improvement."
~ Dima Kubrak
Thank you so much for reading and being a part of my community.
I truly appreciate your support and trust in my reviews.
Remember, I'm here to help you succeed in your Amazon business journey.
So embrace the tools I share, utilize the offers I bring up, unleash your potential, and let them empower your selling endeavors.
Thank you again, and have a fantastic day!
Until we meet again,
Best,
Vova :)
-
How to Use Sellerise - A to Z Tutorial And Review With Dima Kubrak, the Founder
- Dima Kubrak - The Founder of Sellerise
- Sellerise Tutorial
- Sellerise Main Menu
- PPC Dashboard
- Reviews
- Keywords
- Reimbursements
- Inventory Dashboard
- Adult Checker
- Walmart Beta
- Sellerise Pricing
- Conclusion
Disclosure: Hi! It's Vova :) Some of the links in this article may be affiliate links. I get a commission if you purchase after clicking on the link, this does not cost you more money, and many times I can even get a nice discount for you. This helps me keep the content free forever. For you. Thank you! :)